
Quick answer
This is part of the Build a WooCommerce Store hub, which walks through setting up your shop, adding products and taking payments. Shipping comes after the store itself is set up, so start with how to set up WooCommerce for the first time if you have not done that yet; the other half of checkout is how to set up PayFast in WooCommerce, and the orders that follow are covered in how to manage orders in WooCommerce. To set up shipping in WooCommerce, go to WooCommerce → Settings → Shipping, create a shipping zone for each area you deliver to (for example “South Africa”), add the regions it covers, then add shipping methods to the zone — usually Flat rate and Free shipping. Set the flat rate amount, save, and place a test order at checkout to confirm the totals are right before a real customer orders. If checkout says “no shipping options are available”, the customer’s address is not in any zone — that is the most common shipping mistake, and it means a zone is missing, not that shipping is broken.
Tested on: WordPress 7.1.4 · WooCommerce 11.3.0 · Theme: GeneratePress 3.6.1 · PHP 8.5.12 · Tested 16 November 2026 on a WordPress test install. No order was placed in this test — no payment method was enabled, by design.
What you need before you start
- A WooCommerce store with at least one product that has a price. If you do not have a store yet, start with How to Set Up WooCommerce for the First Time.
- Your delivery areas and prices decided in advance. Which countries or regions do you deliver to, and what does each cost? A shipping zone is just that decision written into WooCommerce — decide it on paper first, then create the zones.
- A backup of the site. If you do not have one yet, read How to Back Up Your WordPress Website first. Shipping settings are low risk, but back up before changing store settings anyway.
How to set up shipping zones, step by step
Step 1: Open WooCommerce → Settings → Shipping
In the WordPress admin, go to WooCommerce → Settings → Shipping. You will see a list of shipping zones (empty on a new store) and a “Shipping options” section below it. A zone is a set of regions that share the same shipping methods and prices — for example, one zone for South Africa, another for the rest of the world.
Step 2: Create a zone and add its regions
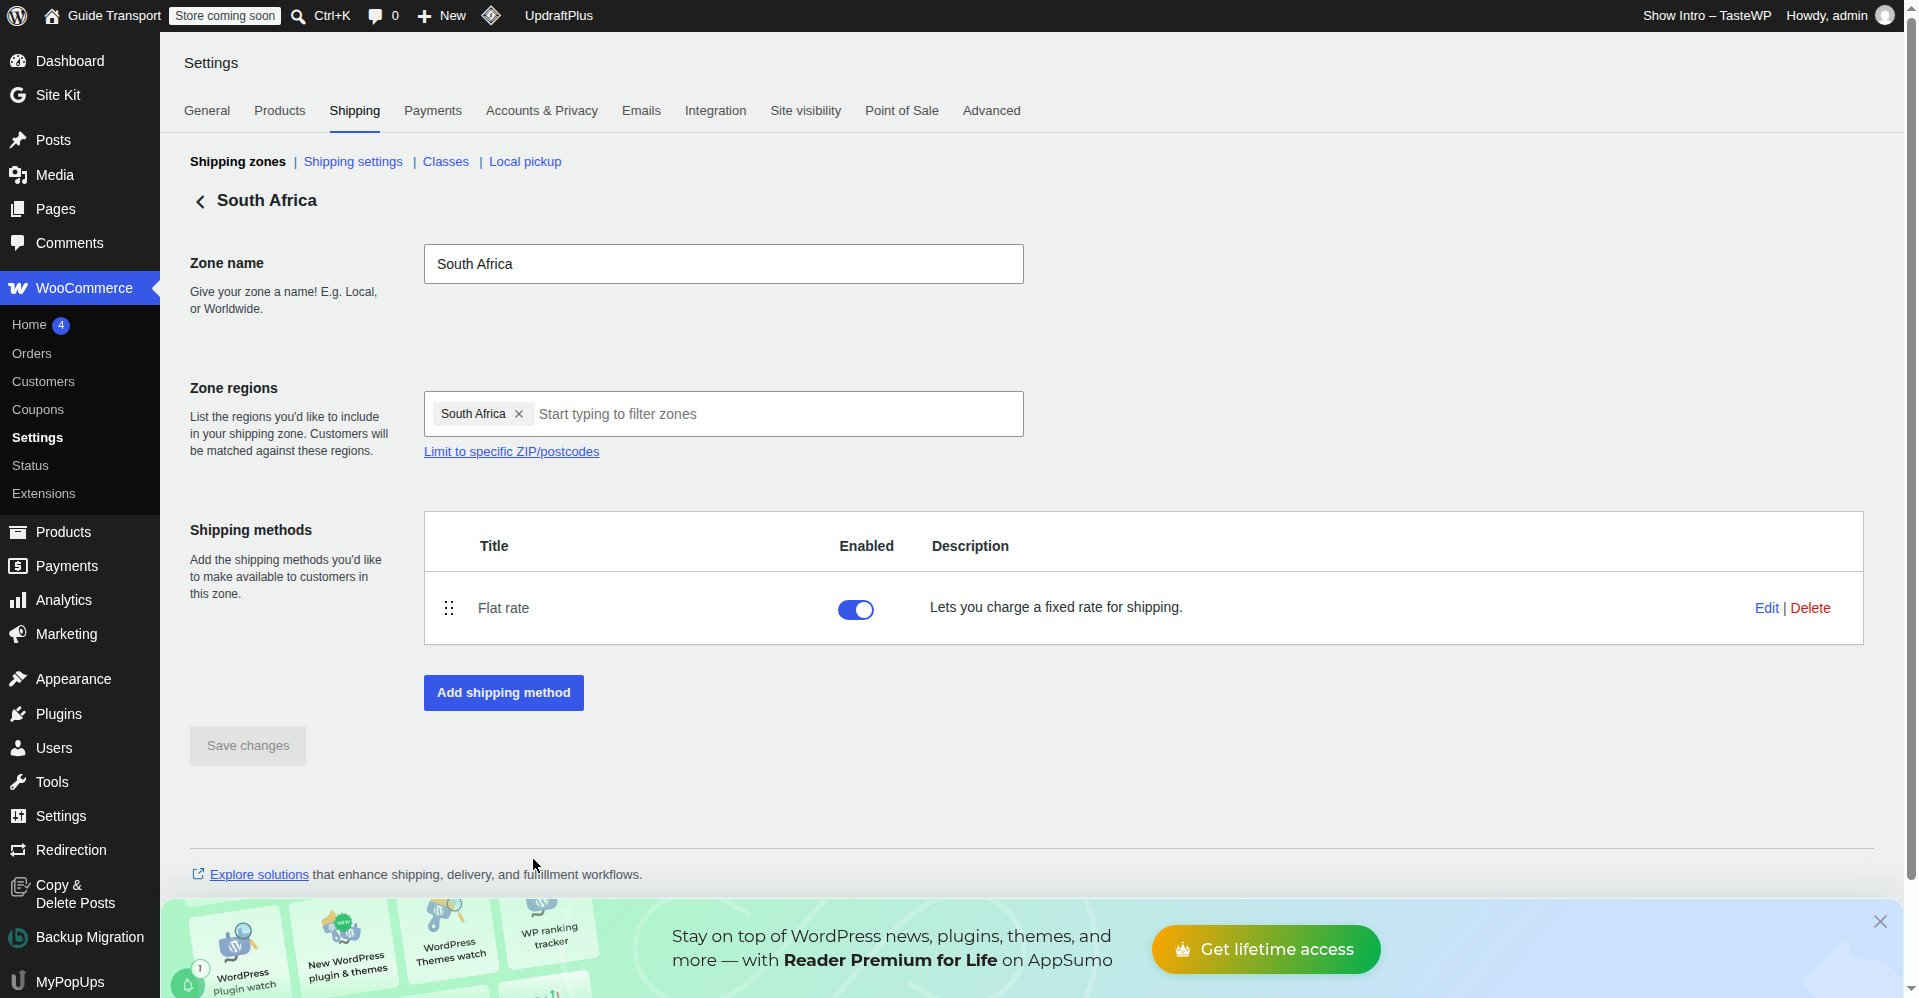
Click Add shipping zone. Give it a name — the name is for you, customers do not see it — for example “South Africa”. Then add the regions it covers: start typing “South Africa” in the Zone regions box and select the country. You can add a whole country, or single provinces if you deliver to only part of a country. Click Save changes. The zone now exists, but it has no shipping methods yet, so checkout will still say no shipping options are available for addresses in it.
On the test install the zone was created as “South Africa” with South Africa as its only region. The zone screen then lists the shipping methods inside the zone.
Step 3: Add Flat rate to the zone
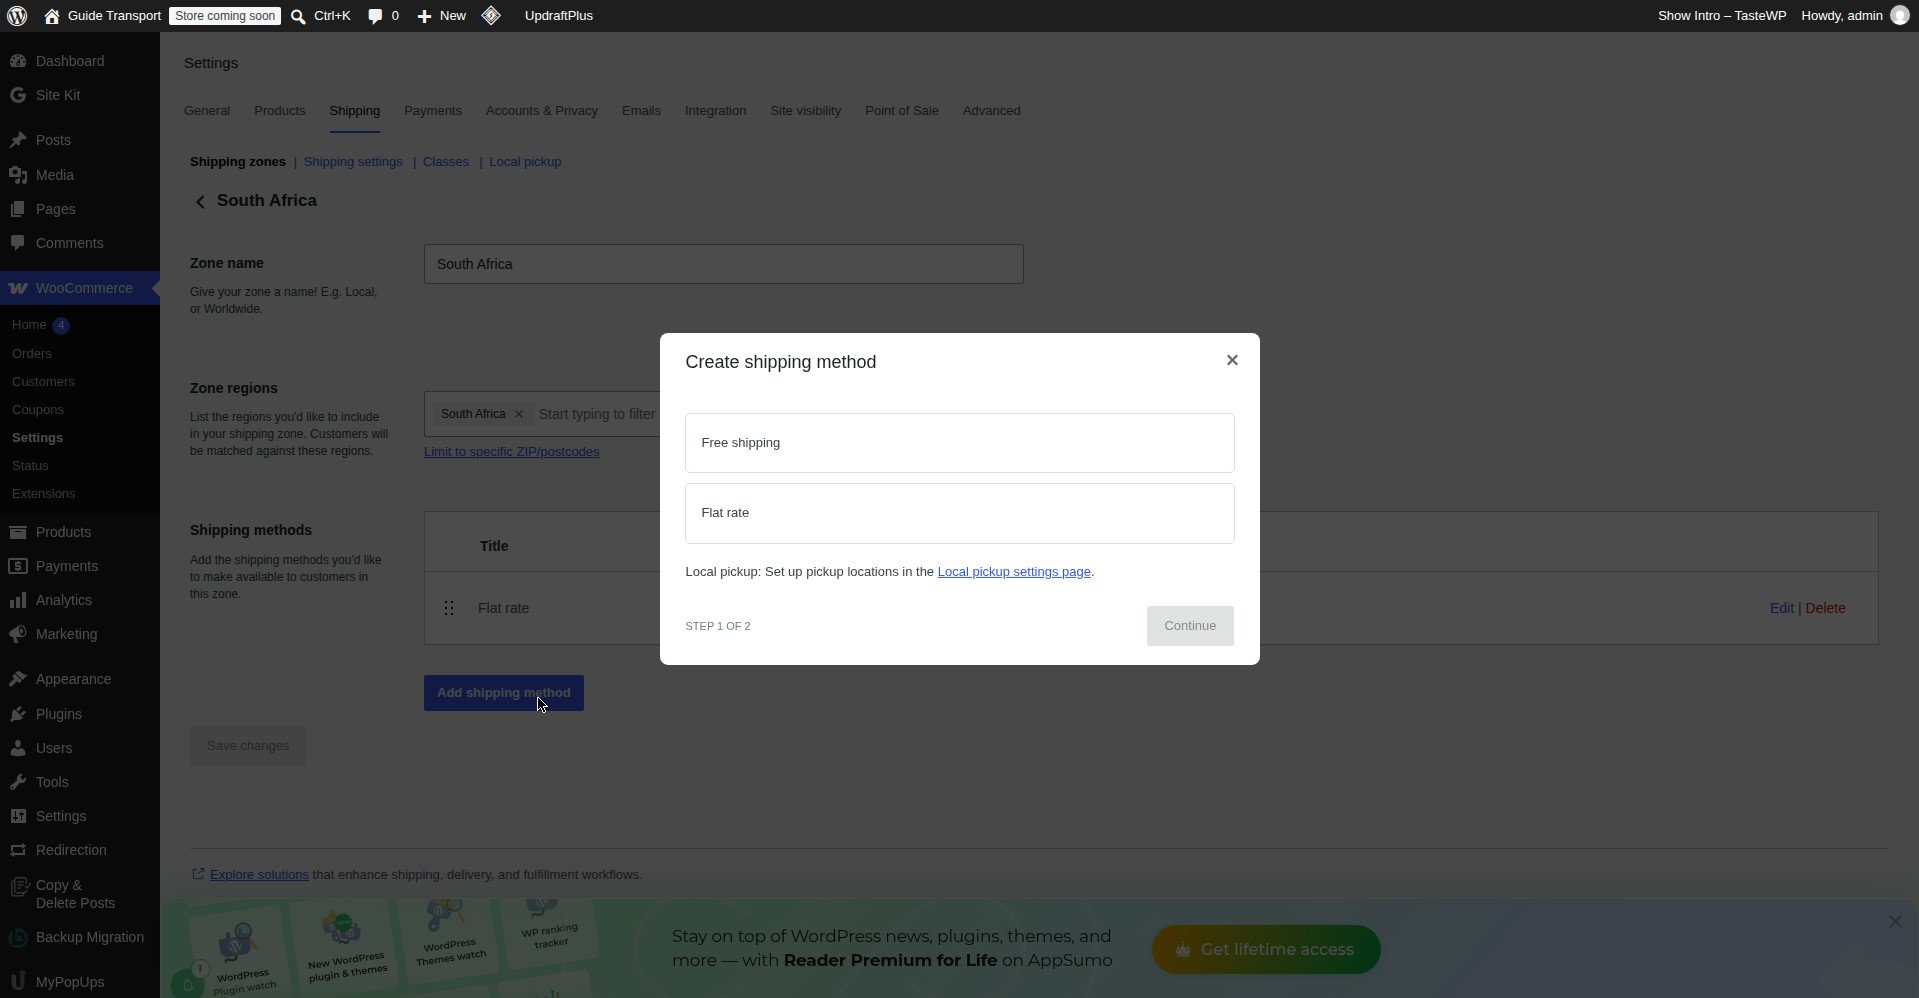
Open the zone you just created and click Add shipping method. Choose Flat rate and click Add shipping method. Click Edit on the flat rate method and set the cost — for example R50.00. You can also set a calculation type if you want the rate per item or per order, but a simple fixed cost is the right start. Save.
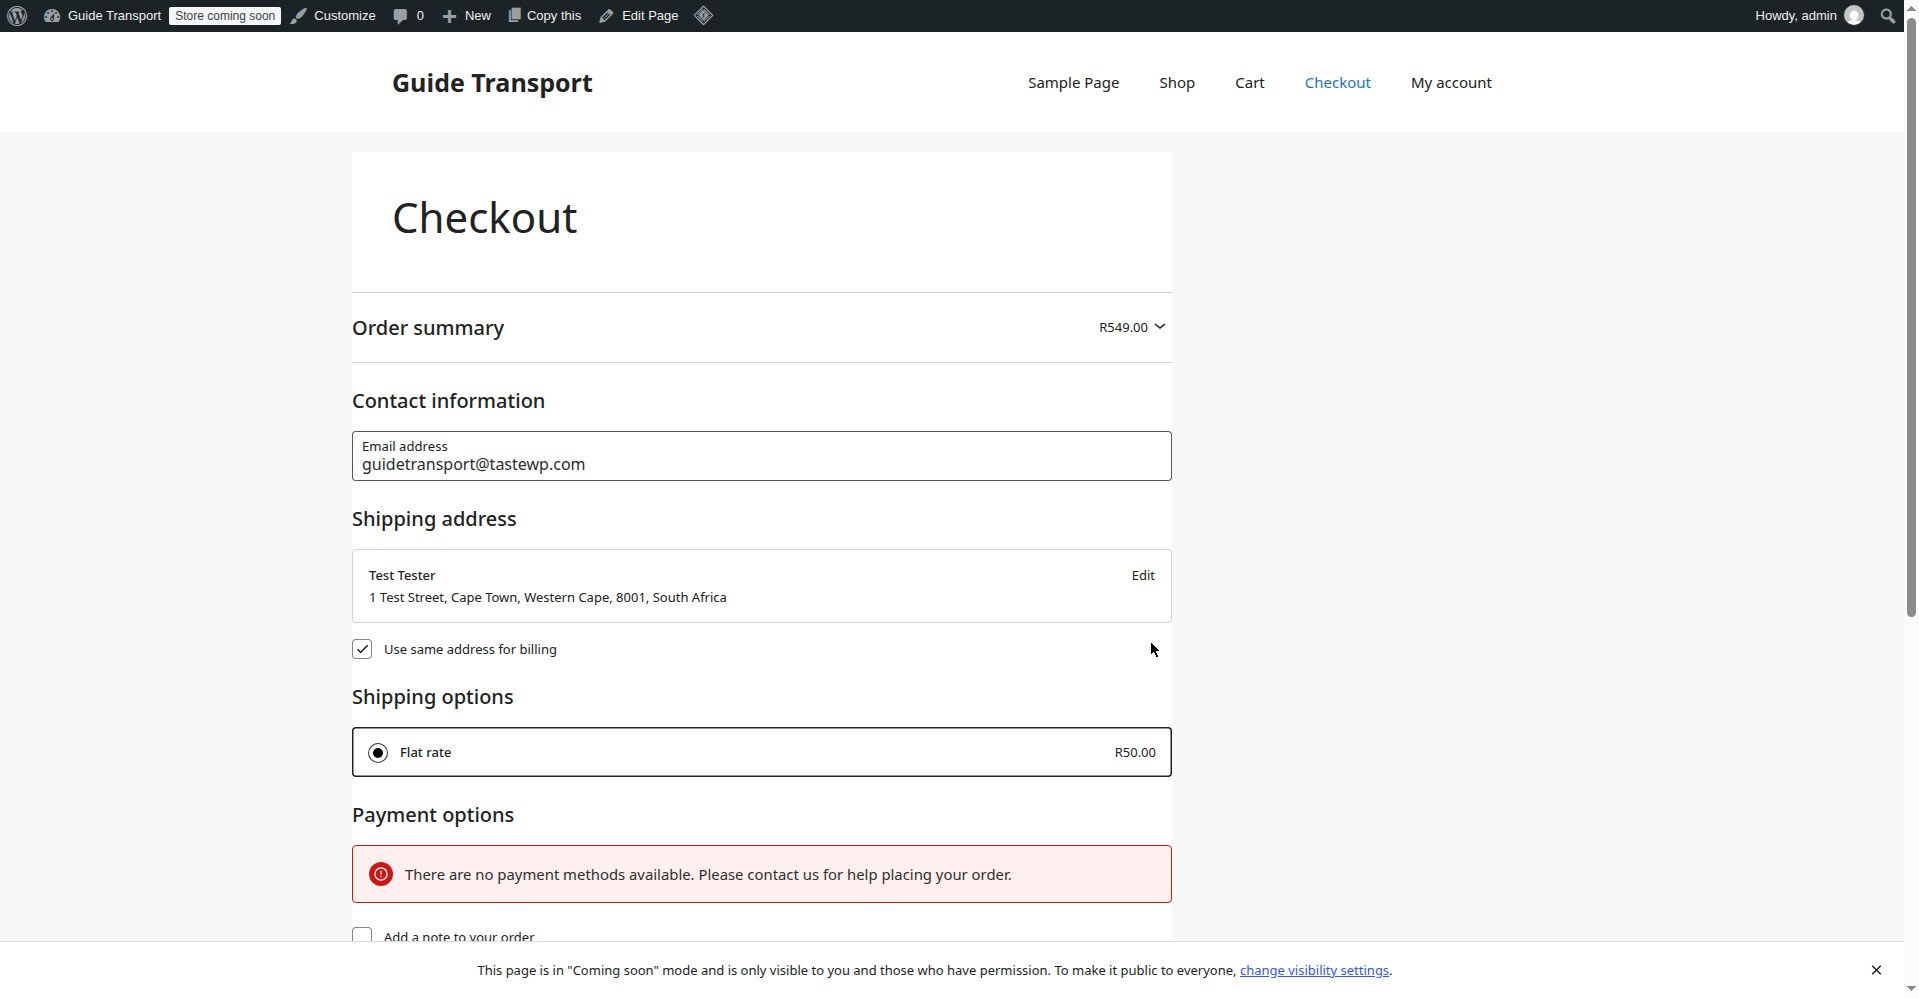
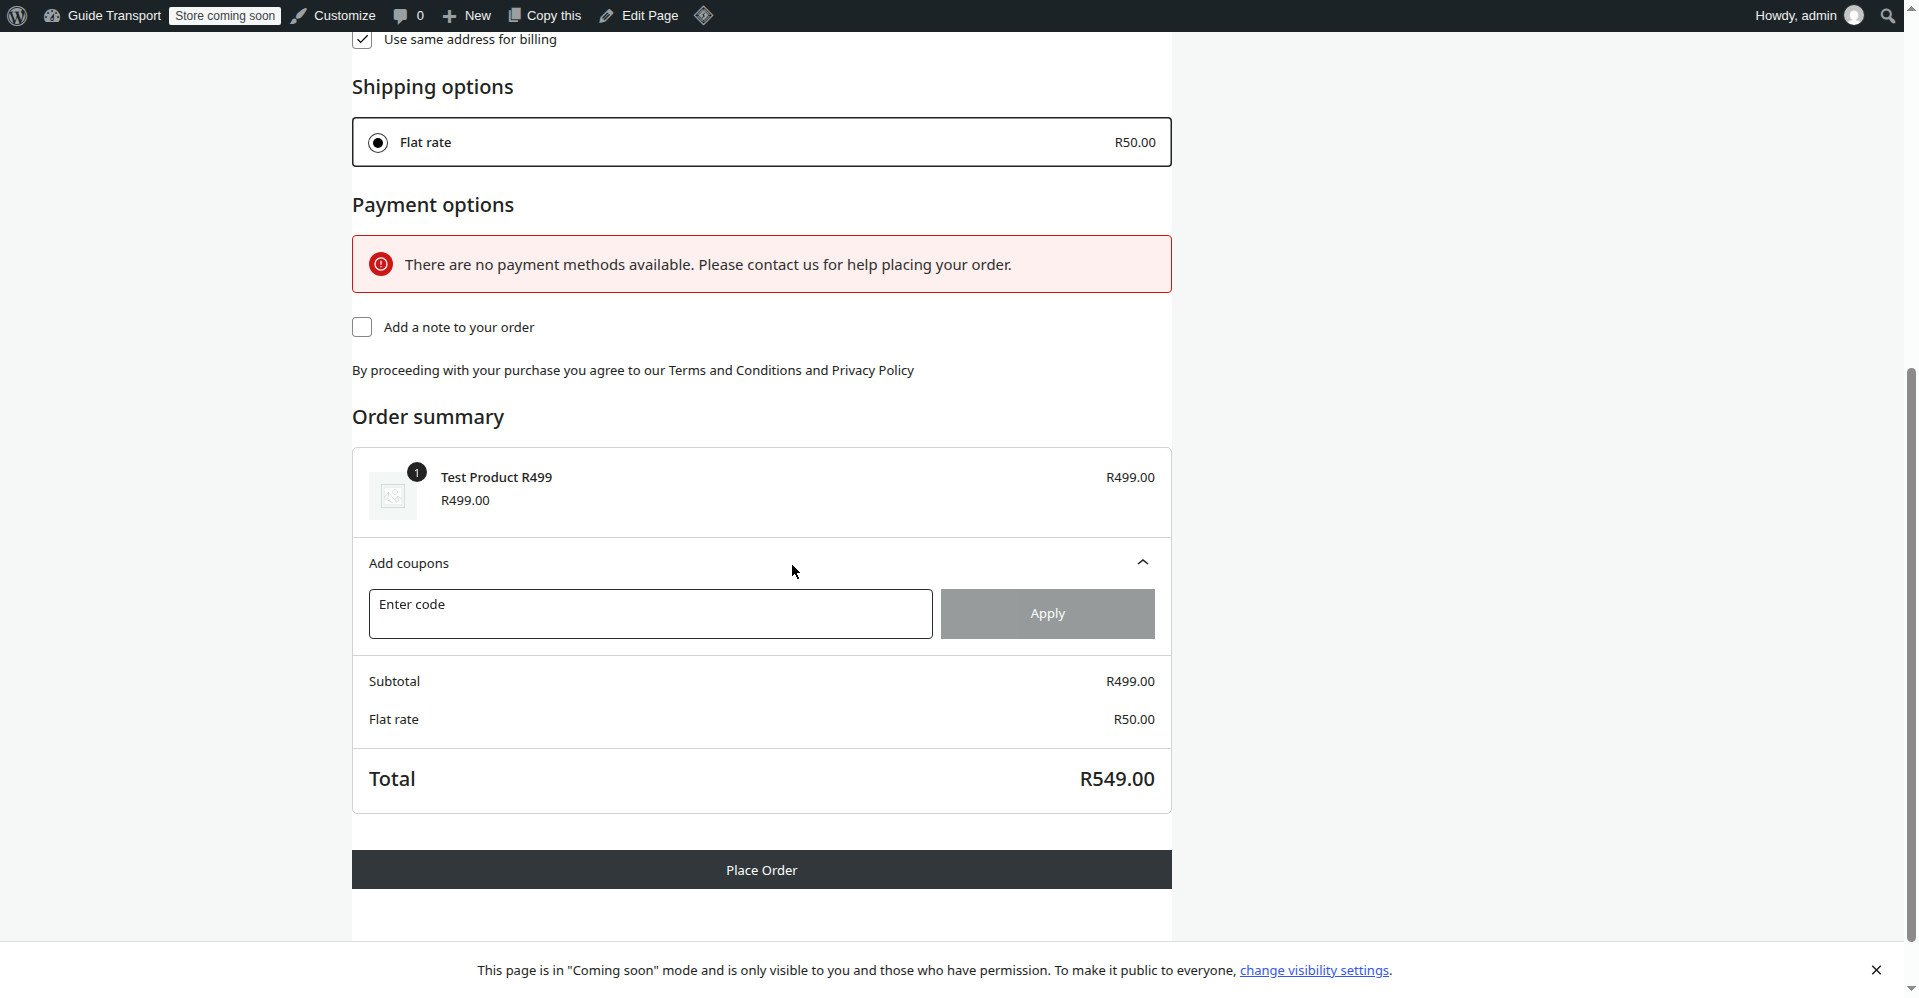
In this test the zone was “South Africa” with a Flat rate of R50.00, and a test product at R499.00 showed R50.00 shipping at checkout, for a total of R549.00.
Step 4: Add Free shipping (optional)
In the same zone, click Add shipping method again and choose Free shipping. Free shipping needs a condition, or it would be free for every order: the usual one is “A minimum order amount” — for example, free shipping on orders over R500. Set the minimum amount and save.
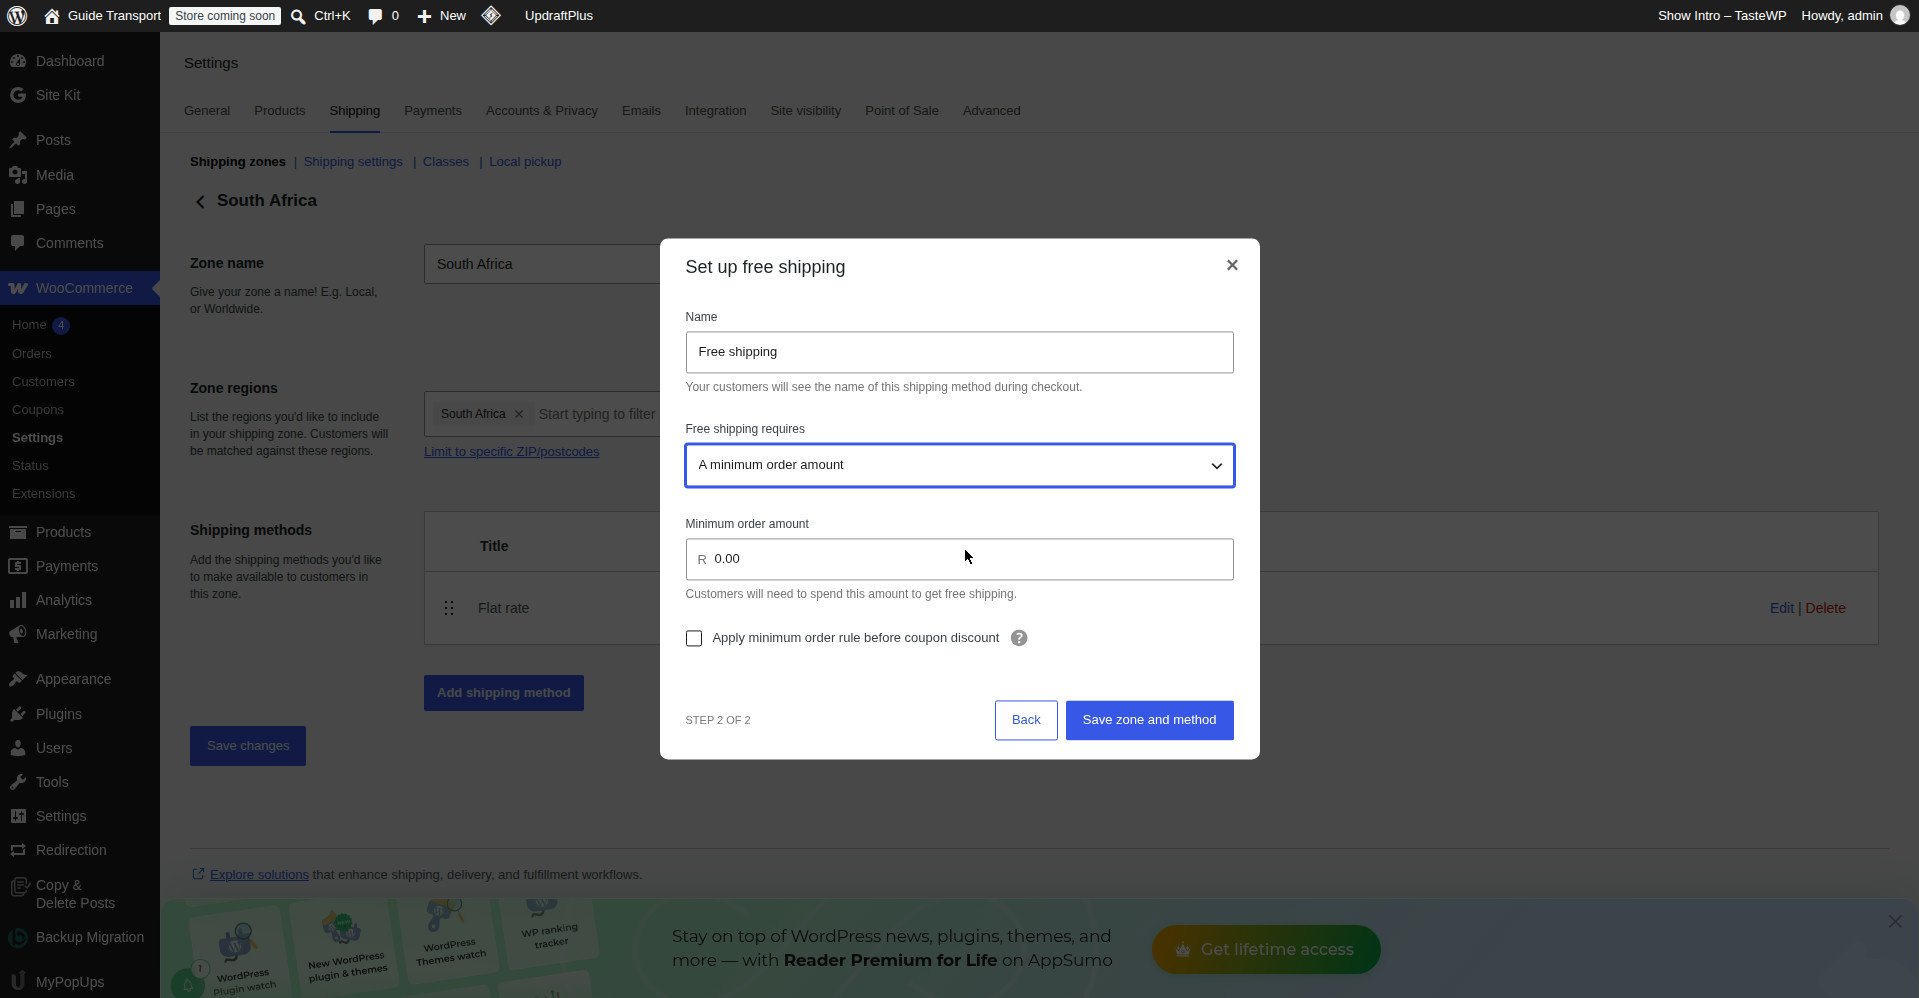
In this test, free shipping was set with a minimum order amount of R500.00. Below R500 (one R499.00 product), only the Flat rate was offered and the total stayed R549.00. Above R500 (two products, subtotal R998.00), both “Flat rate R50.00” and “Free shipping FREE” were offered — with free shipping selected the total was R998.00, and with flat rate selected it was R1,048.00.
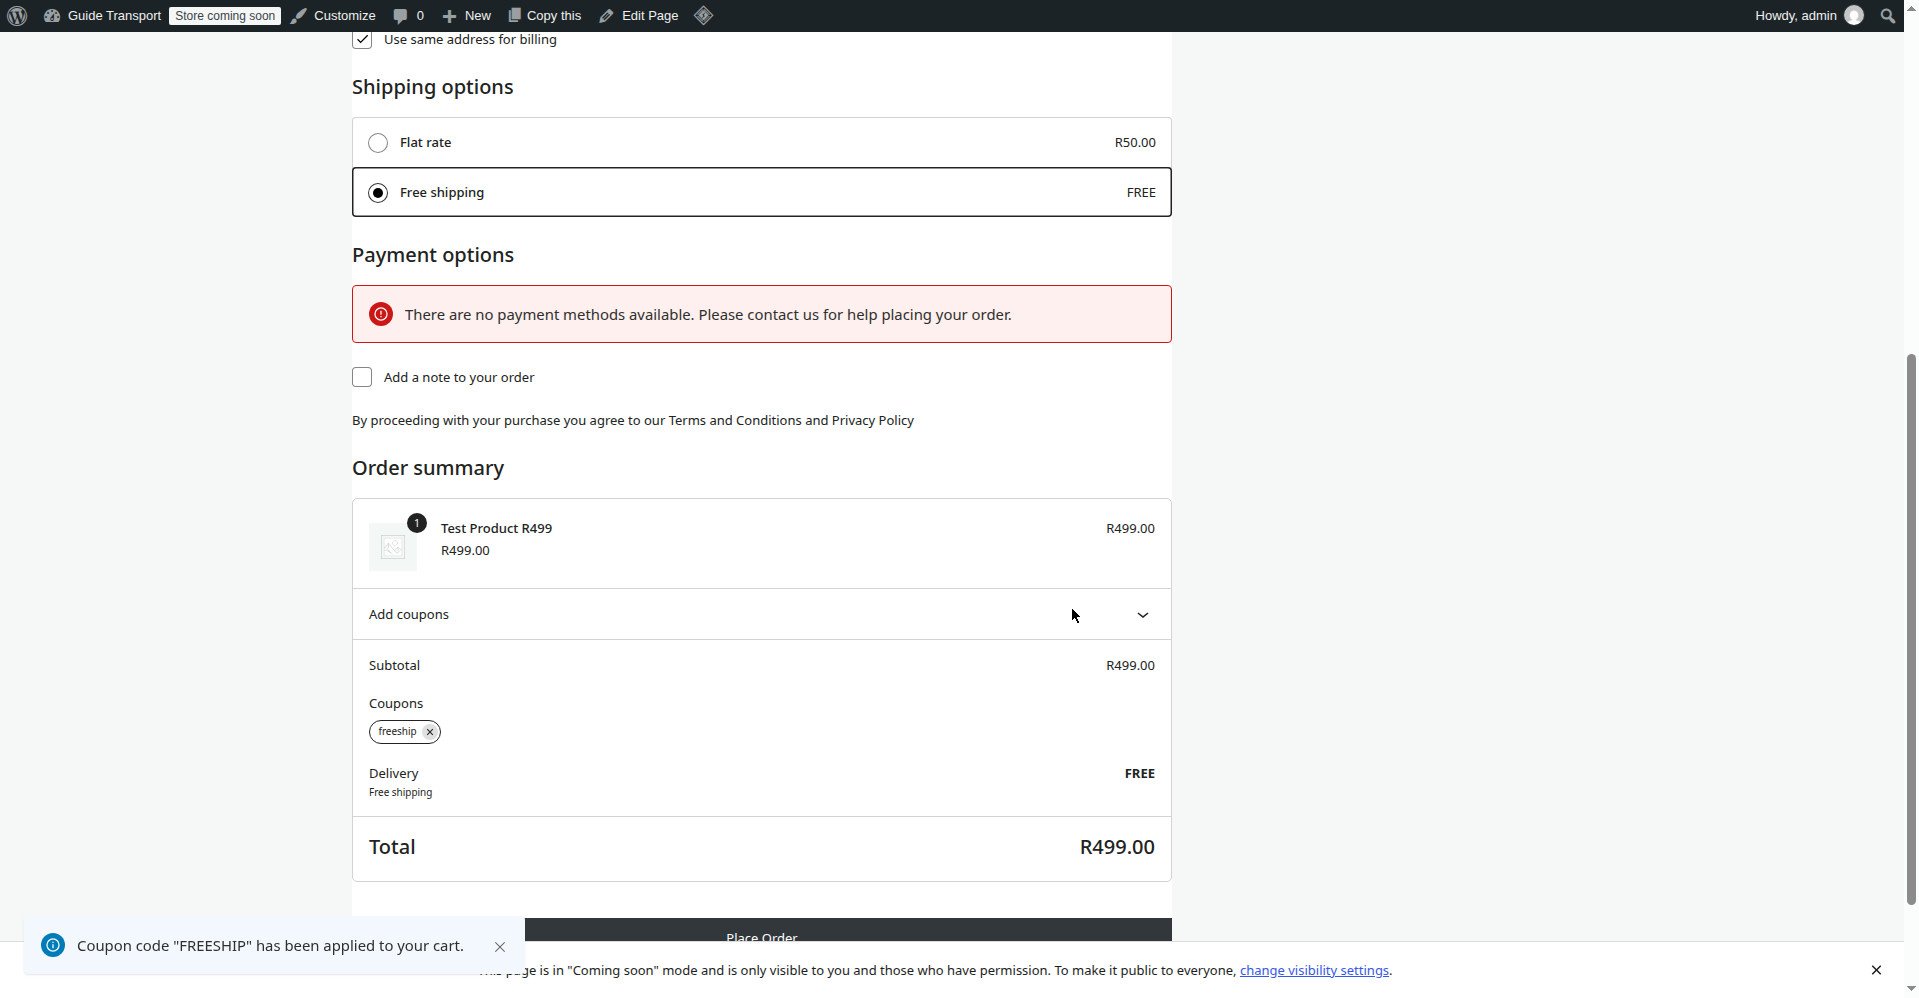
You can also make free shipping require a coupon instead. In this test a coupon called FREESHIP was created with “Allow free shipping” ticked, and applying it at checkout on the R499.00 order made shipping free — total R499.00. One thing to know: the coupon rule needed a SECOND Free shipping method in the zone, because the first one required the R500 minimum. If you want both a minimum-amount rule and a coupon rule, add two Free shipping methods, one for each condition.
Step 5: Add more zones for other areas
Repeat Steps 2–4 for each area you deliver to. A common setup is three zones: your home country (cheapest), neighbouring countries (more), and “Rest of the world” (most, or no shipping at all). Zones are checked top to bottom — WooCommerce uses the first zone whose regions match the customer’s address. If no zone matches, checkout shows “no shipping options are available”. If you do not deliver somewhere, leave it out of every zone on purpose, and say so on your delivery page — a clear “we do not deliver there” is better than a broken checkout.
Step 6: Test the checkout totals
Place a test order for an address inside each zone and check the totals: product price plus the right shipping, and free shipping only where it should apply. Also test an address outside all zones and confirm it shows the “no shipping options” message — that proves the zones are working as designed, not by accident. If the totals are wrong, the mistake is almost always in the zone regions (the address is in the wrong zone) or in the flat rate cost (a typo, or the wrong calculation type).
In this test, an address outside all zones (United States, California, 90210) showed the exact messages “0 shipping options were found.” and “No shipping options are available for this address. Please verify the address is correct or try a different address.” — with Delivery shown as “No available delivery option” and the total R998.00 (products only, no shipping added). That is the correct behaviour when you do not deliver somewhere.
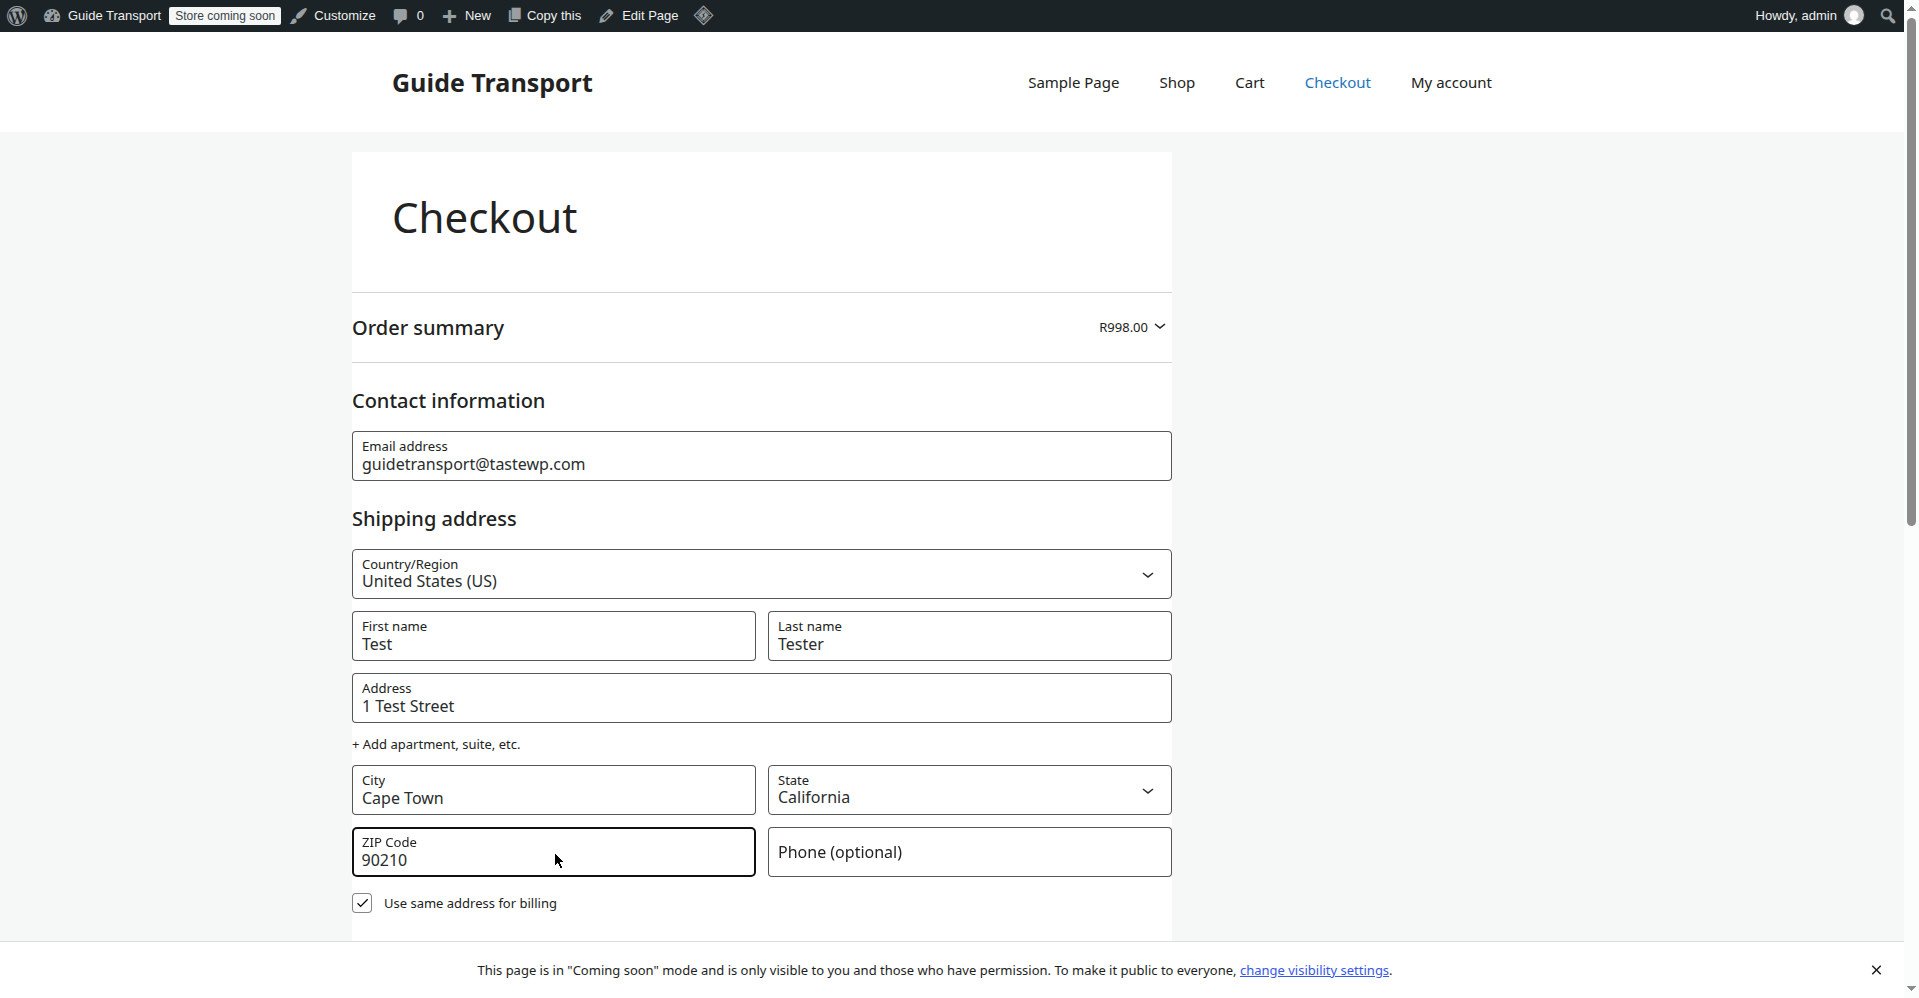
Note: the test checkout also showed “There are no payment methods available. Please contact us for help placing your order.” That is expected here — no payment gateway was enabled on the test install, by design — and no order was placed.
What can go wrong
| Symptom | Likely cause | Fix |
|---|---|---|
| “There are no shipping options available” at checkout | The customer’s address is not in any shipping zone | Add the country or region to a zone, or create a zone that covers it |
| Shipping is charged when it should be free | The free shipping condition is not met, or the method is not in the right zone | Check the free shipping condition (minimum amount or coupon) and that the method is inside the customer’s zone |
| The wrong shipping price appears | The address matched a different zone than you expected, or the flat rate cost has a typo | Check the zone order and the regions in each zone; check the flat rate cost and calculation type |
| A zone exists but checkout still shows no options | The zone has regions but no shipping methods | Add at least one shipping method (Flat rate or Free shipping) to the zone |
| Shipping works for one product but not another | The product is virtual/downloadable (no shipping needed) or has its own shipping class | Virtual products never need shipping; check the product’s shipping class if you use them |
| The shipping total looks wrong | You forgot the product price, the discount, or the tax in the total | Work it out line by line: product minus any coupon, plus shipping, plus tax if it applies |
Frequently asked questions
How do I set up shipping zones in WooCommerce?
Go to WooCommerce → Settings → Shipping, click Add shipping zone, name it, add the regions it covers, save, then add shipping methods (Flat rate, Free shipping) inside the zone. Test the checkout totals for an address in each zone.
Why does WooCommerce say “no shipping options are available”?
Because the customer’s address is not inside any shipping zone, or the zone it is in has no shipping methods. Add the region to a zone and add a shipping method to that zone.
How do I offer free shipping in WooCommerce?
Add a Free shipping method to the zone and set a condition — usually a minimum order amount, or a coupon. In this test a FREESHIP coupon made shipping free and the total became the product price only (R499.00), and a R500 minimum made shipping free on a R998.00 order.
What is a flat rate in WooCommerce?
A fixed shipping cost for the whole zone, for example R50.00 per order. You set it on the Flat rate method inside the zone. It is the simplest shipping method to start with.
Can I charge different shipping for different countries?
Yes — that is what zones are for. Create one zone per area (for example South Africa, neighbouring countries, rest of the world) and set different methods and prices in each.
Do I need a shipping zone for local pickup?
Yes, if you offer it — create a zone for your area and add the Local pickup method to it, so customers nearby can choose it at checkout.
Recap checklist
- Delivery areas and prices decided before opening the settings
- At least one shipping zone created, with the right regions in it
- Flat rate added to the zone, with the correct cost
- Free shipping added with a condition (minimum amount or coupon), if offered
- A zone for every area you deliver to, in the right order
- Test order placed for an address in each zone, totals checked
- An address outside all zones tested, to confirm the “no shipping options” message appears as designed
What to read next
- Set up the store first — How to Set Up WooCommerce for the First Time
- Add and price products — How to Add Products in WooCommerce
- After a sale, manage the order — How to Manage Orders in WooCommerce
- Offer a discount at checkout — How to Add Coupon Codes in WooCommerce
Written by Mohd Shah Ahmad, Learn WordPress Online. He builds and runs live WooCommerce stores in Pretoria, and manages the live stores Stanley’s Bakery (stanleysbakery.co.za) and Aaliyah Perfumes (aaliyahperfumes.co.za). Tested on a WordPress test install — see the “Tested on” box at the top.