
Quick answer
To set up WooCommerce, install WordPress, then go to Plugins → Add New, search for WooCommerce, and click Install Now and Activate. Run the setup wizard with your real store details, then finish in WooCommerce → Settings: currency and selling locations under General, a payment method under Payments, shipping zones under Shipping, and tax under Tax.
The wizard is only the start — it leaves payments, shipping rates and tax for you to finish in Settings. In WooCommerce 11.3.0 the wizard has no currency, tax, shipping or payment screen — those are all finished afterwards in Settings.
This guide is part of the Build a WooCommerce Store hub. Once the shop is set up, learn how to add products in WooCommerce, how to set up WooCommerce shipping zones, and how to set up PayFast in WooCommerce.
Tested on: WordPress 7.1.4 · WooCommerce 11.3.0 · Theme: Twenty Twenty-Three 1.7 · PHP 8.5.12 · Tested: 15 November 2026 on a WordPress test install. Screenshots are from that test install. The theme on that test install was Twenty Twenty-Three, not GeneratePress. If your dashboard looks different, check your WooCommerce version first — screens change between versions.
What you need before you start
- A WordPress site already installed and working, with an admin login. WooCommerce is a plugin, not a website on its own.
- HTTPS (the padlock) working. Do not take live payments on a site that still shows “Not secure”.
- Your real store address. WooCommerce uses it for tax, shipping and order emails.
- Your currency, decided in advance. For a South African store, that is usually South African rand (ZAR, R). Changing currency after prices are entered and orders taken creates inconsistencies.
- A payment account, or a decision about which one to open. You do not need it before installing, but you do need it before going live. For South African stores, the usual starting points are PayFast and Yoco.
How to install WooCommerce
- Log in to your WordPress dashboard.
- Go to Plugins → Add New.
- Search for WooCommerce.
- Find the official plugin — author Automattic — and click Install Now, then Activate.
If the install fails, check Tools → Site Health first. The server recommendations reported for recent WooCommerce versions are WordPress 6.9 or newer and PHP 8.3 or newer. The test install for this guide ran WordPress 7.1.4 and PHP 8.5.12, both above those recommendations. If your host runs something much older, ask the host to upgrade PHP first. Do not install WooCommerce from a ZIP downloaded from a random site.
On the test install, activation did not launch the setup wizard — it showed “Plugin activated.” and landed back on the Plugins page. The wizard was started from the WooCommerce Home screen (“Set up my store”). If it does not appear for you, look for a WooCommerce menu and a banner offering to run setup. You can reach the same settings later at WooCommerce → Settings.
The WooCommerce setup wizard, step by step
Answer with real values, not test values you plan to fix later. The wizard in WooCommerce 11.3.0 has three steps. Welcome — “Welcome to Woo!” — click “Set up my store” (the data-sharing checkbox was left unchecked on the test install). Step 1 asks “Which one of these best describes you?” — the test install chose “I’m just starting my business”. Step 2, “Tell us a bit about your store”, asks for the store name, industry (“Food and drink”), location (“South Africa — Gauteng”) and email, with the marketing checkbox unchecked. Step 3, “Get a boost with our free features”, shows six pre-checked extras — PayPal Payments, Jetpack, MailPoet, Google for WooCommerce, Snapchat Ads and Reddit — the test install clicked “Skip this step” and installed none of them. Note what the wizard does not ask: in WooCommerce 11.3.0 there is no product-types screen, no currency screen, no tax or shipping screen and no payment screen. The currency is derived from the country you pick, and payments, shipping and tax are all finished afterwards in WooCommerce → Settings.
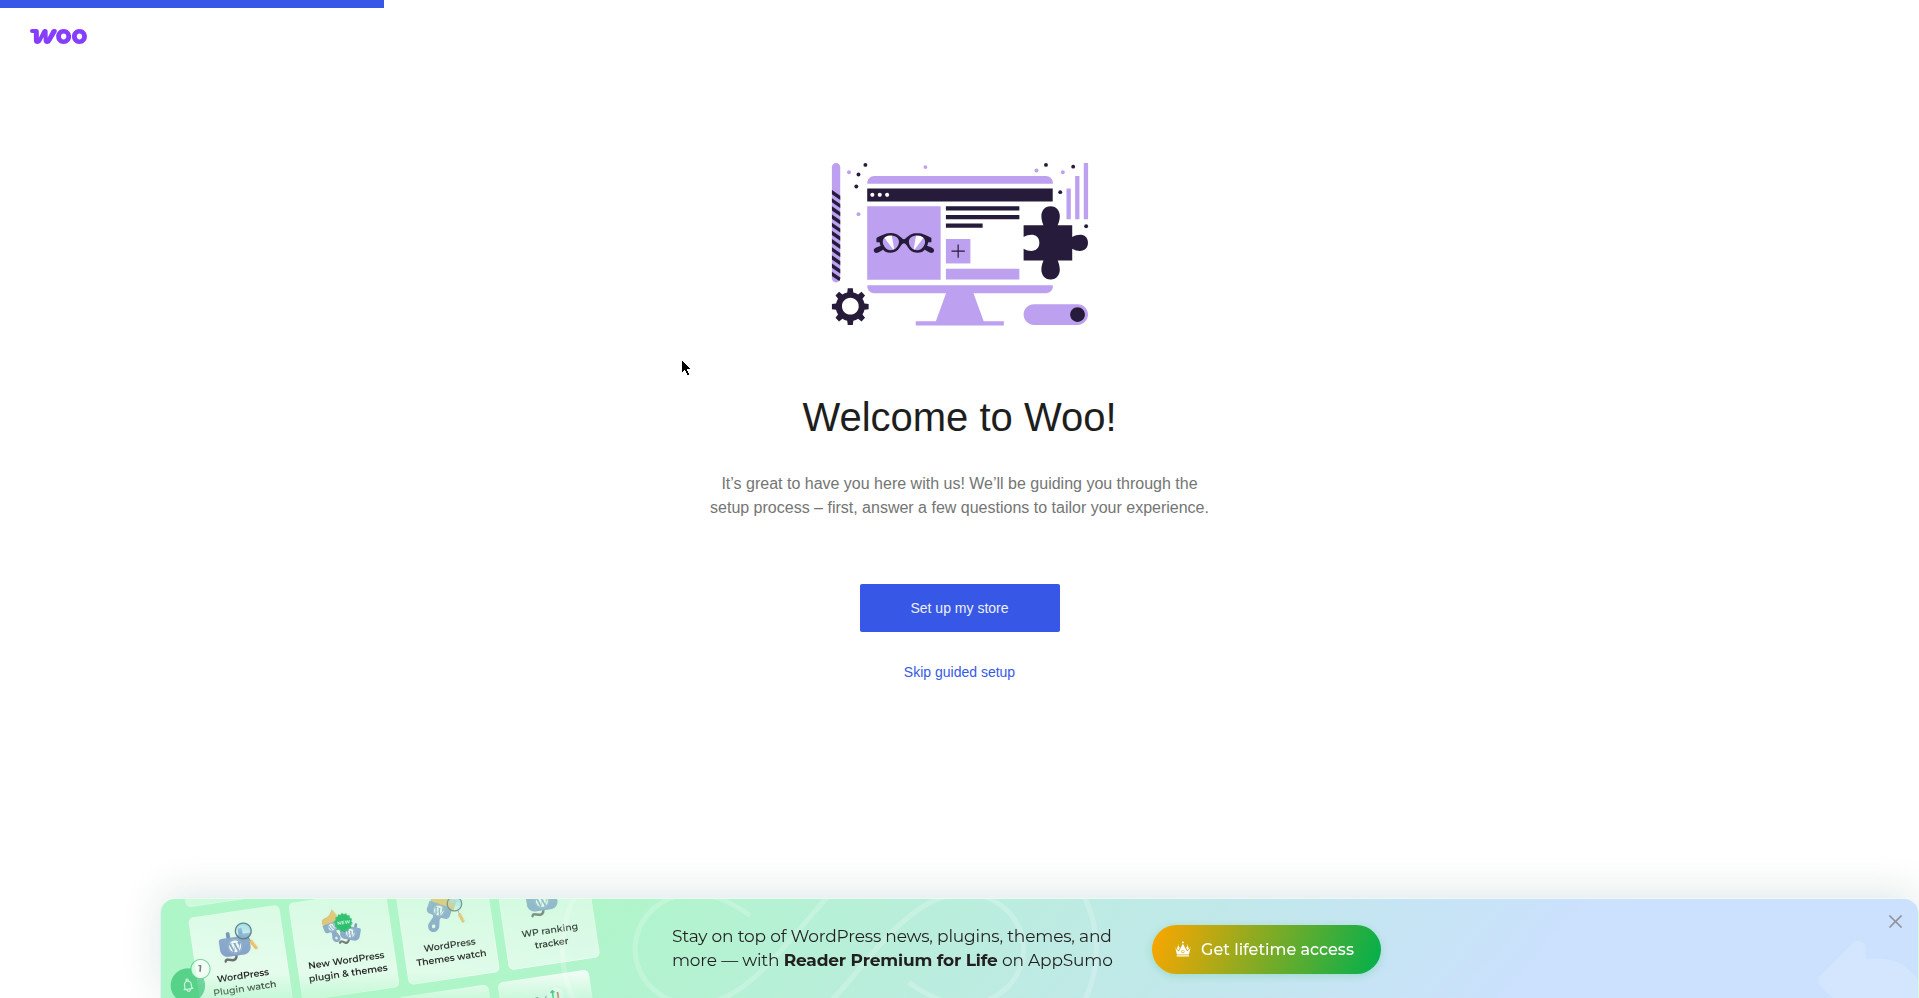
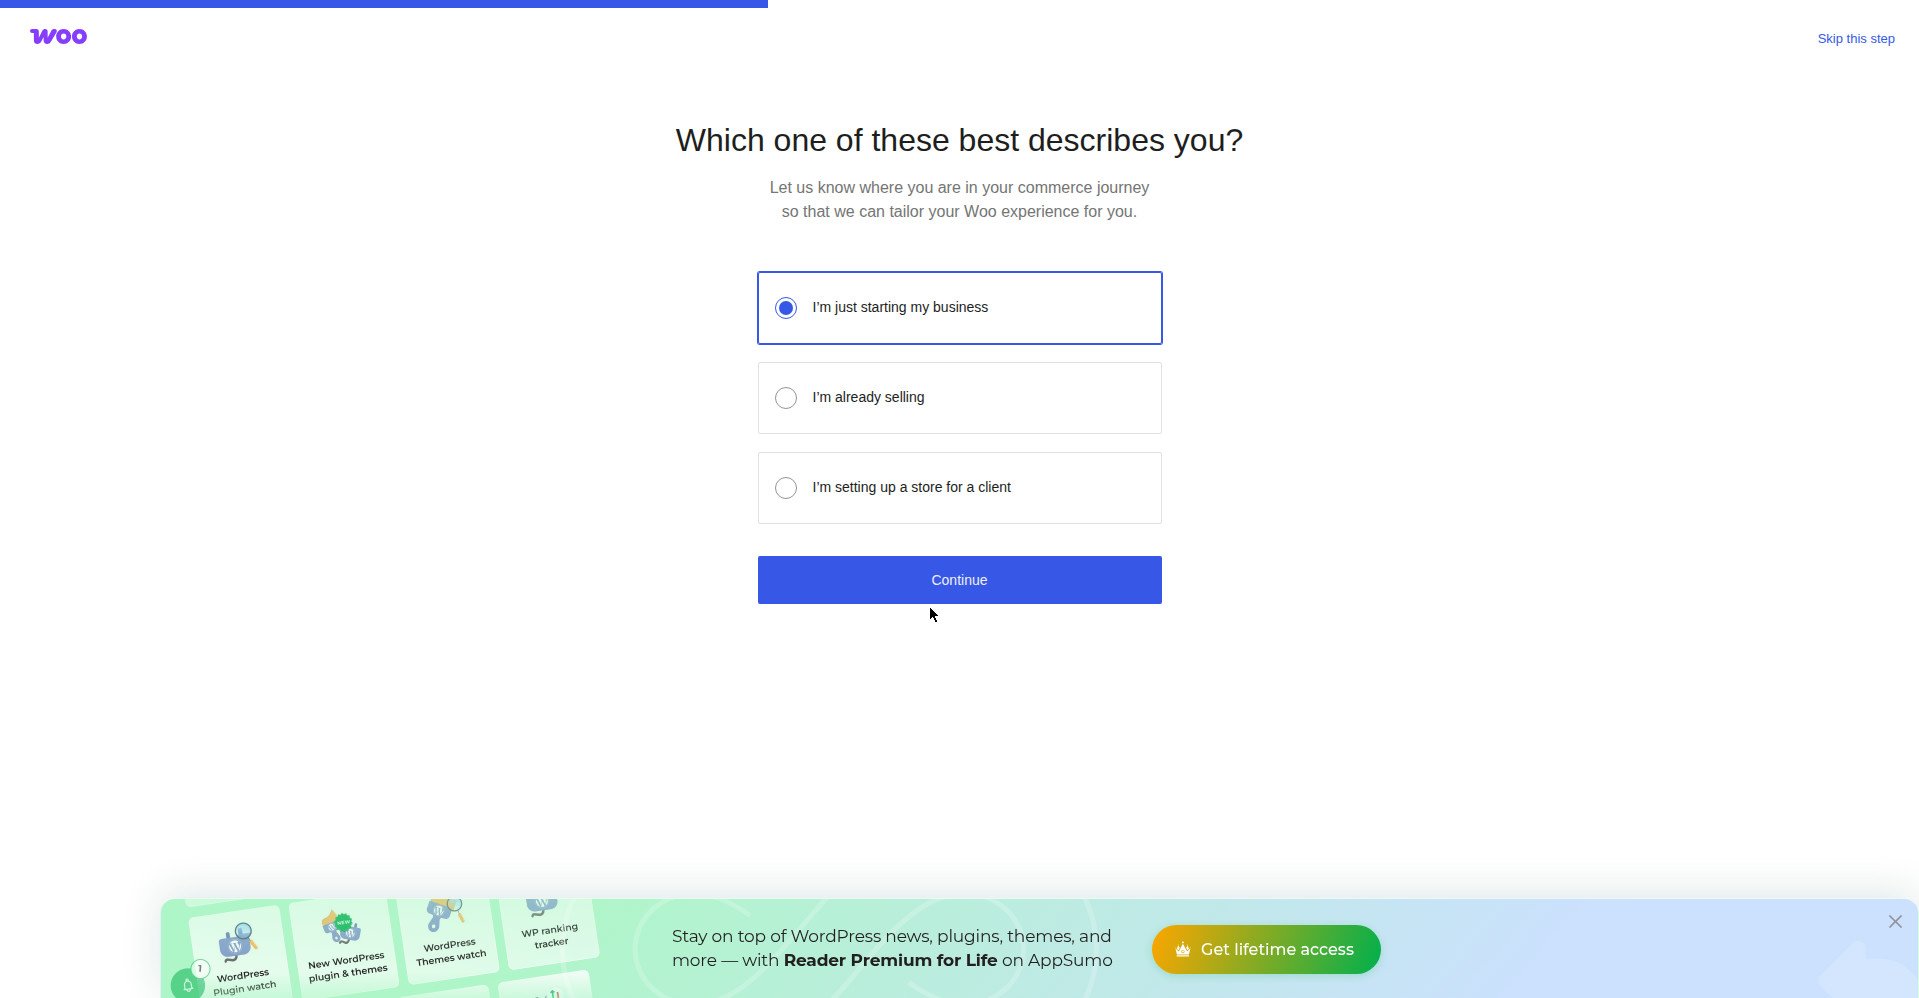
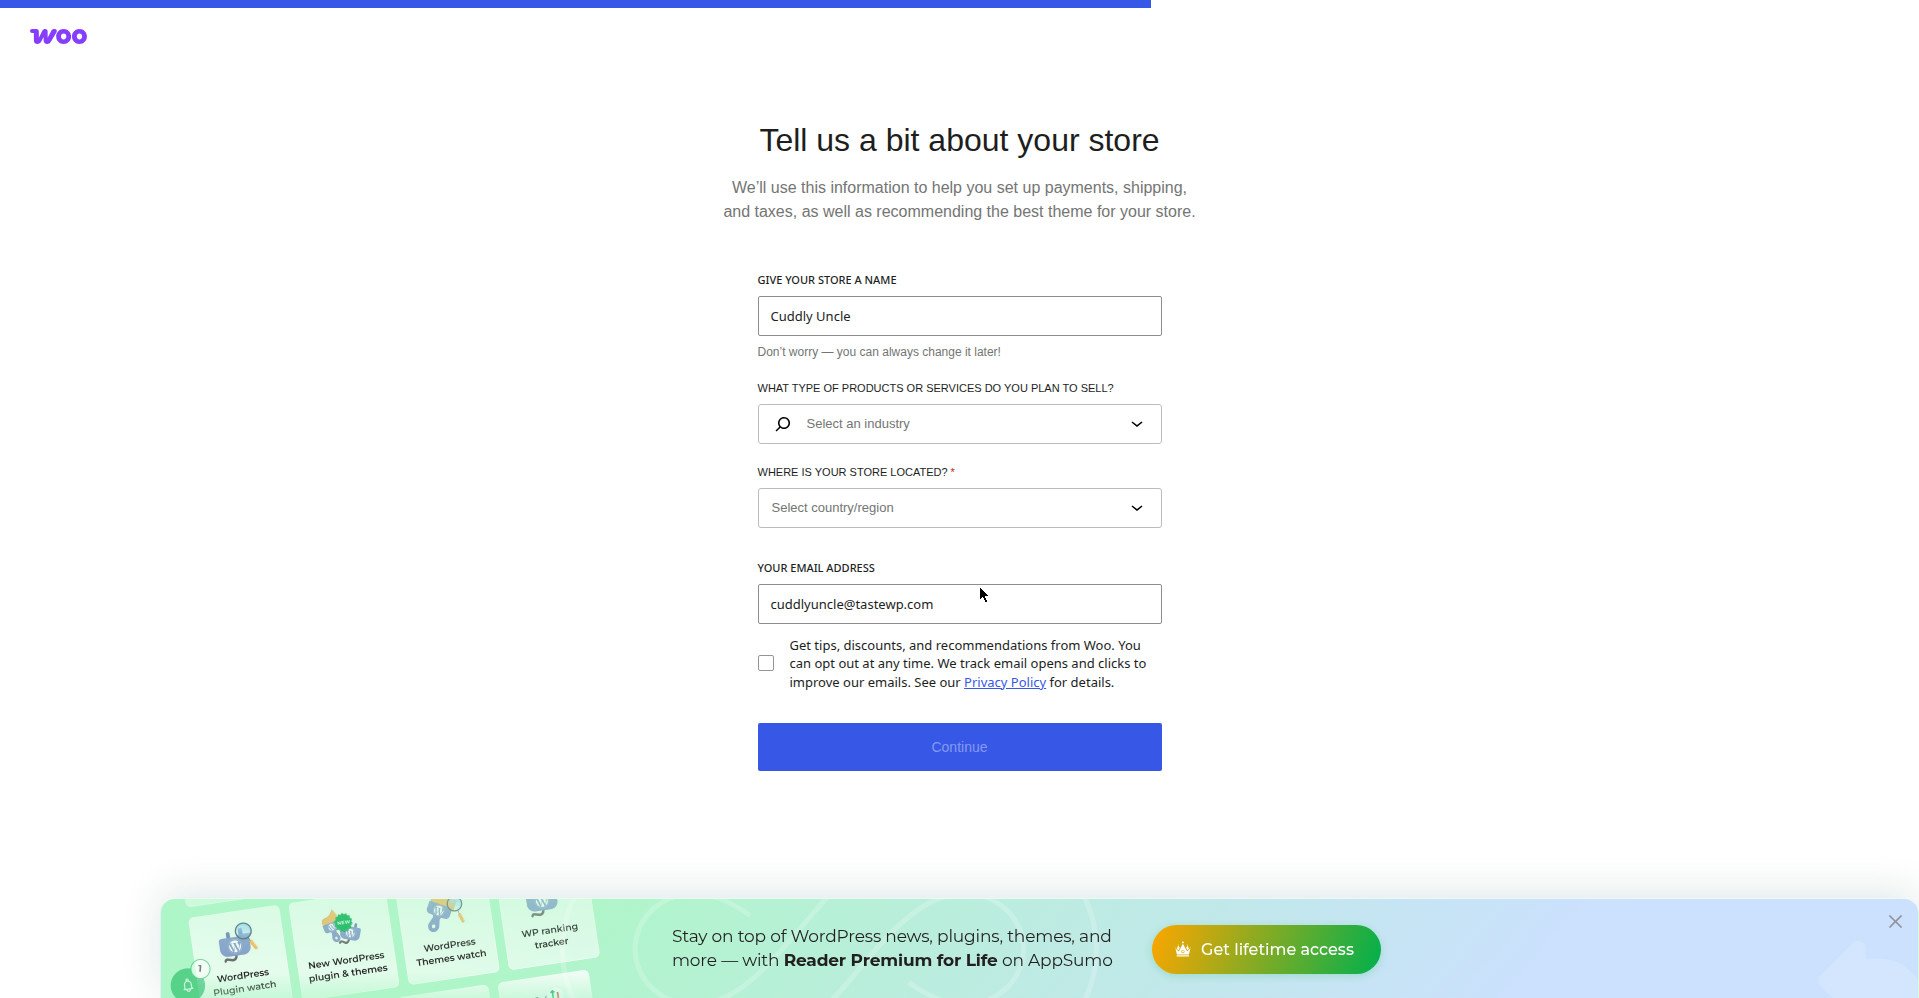
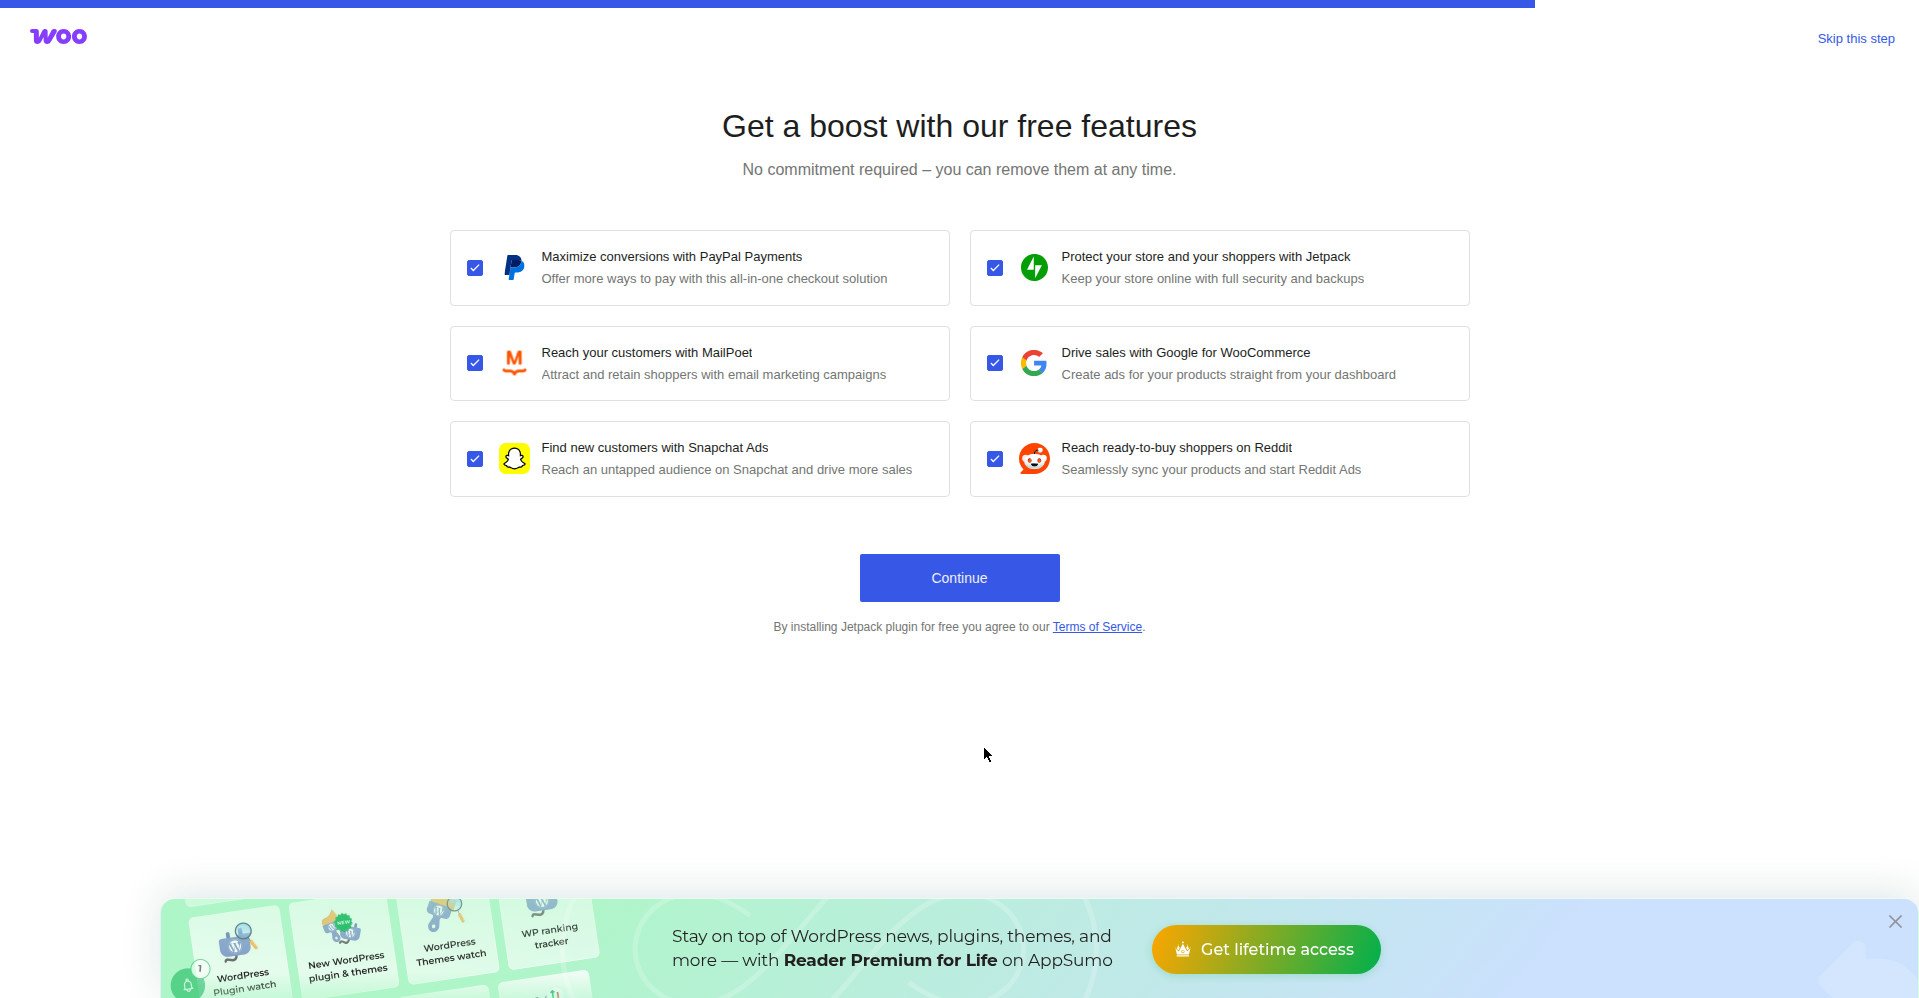
WooCommerce setup wizard stuck on country select
The reported error is: “Oops! We encountered a problem while fetching the list of countries to choose from. Please try again or skip this step.” The support team’s first suggestion is a conflict test — switch to a default theme such as Storefront, deactivate all plugins except WooCommerce, then try again. In at least one reported case another plugin was the cause. If it still will not run, skip it: everything it sets can be set by hand under WooCommerce → Settings → General.
WooCommerce setup wizard blank screen / not showing
A blank wizard, a rotating progress circle that never finishes, or a wizard that loops back to the start, is usually a conflict or a low-resource problem. Try the same conflict test first: default theme, WooCommerce only, then reload the wizard. The test install for this guide did not hit this problem — the wizard loaded on the fresh install — so if it still will not run, check your host’s PHP memory limit against WooCommerce’s documented requirements before changing it. Skipping the wizard loses nothing, because every setting lives in WooCommerce → Settings.
Step 1: Set your store address, currency and selling locations
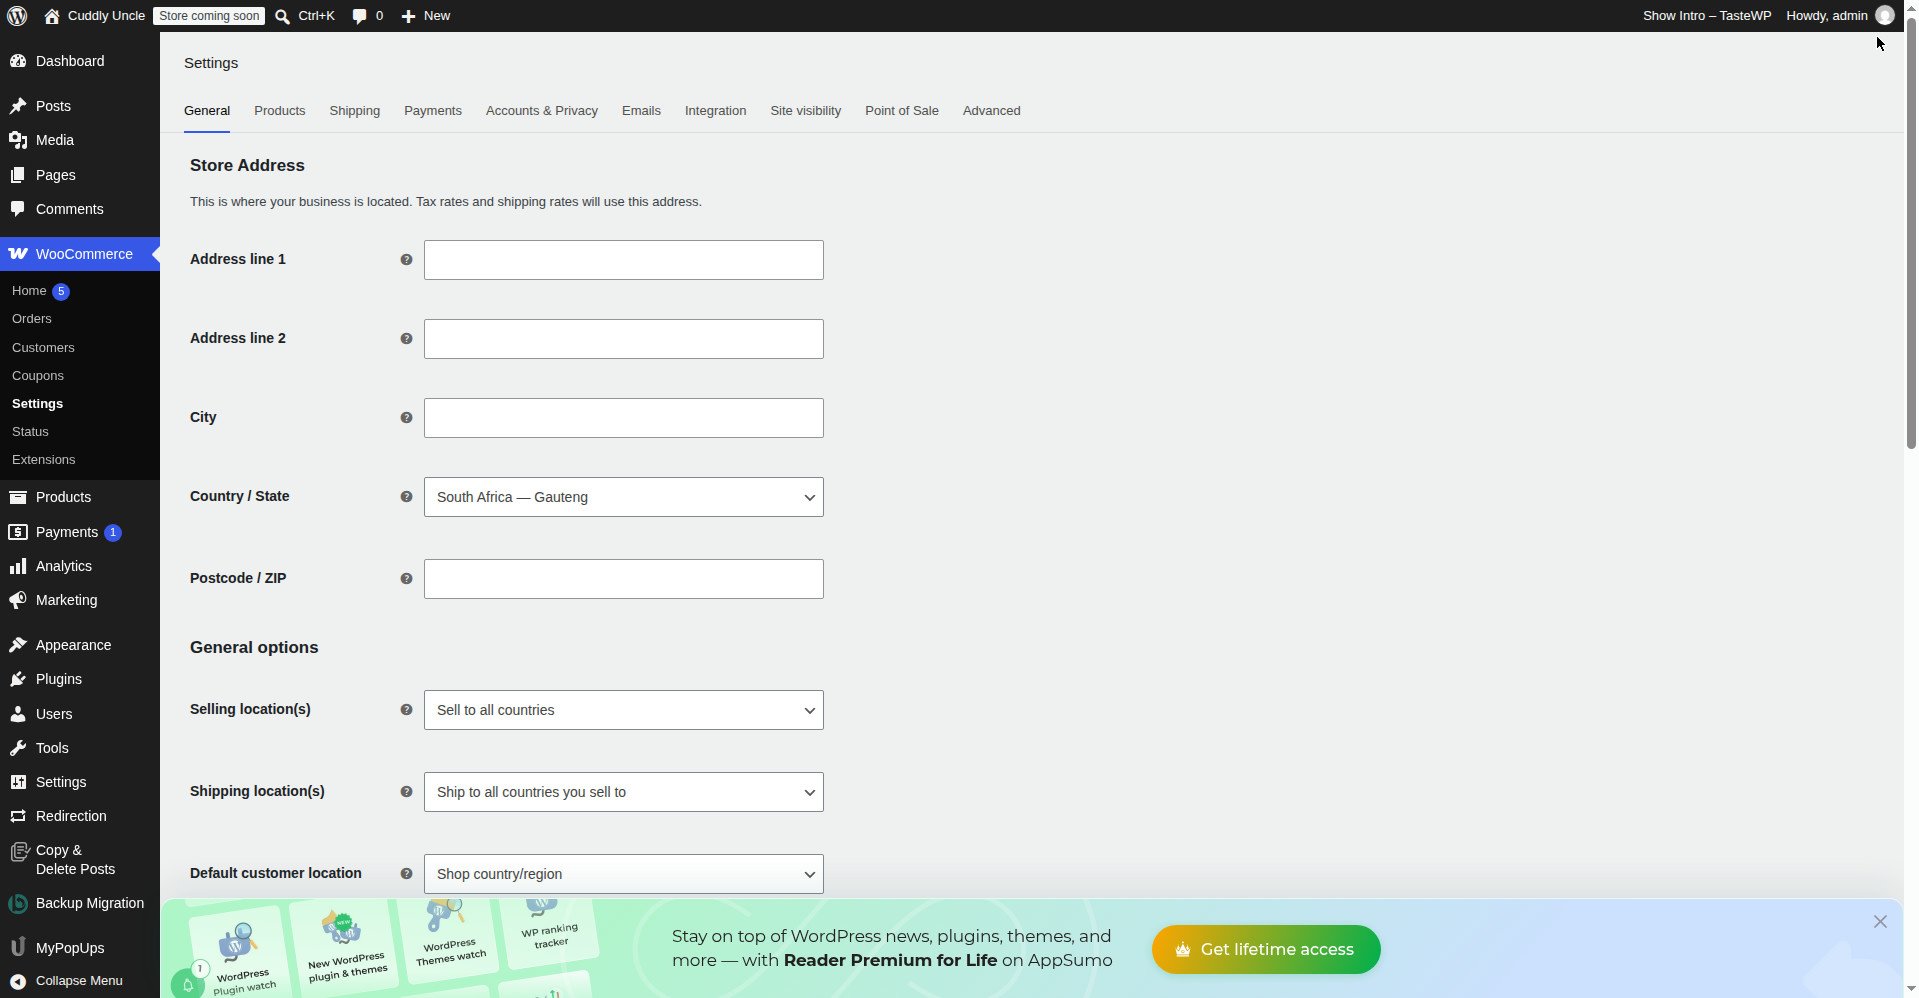
Go to WooCommerce → Settings → General. This one screen controls more of your store’s behaviour than any other.
- Store address. Your base location: WooCommerce calculates tax and some shipping from here, and it appears on invoices and order emails.
- Selling location(s). A South African store that only ships inside South Africa should choose Sell to specific countries and select South Africa. Selling to all countries means customers in countries you cannot ship to can reach checkout, then find no shipping method.
- Shipping location(s). This controls whether the Shipping tab is visible. If it is set to Disable shipping & shipping calculations, the Shipping tab disappears. If you sell physical products, make sure shipping is enabled here.
- Enable taxes and Enable coupons. Tick Enable taxes if you charge tax (Step 4). Tick Enable coupons if you plan to offer discount codes.
- Currency options. Set Currency to ZAR. Check Currency position (R before the amount, as in R100), Thousand separator, Decimal separator and Number of decimals. Rand prices are normally shown with two decimals (R99.99). On the test install the currency was set to “South African rand (R) — ZAR”, and the dashboard showed totals as R0,00 — R first, two decimals, comma decimal separator.
Click Save changes, then read the screen once more. A wrong country or currency here quietly breaks payments, shipping and tax at the same time.
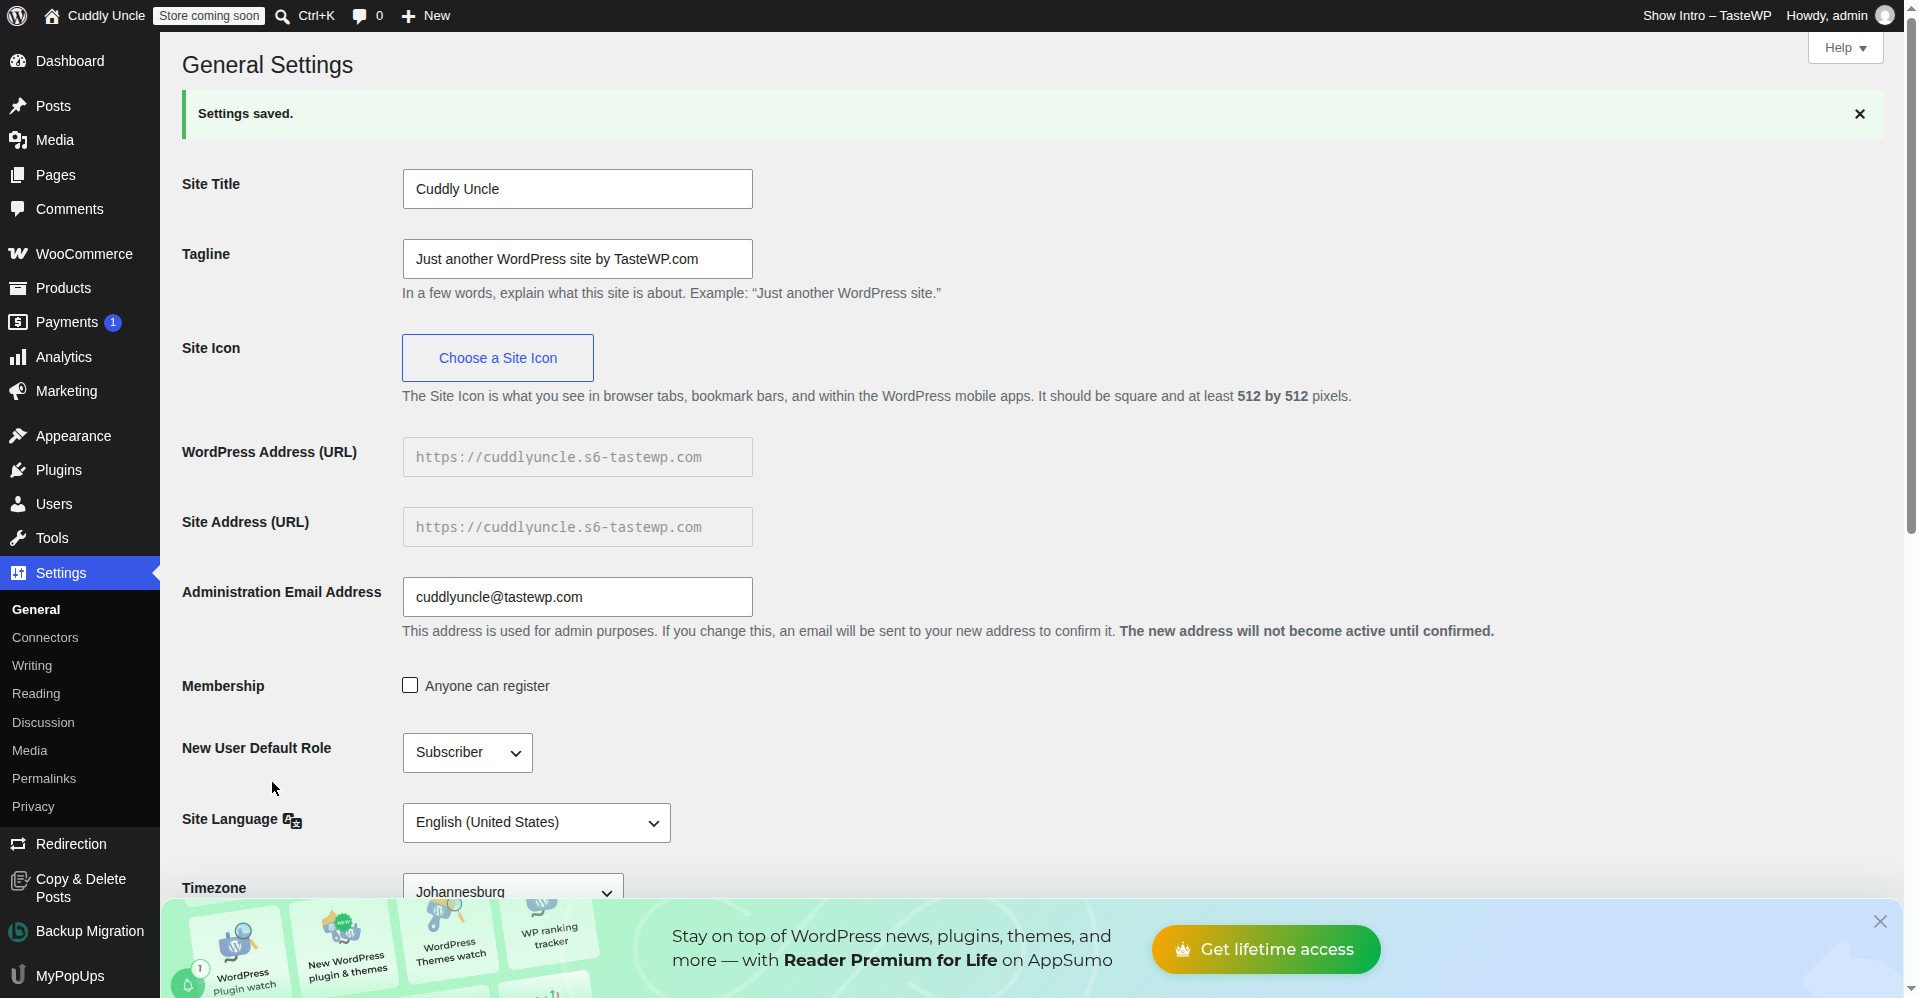
On the test install, Settings → General showed Country “South Africa — Gauteng”, Currency “South African rand (R) — ZAR”, “Enable taxes” unchecked, “Enable coupons” checked, and selling/shipping set to “Sell to all countries” — the selling locations were left at the default, not narrowed to South Africa only. The timezone was set to “Johannesburg” (Africa/Johannesburg); after saving, the screen read “Universal time is 2026-11-15 08:24:13. Local time is 2026-11-15 10:24:13.”
Step 2: Set up payments — and the WooPayments trap for South African stores
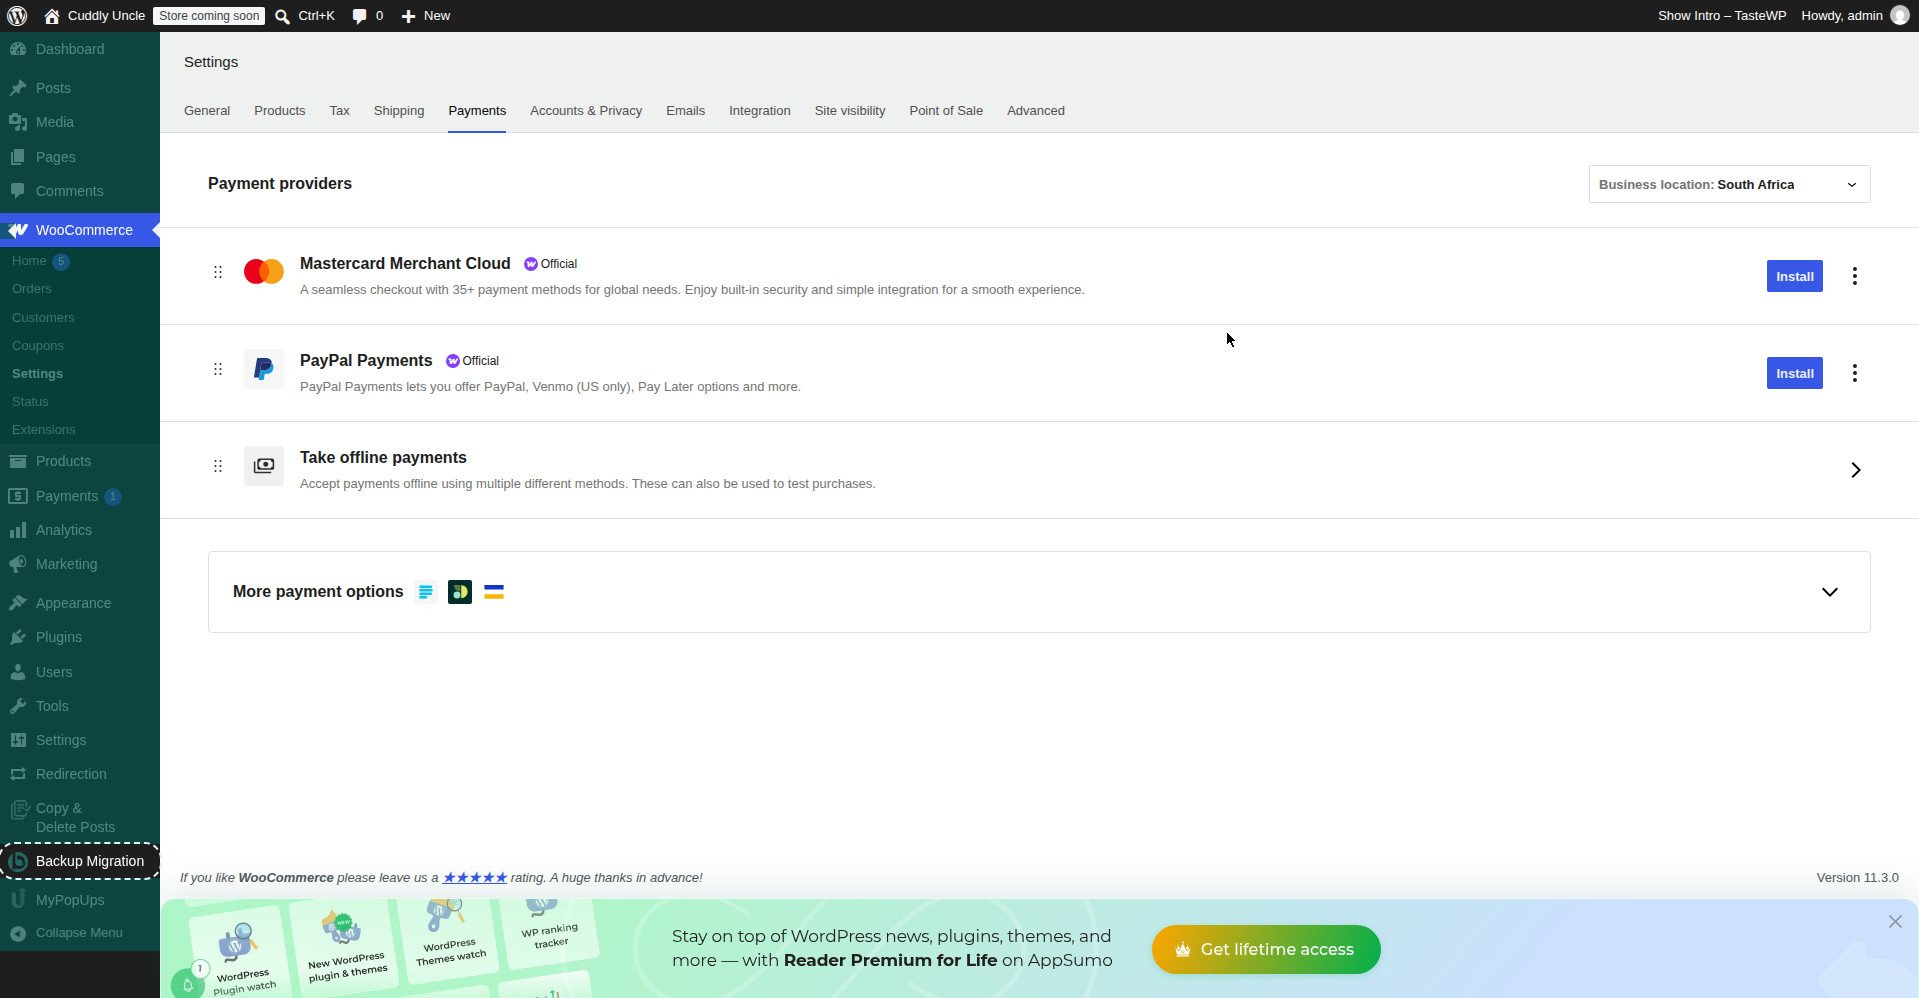
Go to WooCommerce → Settings → Payments. Start with one gateway, not four: enable one payment method your customers actually use, get it working, and test it. Four half-connected gateways produce four different checkout errors.
The WooPayments trap
WooPayments is WooCommerce’s own payment service, and most global guides present it as the default first step. The problem for a South African reader: WooPayments is available only in the countries WooCommerce lists, and South Africa is not on that list. On the test install, WooPayments was not offered for South Africa at all — Settings → Payments showed Mastercard Merchant Cloud, PayPal Payments and the offline methods, with no WooPayments option. A first-time South African store owner following WPBeginner or Jetpack hits a dead end at payments. That is not a mistake you made. Start with a South African gateway instead.
Which gateway for a South African store?
- PayFast is a South African gateway. On the test install it appeared under “More payment options” in Settings → Payments; it was not installed or tested, so the claim that its plugin only shows when the store currency is ZAR was not verified on the test install. It has its own dedicated setup article in this series.
- Yoco is another South African option, commonly used by small South African businesses for card payments. Its WooCommerce plugin was not tested for this guide — check the plugin’s own setup steps before you install it.
- Peach Payments and Ozow are further South African options to compare once your first gateway works — Peach Payments for cards, Ozow for instant EFT. Neither was tested for this guide.
Turn on test mode before your first test order, using the gateway’s published test card. This guide did not place a test order — payments were viewed only on the test install and no gateway was connected — so check your gateway’s own documentation for its current test card. Never test with a real card in live mode, and never leave test mode on after you go live.
Step 3: Set up shipping zones and rates
Go to WooCommerce → Settings → Shipping. WooCommerce organises shipping into shipping zones: regions you define, each with its own delivery methods. Each customer matches only one zone — the first one their address fits — so zone order matters.
“No shipping options are available for this address”
This is what your customer sees when their address falls outside every zone, when the matching zone has no shipping method, or when shipping is disabled under General → Shipping location(s). It looks like a checkout bug; it is almost always a zone problem. Check, in this order: does the address fall inside one of your zones; does that zone have at least one active method; are your zones in the right order, smallest area first; is shipping disabled under General → Shipping location(s).
Create zones from smallest to largest
Click Add zone, name it for the smallest area first — for example, “Gauteng” — add the region it covers, then add a method: Flat rate, Free shipping or Local pickup. Repeat for the next-largest area — “South Africa”, for example — and put it below the smaller zone. Leave the catch-all zone, Locations not covered by your other zones, at the bottom, and give it a method too. If “South Africa” sits above “Gauteng”, the Gauteng rate is never used. A zone with no methods is the same as no zone.
Flat rate first, live courier rates second
Start with flat rates you control: a flat delivery fee per zone, free shipping over a threshold you can afford, and local pickup if customers can collect. Live courier rates are the next step, not the first — they need a courier account, product weights and dimensions, and a plugin that talks to the courier. Keep a flat-rate method in each zone as a fallback. South African stores commonly ship through The Courier Guy, Aramex, RAM, PostNet or Skynet. No courier integration was set up or checked on the test install — live courier rates need a courier account, product weights and dimensions, and a plugin, so compare them once your flat rates work.
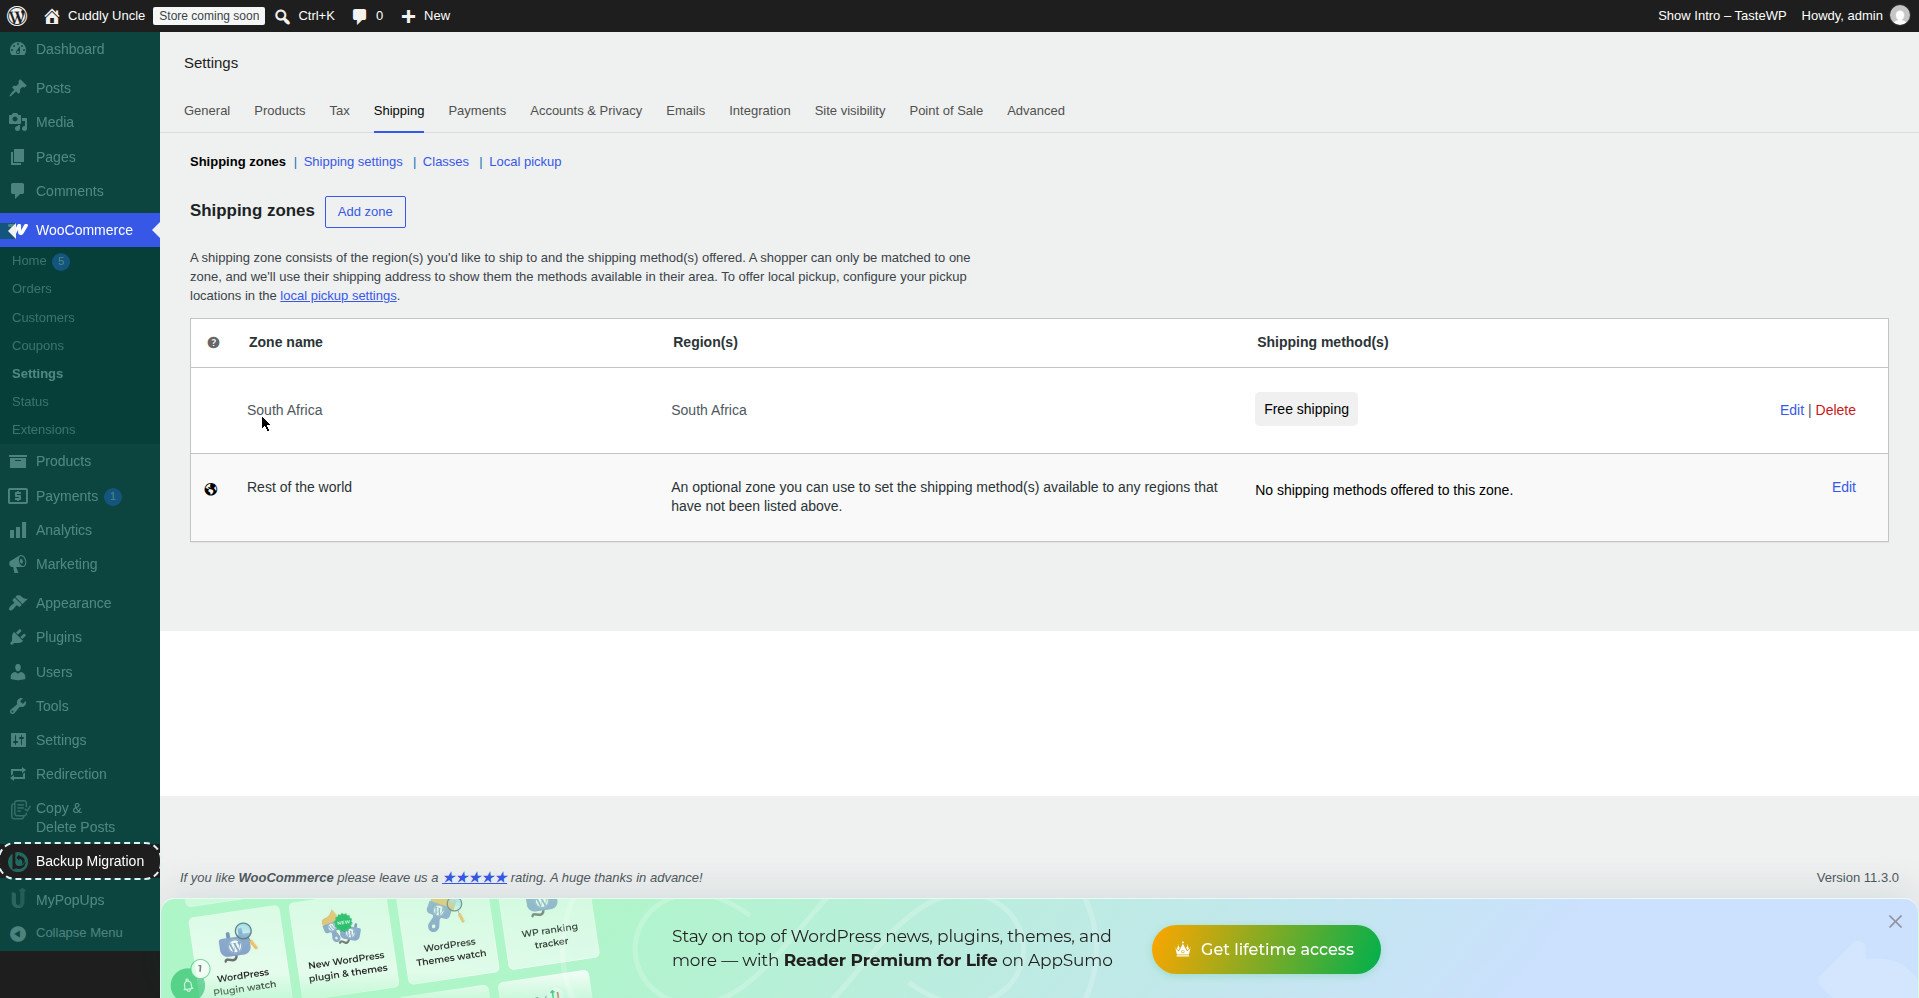
On the test install, no zones were created — the fresh install already had a “South Africa” zone with “Free shipping” enabled, plus a “Rest of the world” zone with no methods. Free shipping is described on the screen as “a special method which can be triggered with coupons and minimum spends”, and it requires “No requirement”. Two quirks: a “Shipping zones” guided-tour popup (Step 1 of 2) covered the zone Edit link and had to be closed first, and the zone’s methods table initially rendered empty and only showed Free shipping on re-observation.
Step 4: Set up tax — including the South African double-charge
Go to WooCommerce → Settings → Tax. If you do not see a Tax tab, go back to General and tick Enable taxes first.
WooCommerce tax not showing in cart / tax not working
Tax is the setting beginners get wrong most quietly, because the shop looks fine and the numbers are wrong. The classic South African version: you enter R115 because that is the price including tax, WooCommerce adds tax on top again, and the customer is charged more than the shelf price. That is not a bug — it is two settings disagreeing.
- Prices entered with tax. If your prices already include tax — the usual South African shelf-price habit — choose “Yes, I will enter prices inclusive of tax.” If your prices exclude tax and tax is added at checkout, choose “No, I will enter prices exclusive of tax.”
- Display prices in the shop / cart / checkout. For most South African stores, showing prices including tax is the honest choice. If tax is not showing in the cart, check this setting and the rate below first.
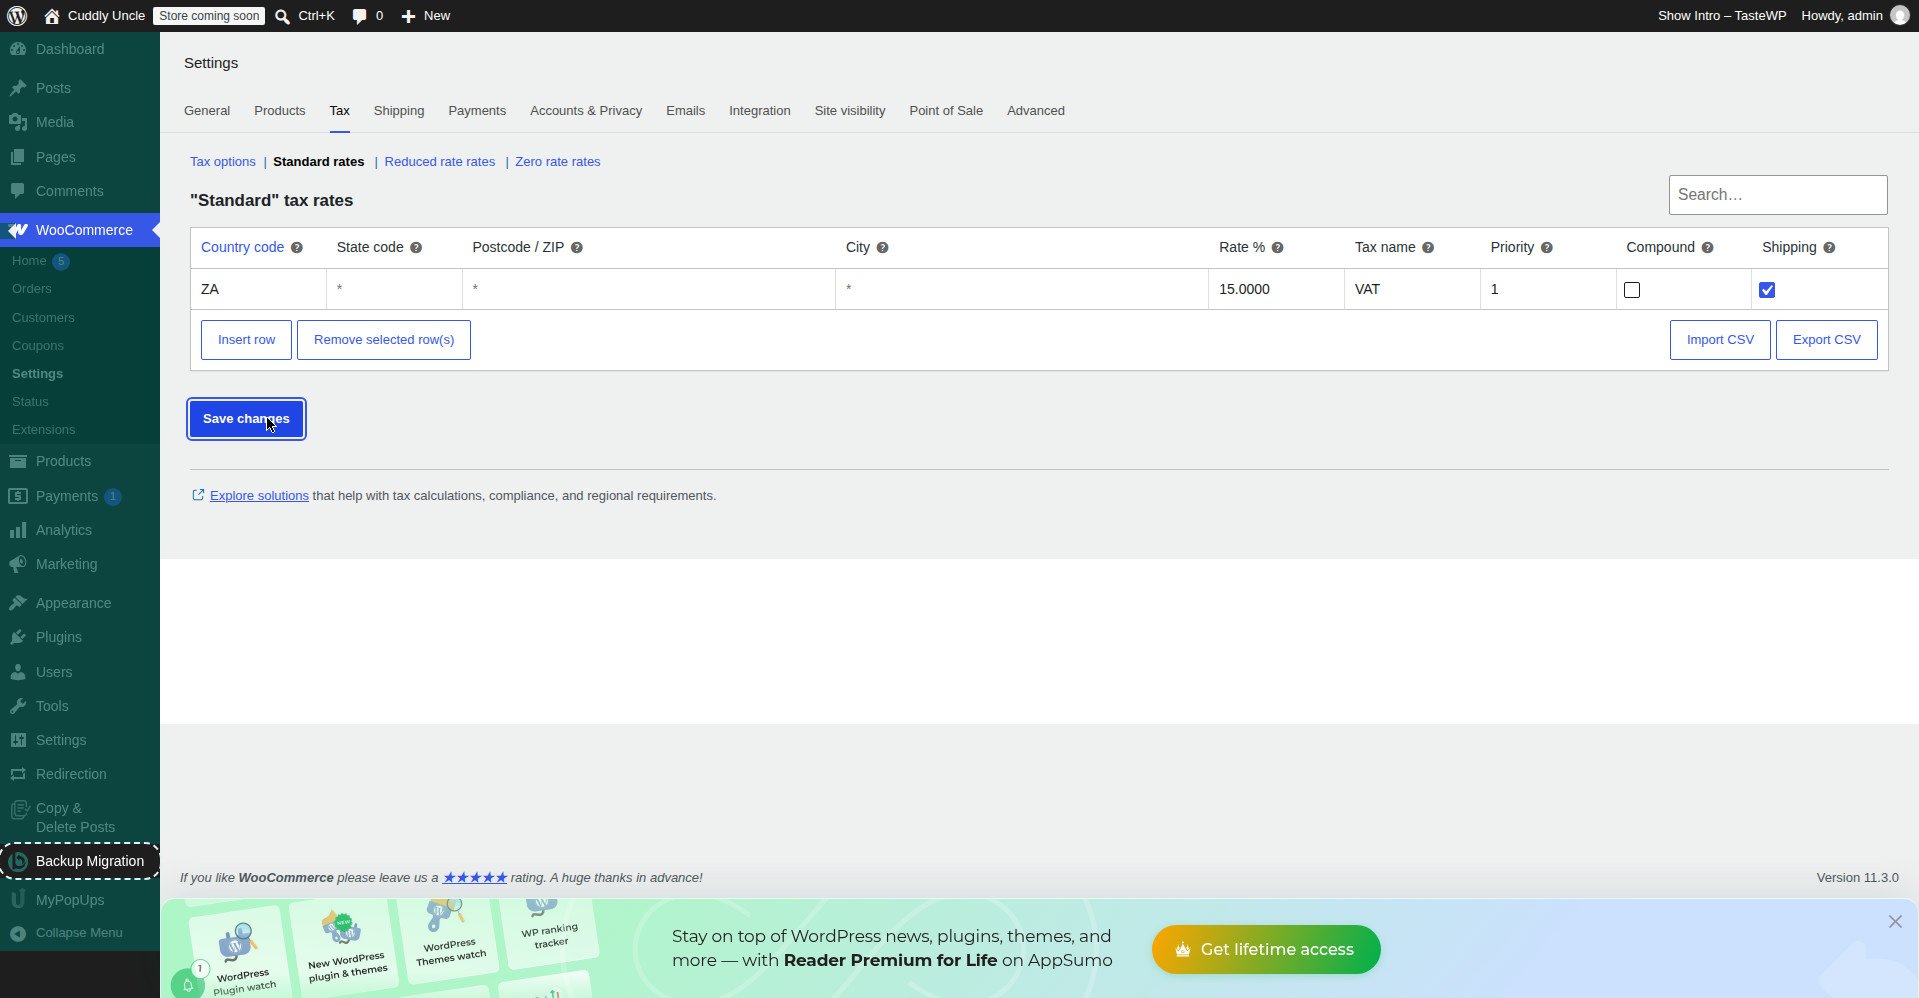
- Tax rates. Under Standard rates, add a rate for your country. South Africa’s VAT rate is 15% — the test install added one standard rate (Country code ZA, Rate 15%, Tax name “VAT”, Priority 1, Compound off, Shipping on), saved it, and it persisted after reloading the page (ZA / 15.0000 / VAT). One quirk: “Save changes” showed no “settings saved” notice; persistence was verified by reloading. If your business is not VAT-registered, do not charge VAT — get advice from your accountant or SARS before you set a rate. Give the rate a name, the country code (ZA) and the percentage, and tick Shipping if tax applies to shipping too.
The tax rate on the test install was set from the Home task “Collect sales tax”: first “Set store location” (test address 1 Test Street, Post code 2000, City Johannesburg), then “Configure tax rates”, which opens Settings → Tax → Standard rates. The Standard rates table was empty before the one VAT row was added.
Step 5: Check the Shop, Cart, Checkout and My Account pages
Installing WooCommerce normally creates four pages automatically: Shop, Cart, Checkout and My Account. Check all four exist before going live, because a missing one breaks the store in ways that look like a checkout bug.
Go to Pages — you should see Shop, Cart, Checkout and My Account, all Published; check Trash too. Then go to WooCommerce → Settings → Advanced → Page setup and confirm each function points at the right page: Cart page → Cart, Checkout page → Checkout, My account page → My Account. Never assign them to the same page — sharing one causes incorrect redirects and broken payment gateways.
If a page is missing, do not create a duplicate by hand first. Go to WooCommerce → Status → Tools, find Create default WooCommerce pages, and click Create pages. It installs only the missing pages. Then re-check the assignments under Settings → Advanced. Cart and Checkout use the Cart and Checkout blocks. Do not empty the page content or replace the block with ordinary text — the block is what does the work.
Also set permalinks: go to Settings → Permalinks and choose Post name (or any option other than Plain). If a checkout page is missing, blank, or redirecting to the home page, run Create pages first, then re-save permalinks, clear any cache plugin, and test while logged out.
No screenshot of the Advanced → Page setup screen was captured on the test install, so there is none here. The front end of the test install lists Cart, Checkout, My account and Shop in its navigation (see the test results below), which is the front-end sign that those pages exist.
Place a test order before you go live
A test order walks the whole path a customer walks: shop → cart → checkout → payment → order email → order in your dashboard. Do it logged out, or in a private browser window, as a guest — admins see a different shop from customers.
Turn on test mode in your payment gateway, or enable Check payments or Cash on delivery for a free test that proves checkout and order flow but not the payment path. Add a product to the cart, go to the Cart, then to Checkout. Enter a real-looking address in the zone you set up, and check the shipping method and price you expect actually appear. If you see “No shipping options are available for this address”, stop — your zones are wrong (Step 3). Pay with the test method and click Place order; you should land on the “Order received” page. Open WooCommerce → Orders — your test order should be there, with the right status: Processing or Completed for a successful payment, On hold for bank transfer, Failed or Pending payment for a declined card. Read the customer and new-order emails: wrong prices, wrong tax or a missing shipping line show up here first. Test a failure too, with a declined test card from your gateway’s documentation. No declined-card test was run on the test install, so this guide does not record a test card number — use the one your gateway publishes. Delete the test orders before opening the store, and switch the gateway back to live mode. If you are already taking live orders, test on a staging copy, not on the live store.
What I tested / What failed — test run on a fresh test install
This section records what actually happened on the test run for this guide — a fresh WordPress test install (no account or email was needed), tested 15 November 2026. WordPress 7.1.4, WooCommerce 11.3.0, theme Twenty Twenty-Three 1.7, PHP 8.5.12. This was not the live site — the live site has no WooCommerce installed — and the theme on that test install was Twenty Twenty-Three, not GeneratePress.
What worked
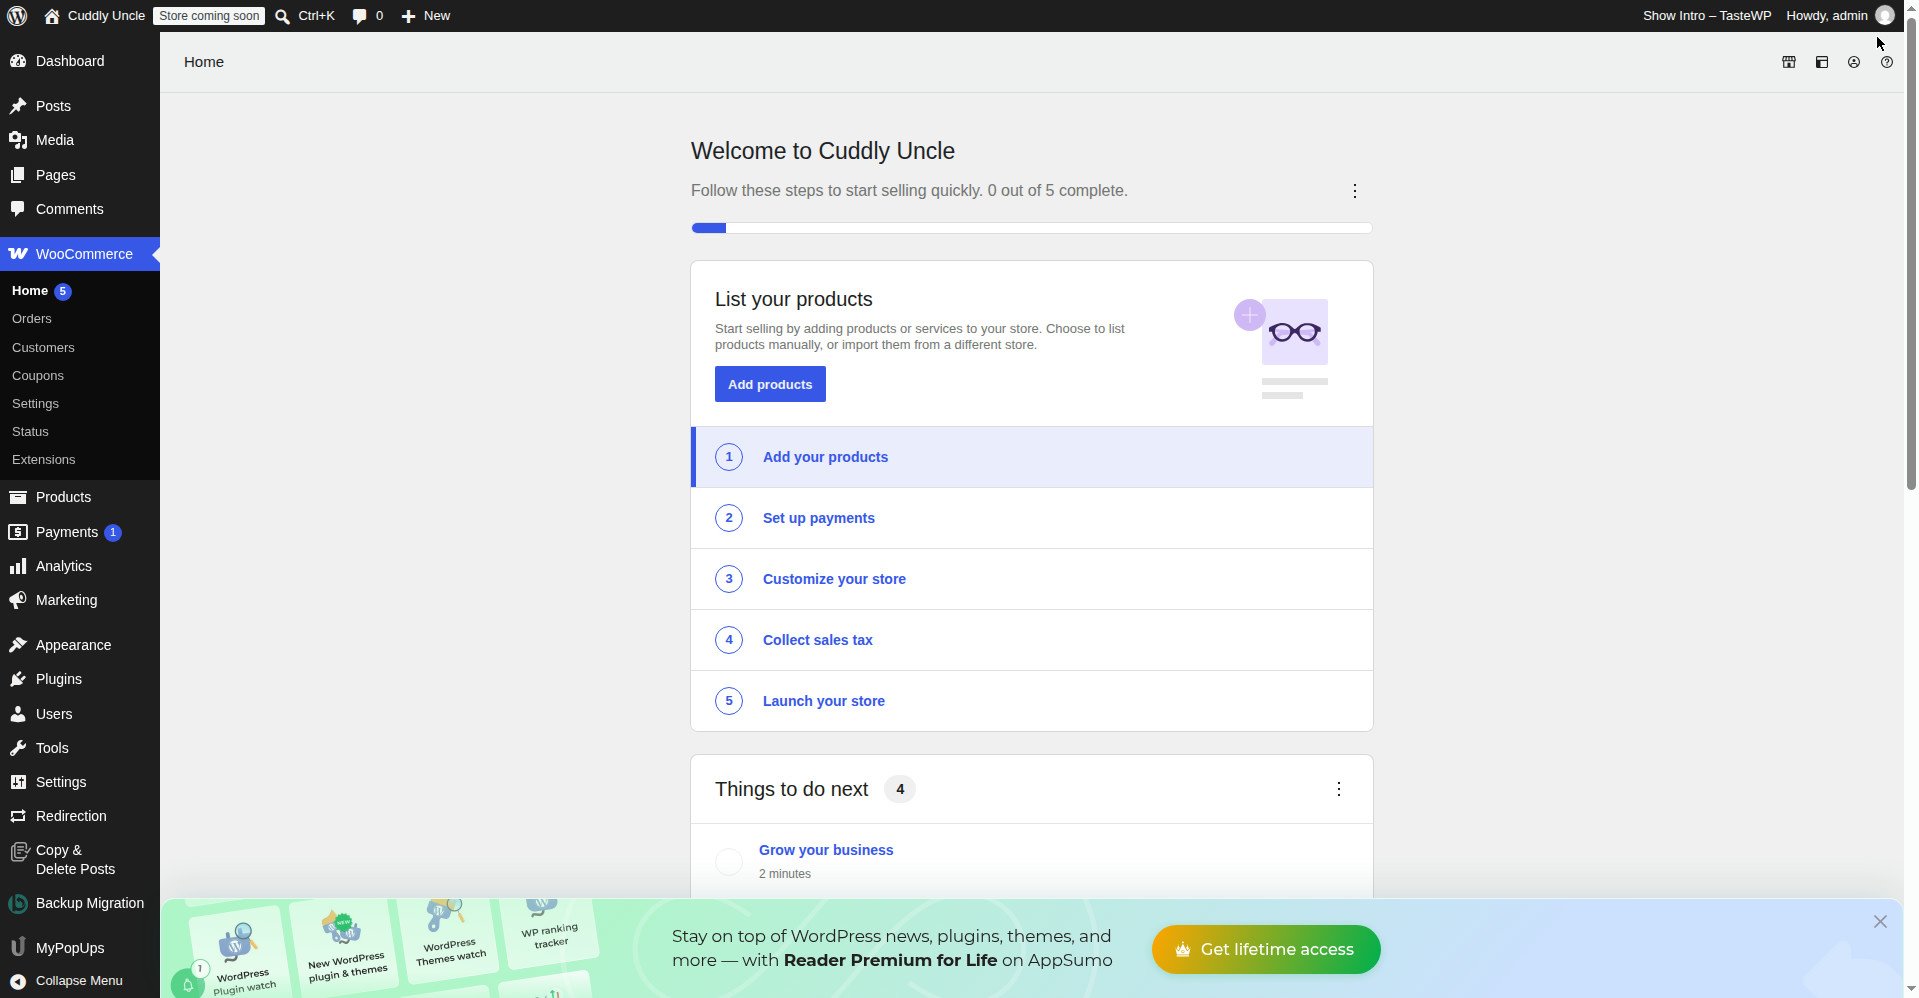
The install worked first time: WooCommerce (by Automattic, 4.5 stars from 4,832 ratings, 7+ million active installations) from Plugins → Add New, “Install Now” → “Activate WooCommerce” → “Plugin activated.” Before the wizard, Home showed “0 out of 6 complete” — Add your products; Set up payments; Customize your store; Collect sales tax; Select your shipping options; Launch your store. The wizard ran as described above, and afterwards Home showed “0 out of 5 complete” and “Total sales R0,00”. Settings → General, the timezone, the tax rate and the shipping zones were all set and verified as described in Steps 1, 3 and 4. The store went live — see below.
What failed
- Activation did not launch the wizard. The usual story is that activation launches the setup wizard. On the test install it did not — it showed “Plugin activated.” and landed back on the Plugins page. The wizard was started from the WooCommerce Home screen instead.
- The wizard is shorter than the guides say. In WooCommerce 11.3.0 the guided wizard has no product-types screen, no currency screen, no tax or shipping screen and no payment screen. The currency is derived from the country, and payments, shipping and tax are all finished afterwards in Settings.
- The first launch attempt failed silently. Clicking the top “Launch Your Store” button went back to Home without launching. The second attempt, after dismissing the AppSumo banner, worked: “Congratulations! Your store is now live”. The front end then showed “Live” in the toolbar, with Cart, Checkout, My account, Sample Page and Shop in the navigation, and Settings → Site visibility showed “Live” checked. Final Home: “2 out of 5 complete”.
- Shipping zones had two quirks. A “Shipping zones” guided-tour popup (Step 1 of 2) covered the zone Edit link and had to be closed first, and the zone’s methods table initially rendered empty and only showed Free shipping on re-observation.
- Saving the tax rate showed no confirmation. “Save changes” showed no “settings saved” notice; the rate was only confirmed by reloading the page (ZA / 15.0000 / VAT).
What was not tested
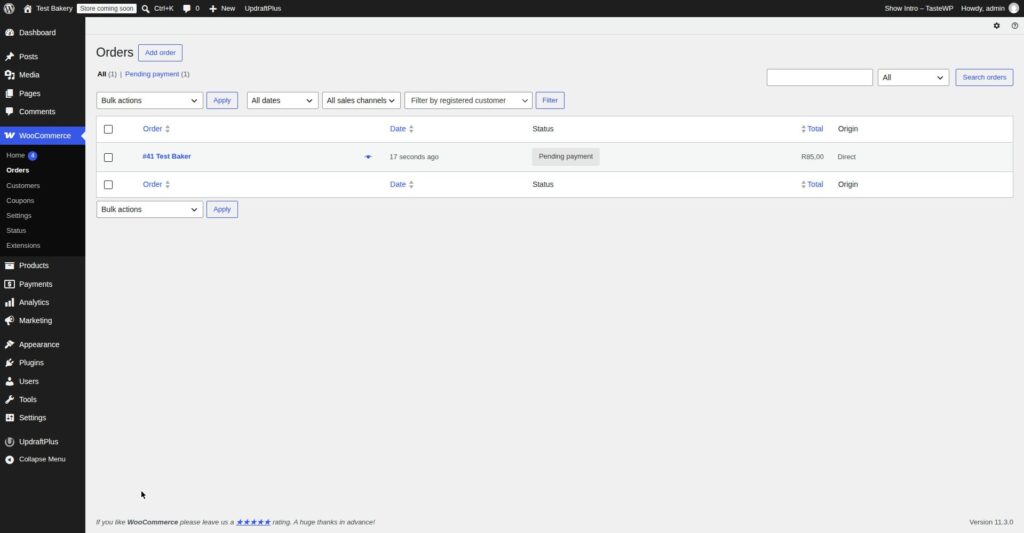
Payments were viewed only in this guide’s own test run — no gateway was installed, enabled or connected here, so no test order was placed in this guide’s test run, no order emails arrived, and no declined-card test was run. A test order does exist from the separate PayFast test run on the WordPress test install (order #41, 15 November 2026 11:34, Pending payment, R85,00 — see the Orders screenshot above), but the PAYMENT itself was not completed: the PayFast sandbox payment failed with a signature error, so no payment was completed and no test card was entered. No shipping zones were created and zone ordering was not tested (the install already had a “South Africa” zone with Free shipping). Checkout was not deleted and the “Create pages” tool was not run. The “Prices entered with tax” setting was not changed during the test, so the double-charge check (price, tax line and total on a test order) was not run. No courier integration was checked. These are steps to run on your own store before you go live, not results this guide can report.
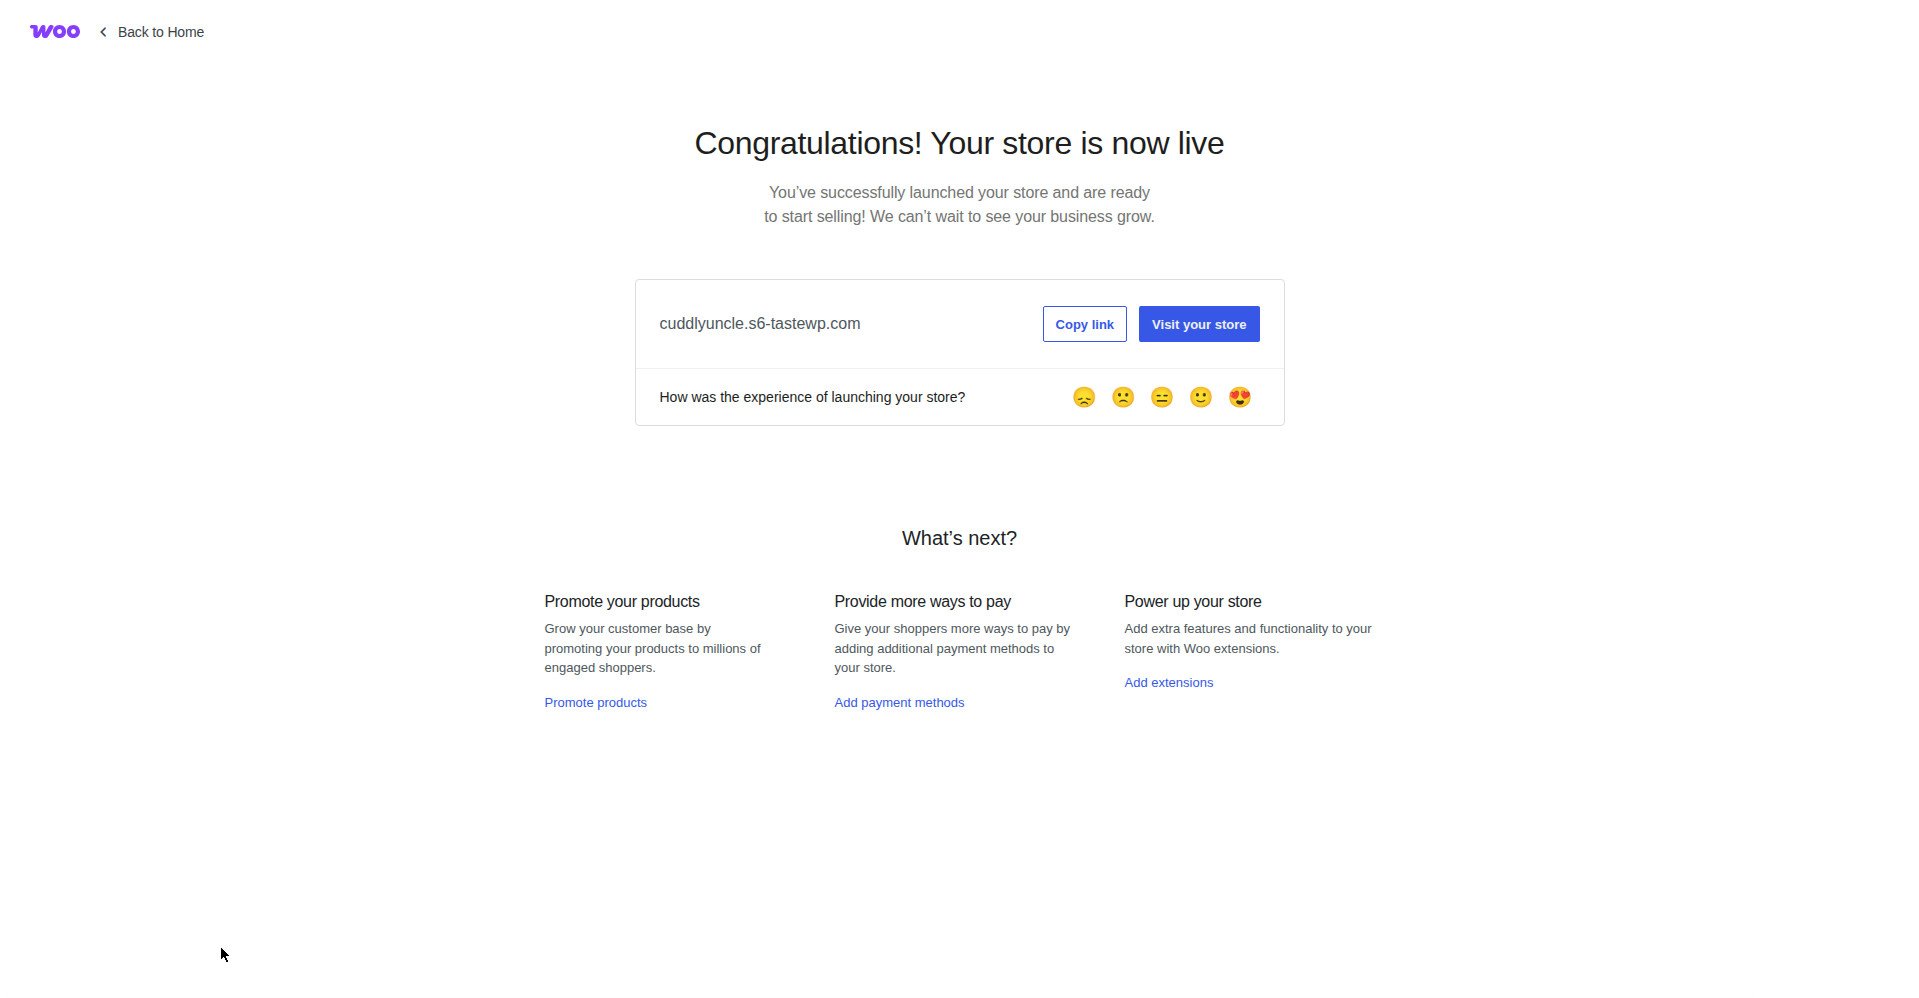
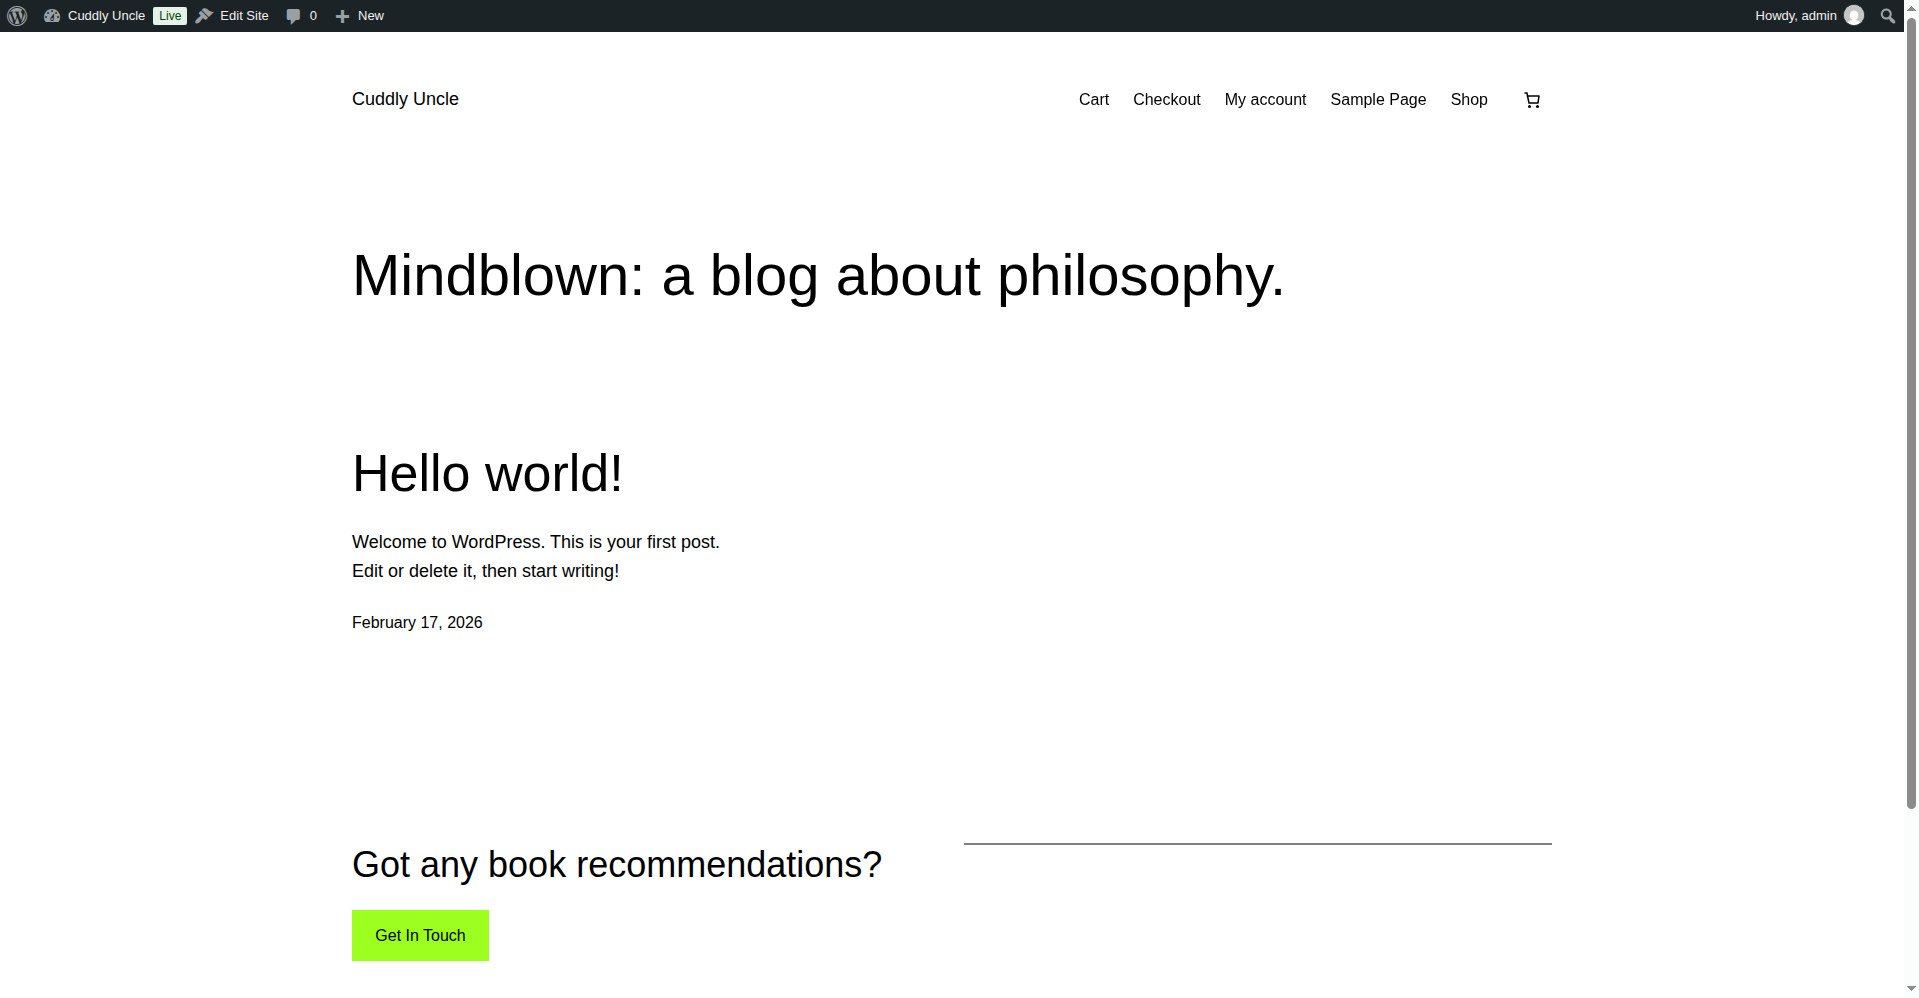
Results: The install, wizard, settings, tax rate and launch all worked, with the corrections noted above — activation did not auto-launch the wizard, and the WooCommerce 11.3.0 wizard has no product-types, currency, tax, shipping or payment screens. No gateway was connected in this guide’s own test run, so no order was placed here and there are no order-email or declined-card results to report from this run. One test order does exist, from the separate PayFast test run — order #41, 15 November 2026 11:34, Pending payment, R85,00, shown in the Orders screenshot above — but the PayFast sandbox payment itself was not completed (signature error), so there is no completed-payment result to report.
Next steps
Once the shop itself is set up, the next job is stocking it. In this series, the next articles cover adding your first products, setting prices, stock and SKUs, variable products, product images, and importing products from a CSV file. If you get stuck, re-read the section for that step and check the setting it names before installing a plugin to fix it. Most first-time WooCommerce problems are a wrong value on a settings screen, not a missing plugin.
Mohd Shah Ahmad is a WordPress & WooCommerce specialist based in Pretoria, South Africa. He builds and runs live WooCommerce stores, and manages the live stores Stanley’s Bakery (stanleysbakery.co.za) and Aaliyah Perfumes (aaliyahperfumes.co.za).