
Quick answer
To add a product in WooCommerce, go to Products → Add New, enter a name and description, leave Product data on Simple product, enter a Regular price, add a Product image, choose a category, and click Publish. Then click View product to check it as a customer would see it.
This guide is part of the Build a WooCommerce Store hub. Next, learn how to add variable products in WooCommerce, how to add product images in WooCommerce, and how to set a sale price in WooCommerce.
Tested on: WordPress 7.1.4 · WooCommerce 11.3.0 · Theme: GeneratePress 3.6.1 · PHP 8.4.27 · Tested: 14 November 2026 on a WordPress test install (currency ZAR). Screenshots are from that test install. If your dashboard looks different, check your WooCommerce version first — screens change between versions.
What you need before you start
Having this ready first saves you publishing a half-finished product.
- WooCommerce installed and activated, setup wizard finished — currency, country and a Shop page set. WooCommerce says you only need a name and a price to begin.
- A product name, written the way a customer would search: “Vanilla Cupcakes — Box of 6”, not “VC-06”.
- A price in rand, decided before you start. If it is on special, decide the sale price too.
- One good product photo. WooCommerce recommends at least 800 × 800 pixels, so the shop page does not look blurry.
- A category, or a decision to make one. Categories are how shoppers browse. One category per product is fine to start with.
You do not need a SKU, weight, shipping class or stock quantity to publish. Prices, stock and SKU get their own article in this series.
Which product type should you choose?
Choose Simple product. It is the default, and it is the right choice for most first products.
| Product type | Use it for |
|---|---|
| Simple product | One item, one price, no options — a book, a candle, a box of cupcakes, one bottle of perfume in one size |
| Variable product | One item with options the customer chooses — a T-shirt in sizes S, M and L, or perfume in 30 ml and 50 ml, each with its own price and stock |
| Grouped product | Several separate products shown together, so a customer can add a few at once — for example, a gift set |
| External / Affiliate product | A product you list but sell on another website — the button links out instead of adding to cart |
| Virtual (tick box) | A service or something with no shipping — a consultation, a voucher |
| Downloadable (tick box) | A file the customer gets after paying — an ebook, a printable, an audio file |
Do not pick Variable because your product might have options one day. Start with Simple; the variable-products article covers sizes and colours later.
How to add a product in WooCommerce, step by step
Step 1: Open Products → Add New
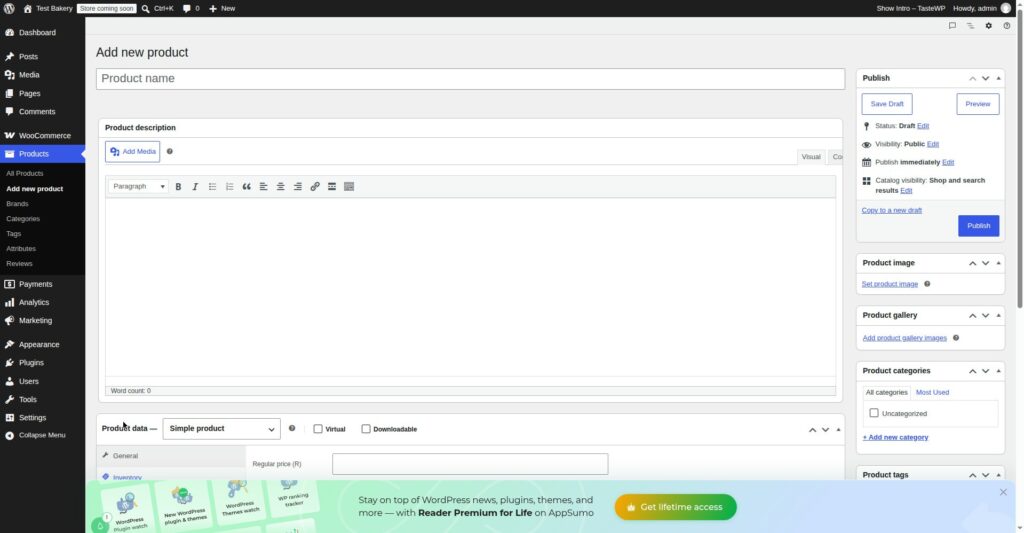
In your WordPress dashboard, click Products, then Add New.
You will see a screen like writing a blog post: title at the top, description underneath, panels on the right. A WooCommerce product is a WordPress post type, with extra panels for price, stock and shipping.
Step 2: Enter the product name
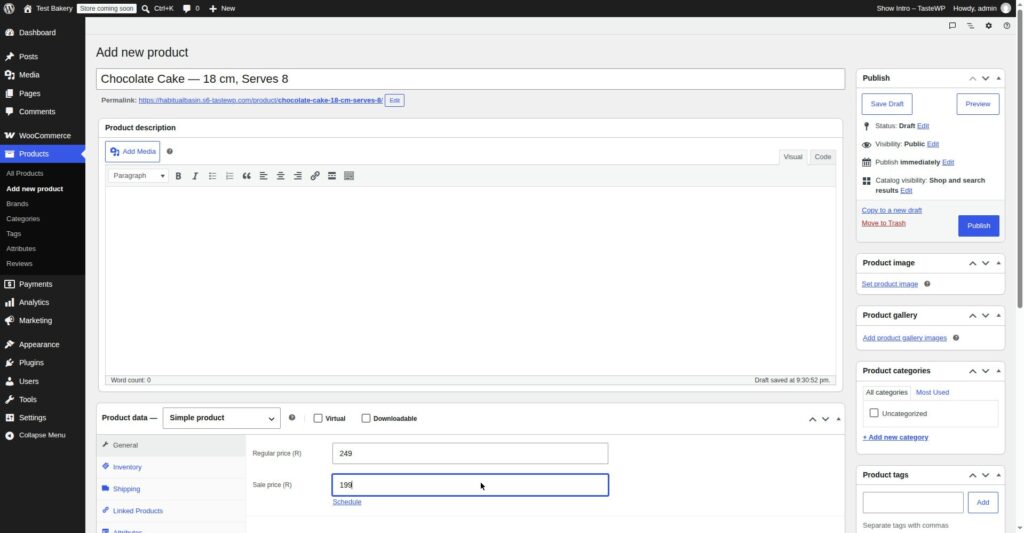
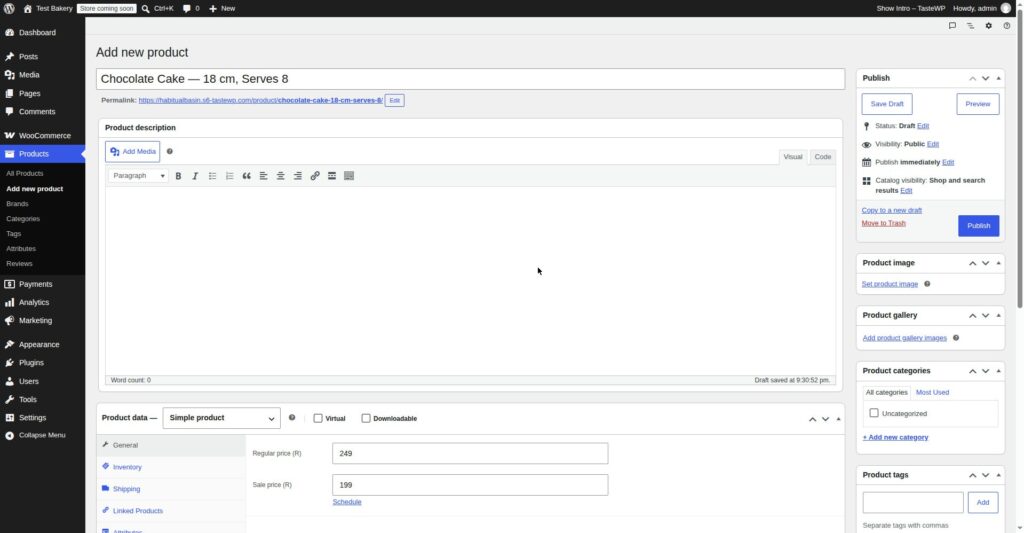
Type the product name in the title field. Be specific: “Chocolate Cake — 18 cm, Serves 8” is a product; “Chocolate Cake” is a category. Put the words a customer would search for first. This name is shown in the shop, search results and the cart, and the web address is created from it.
Step 3: Write the product description
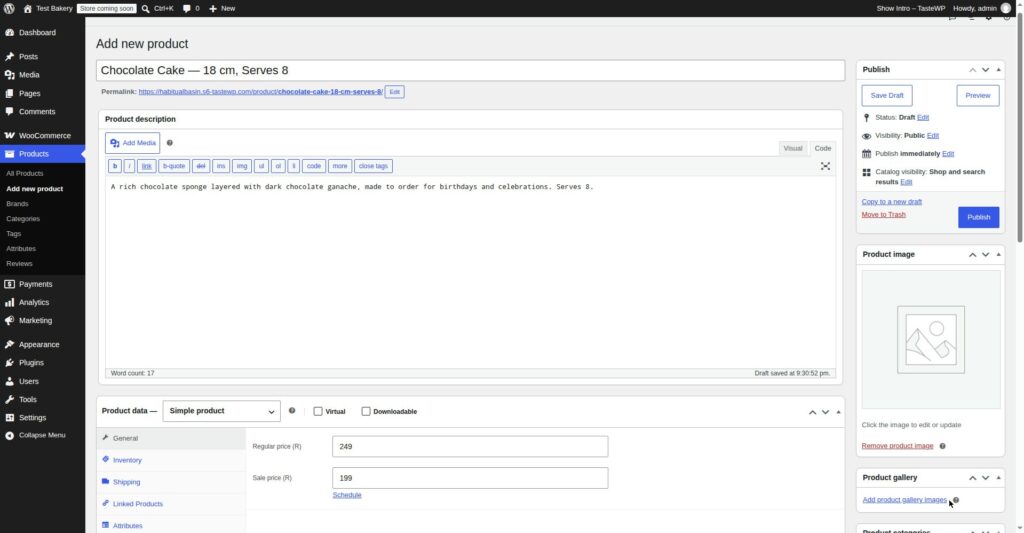
In the big editor box under the title, write the long description — the one a customer sees on the product page.
Write for someone who has never held your product: what it is, what it includes, who it is for. For bakery, size, flavour, ingredients that matter (nuts, gluten, dairy), and servings. For perfume, size and scent notes. A short paragraph and a few bullet points will do. Do not copy a supplier’s description word for word — it is written for wholesalers, and every other store using that supplier will publish the same text. Step 7 is the short version; this box is the full story.
Step 4: Set the product type to Simple product
Scroll down to the Product data box below the description. Its dropdown should already say Simple product — if not, select it.
Next to it are Virtual and Downloadable tick boxes. Leave both unticked for a physical product. Tick Virtual only if nothing is shipped; Downloadable only if the customer gets a file after paying.
Step 5: Enter the regular price
In the Product data box, stay on the General tab.
You will see two price fields:
- Regular price — the normal selling price. Enter numbers only, no currency symbol and no commas. For a R249 product, type
249. WooCommerce adds the rand symbol on the front of the shop from your currency settings. - Sale price — the discounted price, if the product is on special right now. Leave it empty if it is not on sale. If you enter one, WooCommerce shows the regular price crossed out and the sale price next to it, and charges the sale price at checkout.
A Schedule link next to the sale price sets start and end dates; Cost of goods tracks what it cost you. Neither is needed to publish. Leave Tax status on Taxable unless you know otherwise — check WooCommerce → Settings → Tax, do not take a rate from this article.
Step 6: Add the product image
In the right-hand column, click Set product image in the Product image panel, upload a photo or pick one from your Media Library, and click Set product image.
This image is the main image on the product page, in the shop grid, and in search results and the cart. It needs to be a photo of this product, well lit, filling most of the frame — not a logo. On the test install, the only image available was the WooCommerce placeholder image — the grey picture icon — not a real product photo, so that is what the screenshots in this guide show. More photos go under Product gallery below, via Add product gallery images. Image sizes and blurry photos are covered in the product-images article.
Name the file before uploading: vanilla-cupcakes-box-of-6.jpg, not IMG_4829.jpg.
Step 7: Write the short description
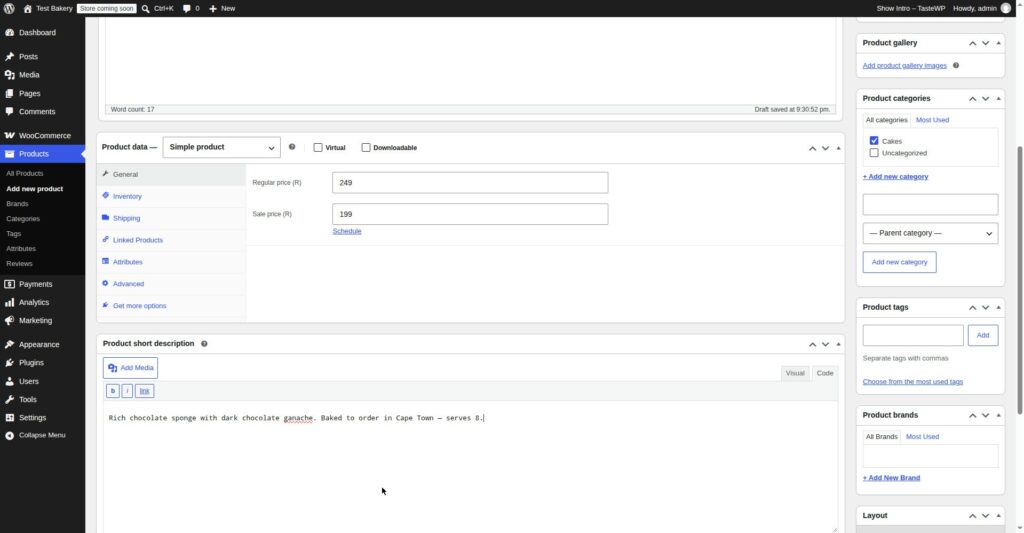
Scroll down to the Product short description editor below the Product data box.
Write two or three sentences — the summary next to the price and the Add to Cart button, answering: “Is this the one I want?” For example: “Six vanilla cupcakes with buttercream icing, baked fresh to order. Serves 4–6.”
Do not leave this empty, and do not paste your whole long description in here — the customer would read the same text twice.
Step 8: Choose a category and add tags
In the right-hand column you will see Product categories and Product tags.
Categories are the shelves in your shop. Tick the category it belongs to, or click + Add new category to make one. Start with one category per product.
Tags are small labels that help customers find related products — “gift”, “gluten-free”, “birthday”. Add one or two that a real customer might use. Tags are not a place to list every keyword you can think of.
Skip categories and WooCommerce puts the product in Uncategorized — it works, but a customer browsing by category will never find it.
Step 9: Publish — then check it like a customer
In the Publish panel at the top right, check two settings before you click anything:
- Status should say Published when you click Publish. A Draft is visible only to you.
- Catalog visibility — click Edit next to it. It should say Shop and search results. If it says Hidden, the product will not appear in the shop at all, even though it is published. This one setting causes more “my product is not showing” panic than any other.
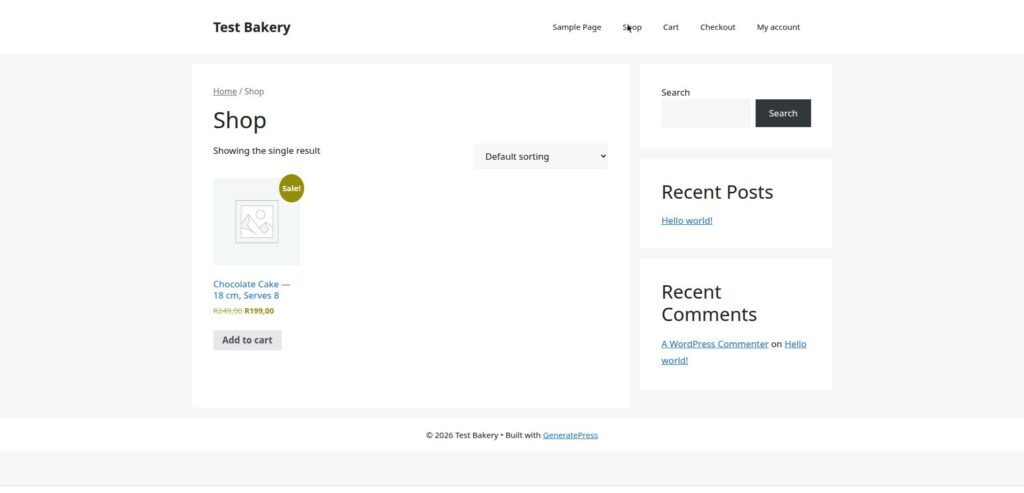
Now click Publish, then View product at the top. Check three things: price, image, and Add to cart — does the cart show the right product, price and quantity? If all three pass, your first product is live.
What I tested — and what failed
A tutorial that only shows the happy path is not much use the first time something goes wrong.
What failed on the test install
Two things went wrong on the test run, and both are worth knowing about before you start.
First, WooCommerce’s first activation failed with a fatal error — “There has been a critical error on this website.” Activating it again from the Plugins list worked straight away, and nothing was lost. This happened on the test install, so do not take it as a normal install failure.
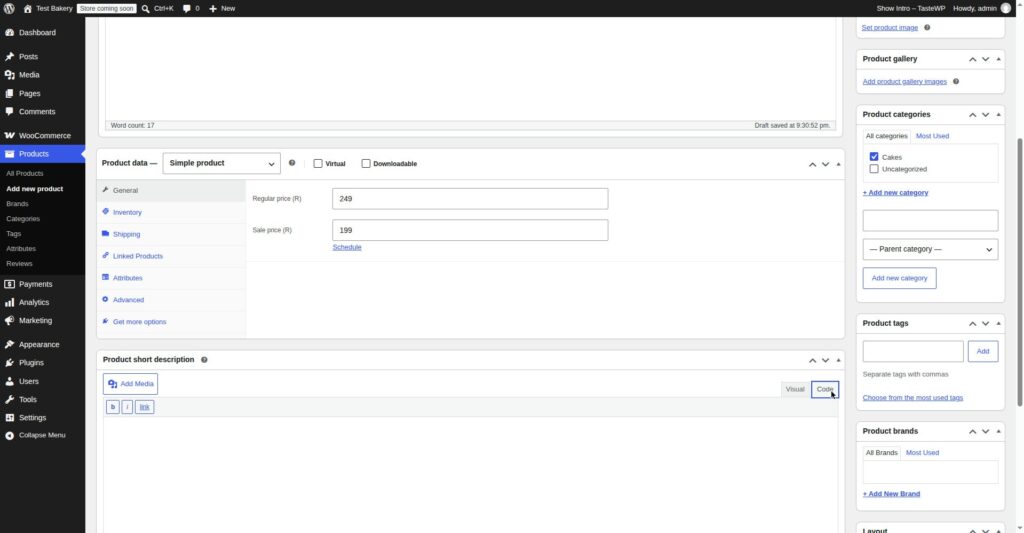
Second, the visual editor would not accept typed input in the description boxes, so the long description and the short description had to be typed in the editors’ Code mode instead. Once entered that way, the text saved normally.
Everything else worked first time. The test product, “Chocolate Cake — 18 cm, Serves 8”, published at 21:31, and the shop showed it with a “Sale!” badge, R249,00 struck through and R199,00, with an Add to cart button. The product image in the screenshots is the WooCommerce placeholder image, not a real product photo.
Before you test, know this: you will see your own product even when a customer cannot. Logged in as admin, WordPress shows you drafts, private and hidden products. Always do your final check in a private window, logged out.
Troubleshooting: my WooCommerce product is not showing in the shop
Work through this table top to bottom, checking the shop in a private window after each row. Most problems are in the first three rows. Searchers usually phrase this as “WooCommerce product not showing in shop” or “WooCommerce product not showing after publish” — both mean the same thing.
| Symptom | Likely cause | Fix |
|---|---|---|
| Not on the Shop page, but opens from its direct link | Draft, Scheduled or Private, not Published | Set Status to Published, click Update |
| Published, but not on the Shop page or in search | Catalog visibility is Hidden, or “Search results only” / “Shop only” | Set Catalog visibility to Shop and search results, click Update |
| Shows in search but not on the Shop page | Catalog visibility is “Search results only” | Same fix — set it to Shop and search results |
| Shows on the Shop page but has no price and no Add to Cart button | No Regular price entered | In Product data → General, enter a Regular price, click Update. See the sale price guide |
| Published and priced, but the Shop page still shows the old version | Caching — browser, caching plugin or host showing an old copy | Clear browser cache, purge the caching plugin, check in a private window |
| Shop page is blank or shows a 404 | Shop page not assigned, or permalinks need refreshing | Check the Shop page field under WooCommerce → Settings → Products, then go to Settings → Permalinks and click Save Changes without changing anything |
| Out of stock and disappeared from the shop | Hide out of stock items from the catalog is ticked, and the product has no stock | Restock the product, or untick that setting under WooCommerce → Settings → Products → Inventory |
| Shows for you, but a customer cannot see it | You are logged in as admin, seeing a draft, private or hidden product | Check in a private window while logged out; if it is not there, work through the rows above |
| Image missing or a grey placeholder | No product image set, or the image was deleted from the Media Library | Click Set product image, choose an image, click Update. See the product images guide |
If the whole table fails, go to WooCommerce → Status → Tools and click Regenerate next to Product lookup tables, then check again. Remember: re-saving Settings → Permalinks rebuilds the rewrite rules WooCommerce relies on.
How to add products to WooCommerce for beginners — habits that save time later
Use the same name pattern every time — “Vanilla Cupcakes — Box of 6”, “Chocolate Cupcakes — Box of 6” — so customers can scan the shop page in seconds.
Fill in every field before you publish, or do not publish yet. Use Save Draft. Ten finished products look better than thirty half-finished ones.
Add products one at a time until you have about ten, then import the rest with the built-in CSV importer under Products → All Products → Import — see the CSV import guide.
Check the shop on your phone. Most customers shop on a phone: check the image, price and Add to Cart button there.
Frequently asked questions
How do I add a product to WooCommerce?
Go to Products → Add New, enter a product name and description, leave Product data set to Simple product, enter a Regular price under General, add a Product image, choose a category, and click Publish. Then click View product to check it. That is the minimum — name, price, image, category and publish.
What do I need to add a product in WooCommerce?
At minimum, a product name and a regular price. In practice, add a product image and a category too, or it will publish but look unfinished and be hard to find.
Why is my WooCommerce product not showing in the shop after I publish it?
The most common causes are: the product is still a Draft; Catalog visibility is Hidden or “Search results only”; it has no price; it is out of stock and your store hides out-of-stock items; or a cached shop page is being shown. Work through the table above, one row at a time.
Can I add a product in WooCommerce without a price?
You can save it as a draft without a price, but do not publish it that way. A published product with no price has no Add to Cart button, so a customer cannot buy it. If the price is not decided yet, keep the product as a draft until it is.
How do I add a product category in WooCommerce?
On the Add New product screen, look at Product categories in the right-hand column and click + Add new category. Type the category name, choose a parent category if it belongs under one (for example, “Cupcakes” under “Bakery”), and click Add new category. You can also create categories in advance under Products → Categories.
How do I upload products to WooCommerce in bulk?
One at a time, use Products → Add New as in this guide. For many at once, use the built-in CSV importer: Products → All Products → Import, upload a CSV with one product per row, map the columns, and click Run the importer. The template, mapping and skipped-row errors are covered in the CSV import guide.
What to read next
- Prices, stock and SKU — sale price, scheduled sales, stock and SKUs.
- Variable products — sizes, colours and other options.
- Product images and galleries — sizes, galleries and variation images.
- Bulk CSV import — adding many products at once, and fixing skipped-row errors.
Written by Mohd Shah Ahmad, Learn WordPress Online. He builds and runs live WooCommerce stores in Pretoria, and manages the live stores Stanley’s Bakery (stanleysbakery.co.za) and Aaliyah Perfumes (aaliyahperfumes.co.za). Tested on a WordPress test install — see the “Tested on” box at the top.