
Quick answer
To add a variable product in WooCommerce, go to Products → Add New, set Product data to Variable product, add an attribute such as Box size on the Attributes tab, tick Used for variations and click Save attributes. Then go to the Variations tab, choose Create variations from all attributes and click Go.
Expand each variation and give it a Regular price — a variation with no price will not show in your shop — plus stock, SKU and an image if needed, then click Save changes and Publish. The rest of this guide covers the three failures that catch almost everyone: a forgotten price, an unticked “Used for variations” box, and too many variations generated at once.
This guide is part of the Build a WooCommerce Store hub. Start with how to add products in WooCommerce, then learn how to add product images in WooCommerce and how to import products in WooCommerce with a CSV file.
Tested on: WordPress 7.1.4 · WooCommerce 11.3.0 · Theme: GeneratePress 3.6.1 · PHP 8.4.27 · Tested: 15 November 2026 on a WordPress test install. Screenshots are from that test install. If your dashboard looks different, check your WooCommerce version first — screens change between versions.
What is a variable product?
A variable product is one listing with options the customer chooses before buying. The options are called attributes — Box size, Flavour — and each combination is a variation, with its own price, stock, SKU and image if you want it to have one.
Use one when the customer must choose something first: Vanilla Cupcakes in a Box of 6 or a Box of 12; a perfume in 30 ml and 50 ml at different prices; cupcakes in vanilla, chocolate and red velvet, in a box of 6 or a box of 12.
Do not use one when the product has no real options. A book, a candle in one scent, a box of cupcakes in one flavour — those are simple products, covered in how to add products in WooCommerce. The other beginner mistake is creating separate simple products called “Vanilla Cupcakes — Box of 6” and “Vanilla Cupcakes — Box of 12”. That works for two products and becomes a mess at thirty.
One thing to understand first, because it explains almost every error here: attributes are the choices, variations are the things you sell. Box size is an attribute. “Box of 6” is a variation. If you only set up the attribute and never create the variations, the customer sees a dropdown with nothing to buy. If you create variations but give one of them no price, WooCommerce hides that one. That is not a bug — it is WooCommerce refusing to sell something with no price.
What you need before you start
- WooCommerce installed and activated, with a Shop page set. You should already know how to add a simple product — if not, read how to add products in WooCommerce first, because this guide builds on it and does not repeat the name, description, image and category steps.
- The options, decided in advance. Write them down first: Box size — Box of 6, Box of 12. Deciding while clicking through the dashboard is how you end up with a Box size attribute called “Box sizes” and variations to delete and redo.
- A price for each variation. A 50 ml perfume costs more than a 30 ml bottle. If they are all the same price, set them all at once with Bulk Actions (Step 7).
- Stock numbers, if you manage stock. If you do not know them, leave stock management off for now, because it can show “Out of stock” for a size you do have.
- A photo for each variation, if the variations look different. Vanilla and chocolate cupcakes should show different photos. A 30 ml and a 50 ml bottle can share one.
Keep the first variable product small. Box size with Box of 6 and Box of 12 gives you two variations — enough to learn the whole process.
Attributes: global or custom
Global attributes are created once, under Products → Attributes, and reused on many products. Box size, with the terms Box of 6 and Box of 12, is a global attribute. Create it once, and every cupcake product in your shop can use it.
To create one, go to Products → Attributes. Type a name, for example Box size, and click Add attribute. Then click Configure terms next to it, add each term, and click Add new Box size after each one.
Custom product attributes are created on one product only, on that product’s Attributes tab. Use them for options that only make sense on one product — “Gift message: Yes / No” on a gift box — or for information the customer reads but does not select, such as “Material: 100% cotton”.
For the example in this guide, use a global attribute. Create Box size (Box of 6, Box of 12) under Products → Attributes first.
One warning: do not rename attribute terms after you have created variations from them. If you change “Blue” to “Navy” after the variations exist, the variations still point at the old term. Delete the variations and regenerate them after a rename, or the customer will see “Sorry, this product is unavailable. Please choose a different combination.”
How to add a variable product in WooCommerce, step by step
The example is Vanilla Cupcakes — Box of 6, with the Box size attribute (Box of 6 and Box of 12) — two variations. Substitute your own product and options as you go.
Step 1: Create the product and set the type to Variable product
Go to Products → Add New. Enter the product name — “Vanilla Cupcakes — Box of 6” — and write the long description, the same as for a simple product.
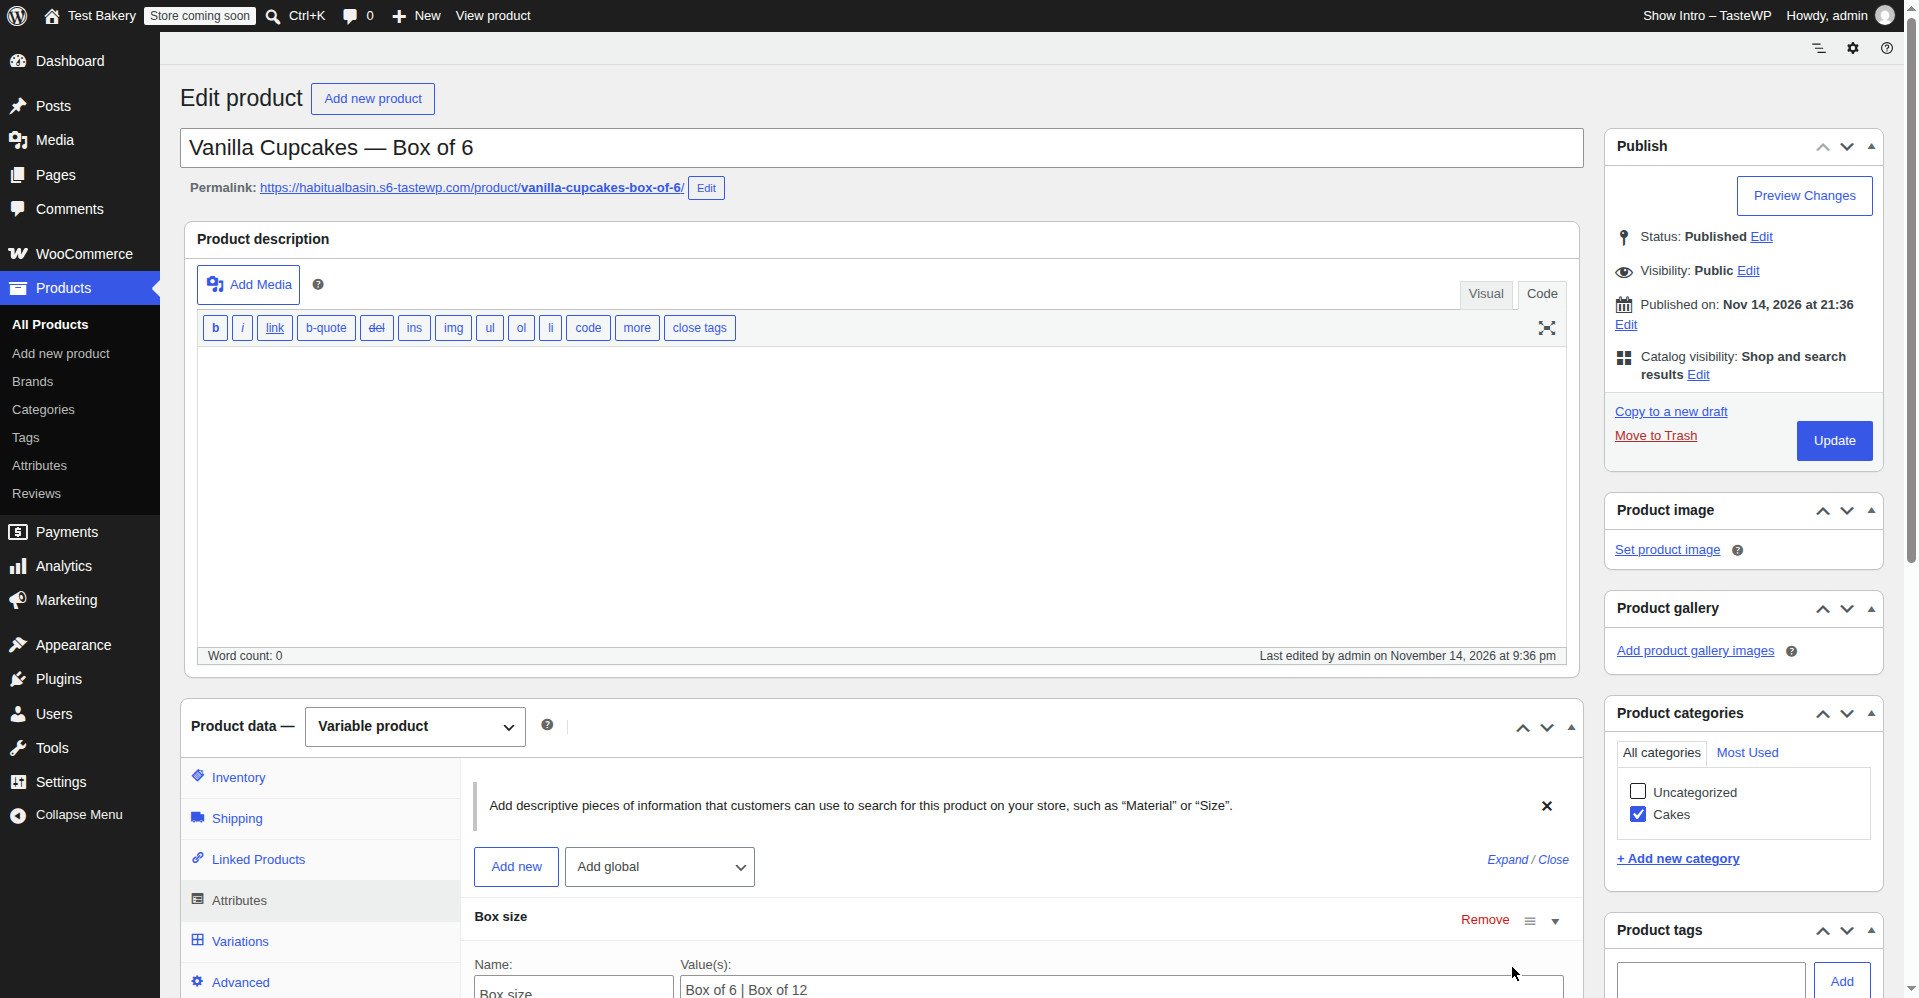
Scroll down to the Product data box. Change the dropdown from Simple product to Variable product. The General tab changes, because a variable product has no single regular price — the price lives on each variation — and a new Variations tab appears on the left. If it does not appear, the product type is not set to Variable product. Check that again. Leave Virtual and Downloadable alone for a normal physical product.
Step 2: Add the attributes
Click the Attributes tab. Use the Add dropdown, choose Box size, and click Add. Click inside the Value(s) box and choose the terms this product uses — Box of 6 and Box of 12. Click Select all if it uses every term.
For a custom attribute, choose Custom product attribute, click Add, type a name such as Gift wrap, and type the values separated by a vertical bar — Yes | No.
Step 3: Tick “Used for variations” — and save the attributes
For each attribute row, tick Used for variations. Then click Save attributes.
This checkbox is what most of the troubleshooting in this guide is about. Ticking it tells WooCommerce: “This attribute is a choice the customer makes.” Without the tick, WooCommerce treats the attribute as plain information. It shows up in the Additional Information tab as text — “Box size: Box of 6, Box of 12” — and no dropdown is created, no variations can be generated from it, and the customer cannot select anything.
The failure is silent. WooCommerce does not warn you. You save the product, open it on the front end of the shop, and there is no dropdown at all. If that is what you see, come back here, tick Used for variations, click Save attributes, and generate the variations again. Tick the box for every attribute you want as a dropdown — if you have three attributes and only tick two, the third will not appear as a choice.
Step 4: Create variations from all attributes
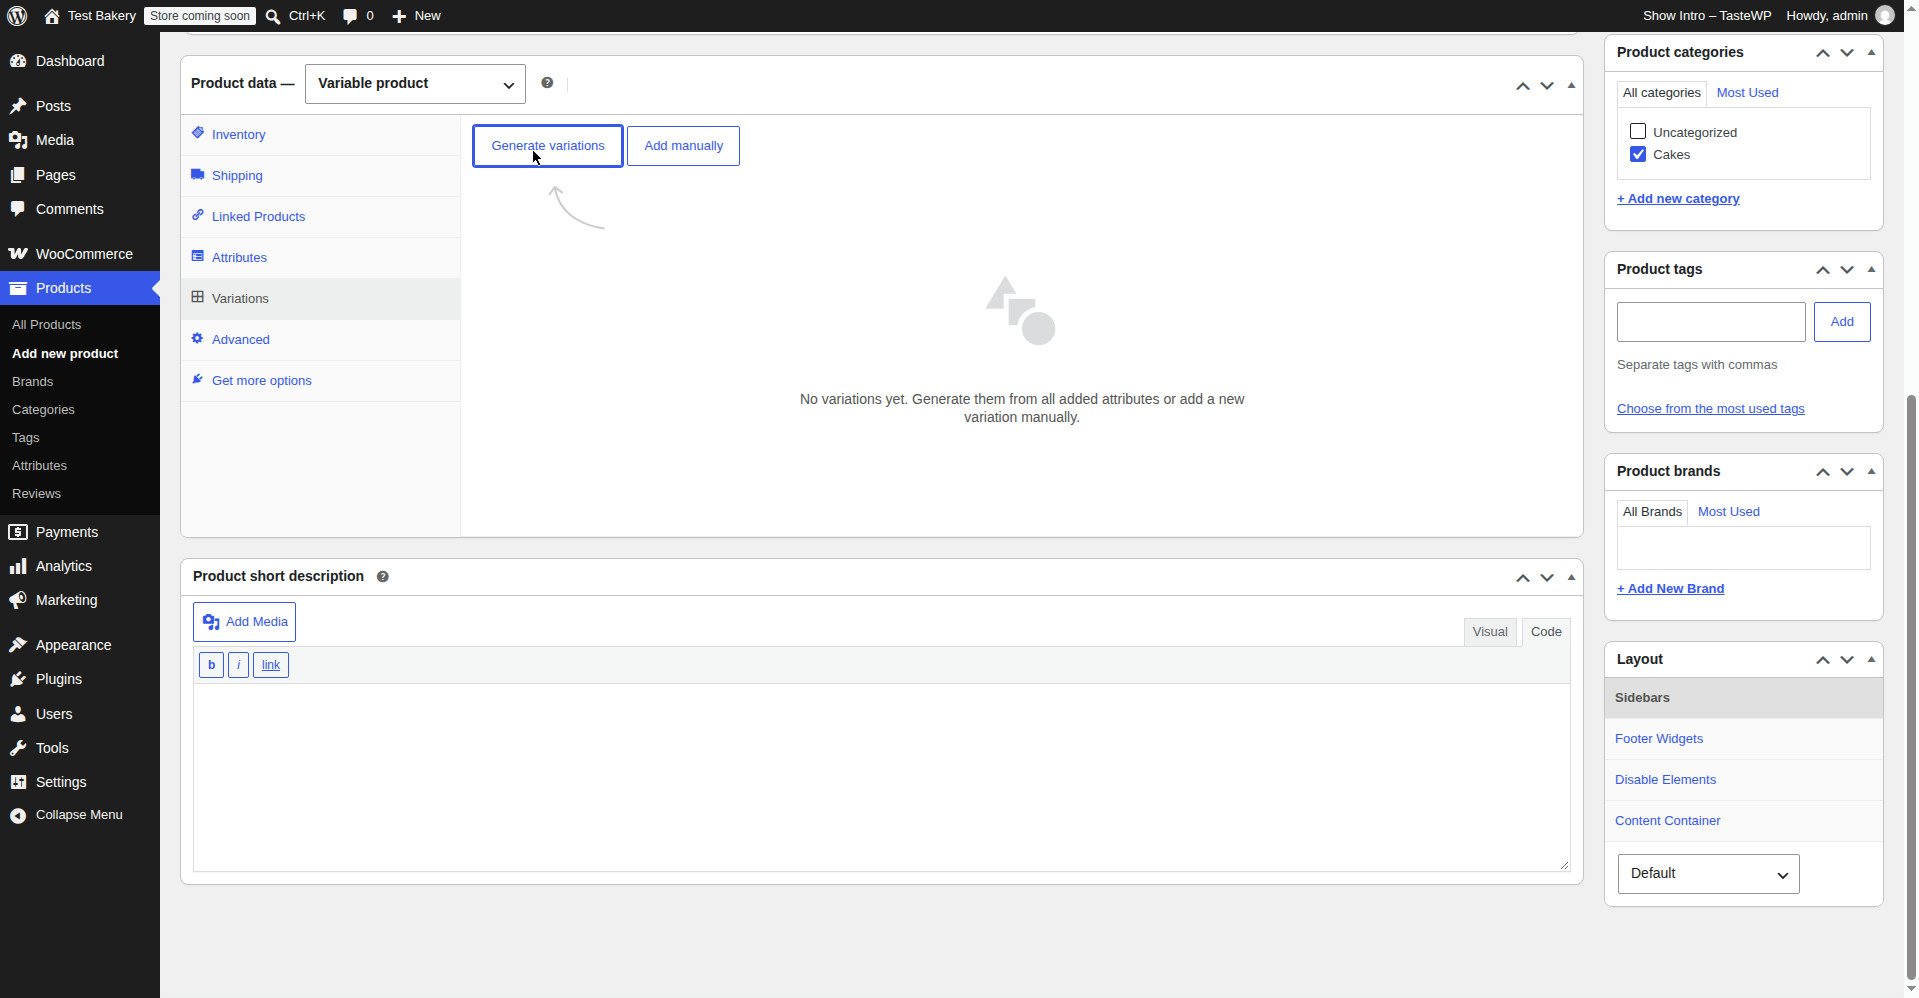
Click the Variations tab. It is empty the first time — that is normal. Change the dropdown at the top to Create variations from all attributes and click Go. Confirm when WooCommerce asks. It creates every combination: Box of 6 and Box of 12 — two variations, each as a row you can expand.
Two limits to know about:
- WooCommerce generates up to 50 variations per run. The constant is called
WC_MAX_LINKED_VARIATIONSand it is set to 50. If your attributes would make more than 50 combinations — 5 sizes × 4 colours × 3 materials is 60 — WooCommerce creates the first 50 and stops. Run Create variations from all attributes again for the next batch, or delete the combinations you do not actually sell. - If you only sell some combinations, do not generate all of them. Vanilla Cupcakes sold only as a Box of 6 and a Box of 12 need only those two variations. If you generate more anyway, you will have variations sitting there disabled. Generate all of them, then delete the ones you do not sell, or use Add variation to create only the combinations you need. Fewer, real variations are better than a long list of disabled ones.
Step 5: Give every variation a regular price
Expand the first variation. You will see Enabled (ticked), Regular price, Sale price, Stock status, SKU, Image, and more. Enter a Regular price.
This is not optional. A variation with no regular price does not appear in your shop. WooCommerce treats it as not purchasable and hides it — no price, no Add to Cart button for that combination, and no warning.
Do the same for every variation. If they are all the same price, use Bulk Actions in Step 7 instead of opening each one.
Enabled is ticked — an unticked variation stays in your admin list but is hidden from customers — and Stock status is “In stock” for variations you can sell. Prices and stock in detail are in how to set a sale price in WooCommerce.
Step 6: Set SKU, stock and weight per variation — only where they differ
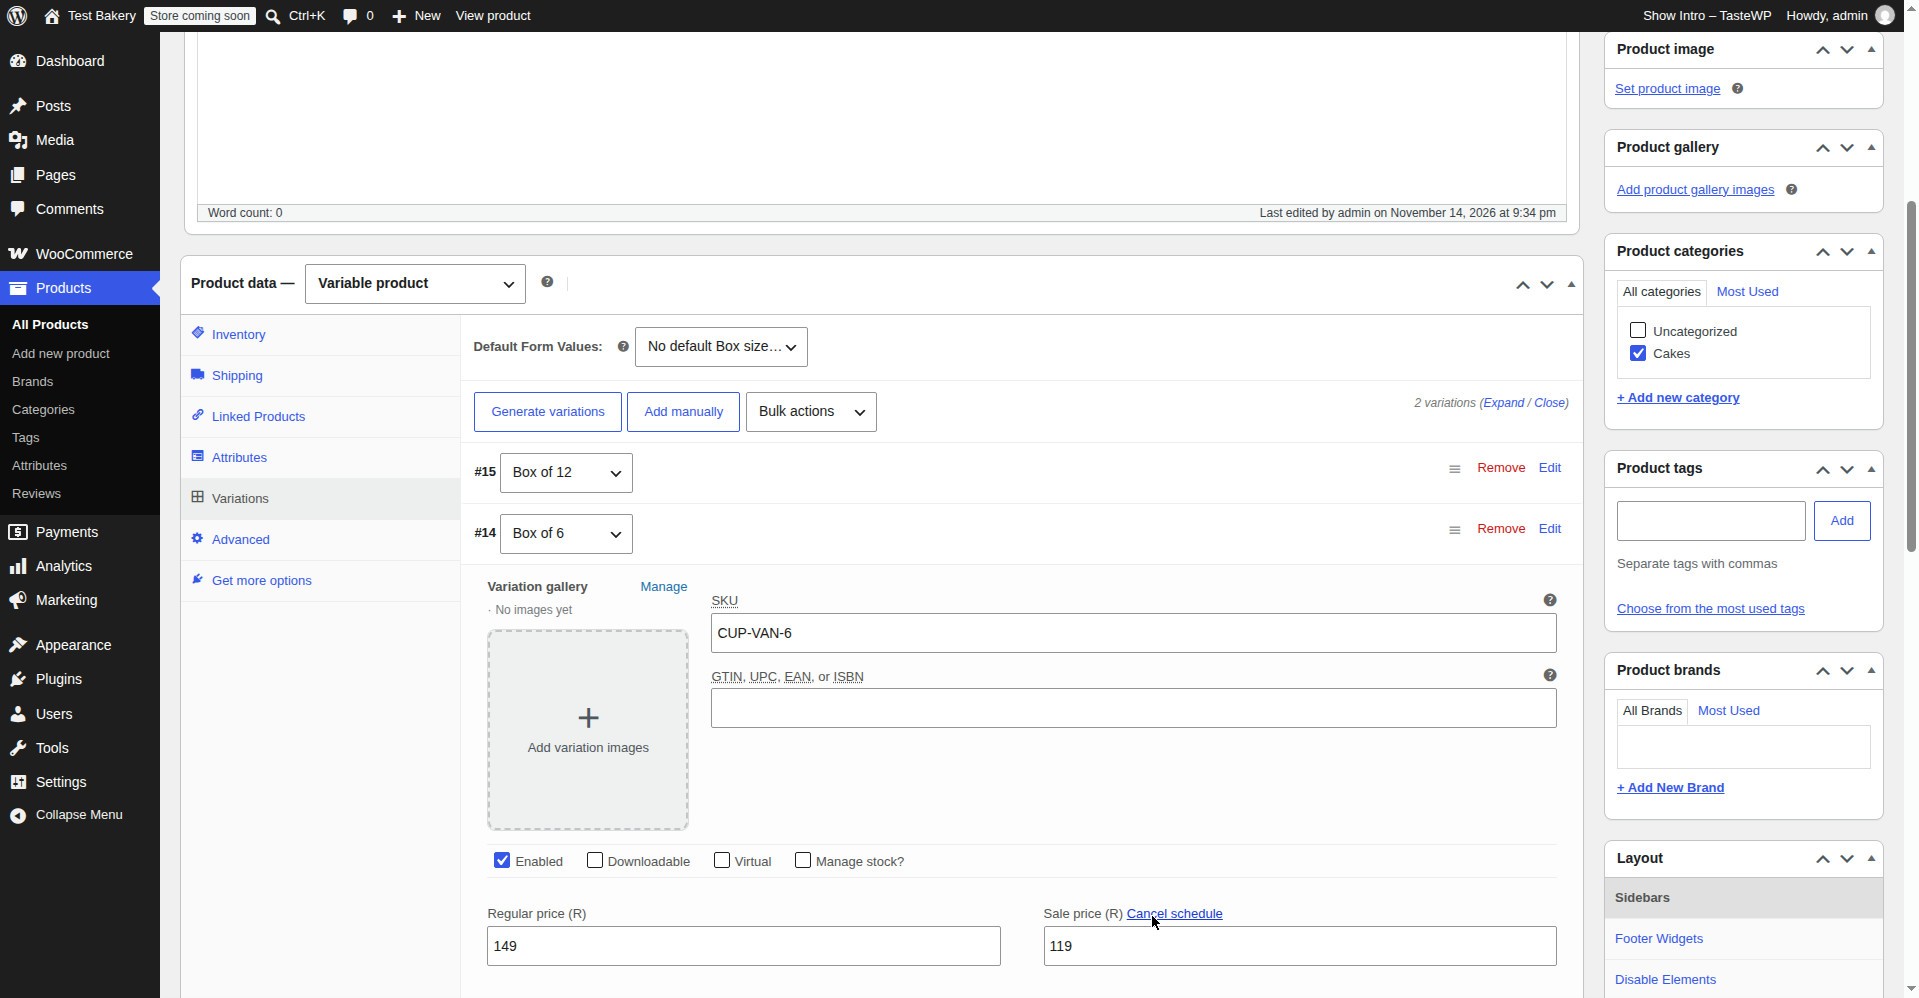
- SKU — a code for that exact variation, for example CUP-VAN-6 for the Box of 6 variation and CUP-VAN-12 for the Box of 12 variation. Two variations must not share a SKU. If you do not use SKUs, leave this blank.
- Manage stock — tick this only if you want WooCommerce to count stock for this variation separately, then enter a Stock quantity. The trap is doing half of it: a variation with stock management on and a quantity of 0 is out of stock and will not sell.
- Weight and dimensions — only if they differ per variation, for example a 50 ml bottle weighs more than a 30 ml bottle and costs more to ship.
Do not fill in every field on every variation because it is there. Price, stock and SKU are the three that matter; the rest are for when a variation genuinely differs.
Step 7: Use Bulk Actions to set prices on all variations at once
At the top of the Variations tab there is a Bulk actions dropdown. Choose Set regular prices, enter the price, and click OK. WooCommerce fills that price into every variation at once. Then expand the variations that should cost more or less and change them one by one.
The same dropdown does Set sale prices, Toggle “Enabled”, Set stock, and Delete all variations — the last one deletes every variation, with no undo, so only use it if you are about to regenerate them.
After any bulk action, click Save changes at the bottom of the Variations tab. Bulk actions change the fields on the screen, but they are not saved until you do.
Step 8: Add an image to each variation that looks different
Expand a variation and look for the Image field. Click it, choose a photo, and click Set variation image. Set an image when the variation looks different: vanilla and chocolate cupcakes, 30 ml and 50 ml bottles of the same perfume. Image sizes and cropping are covered in how to add product images in WooCommerce.
Step 9: Add the product image, category and short description — then publish
The rest is the same as a simple product, covered in full in how to add products in WooCommerce: Product image, the Product gallery, a Product category, and a Product short description of two or three sentences next to the price.
Then check the Publish panel. Catalog visibility should be Shop and search results, and Status should be Published. Click Publish, then click View product.
Check the product as a customer, in a private window while logged out — admin sees things customers do not.
- Does the Box size dropdown appear?
- Pick a combination. Does the price appear, and does it change for a different combination?
- Does the image change when you pick a different variation?
- Does the Add to Cart button appear only after you have picked every dropdown? That is correct. If the page says “Please select some product options”, you have not picked them all yet.
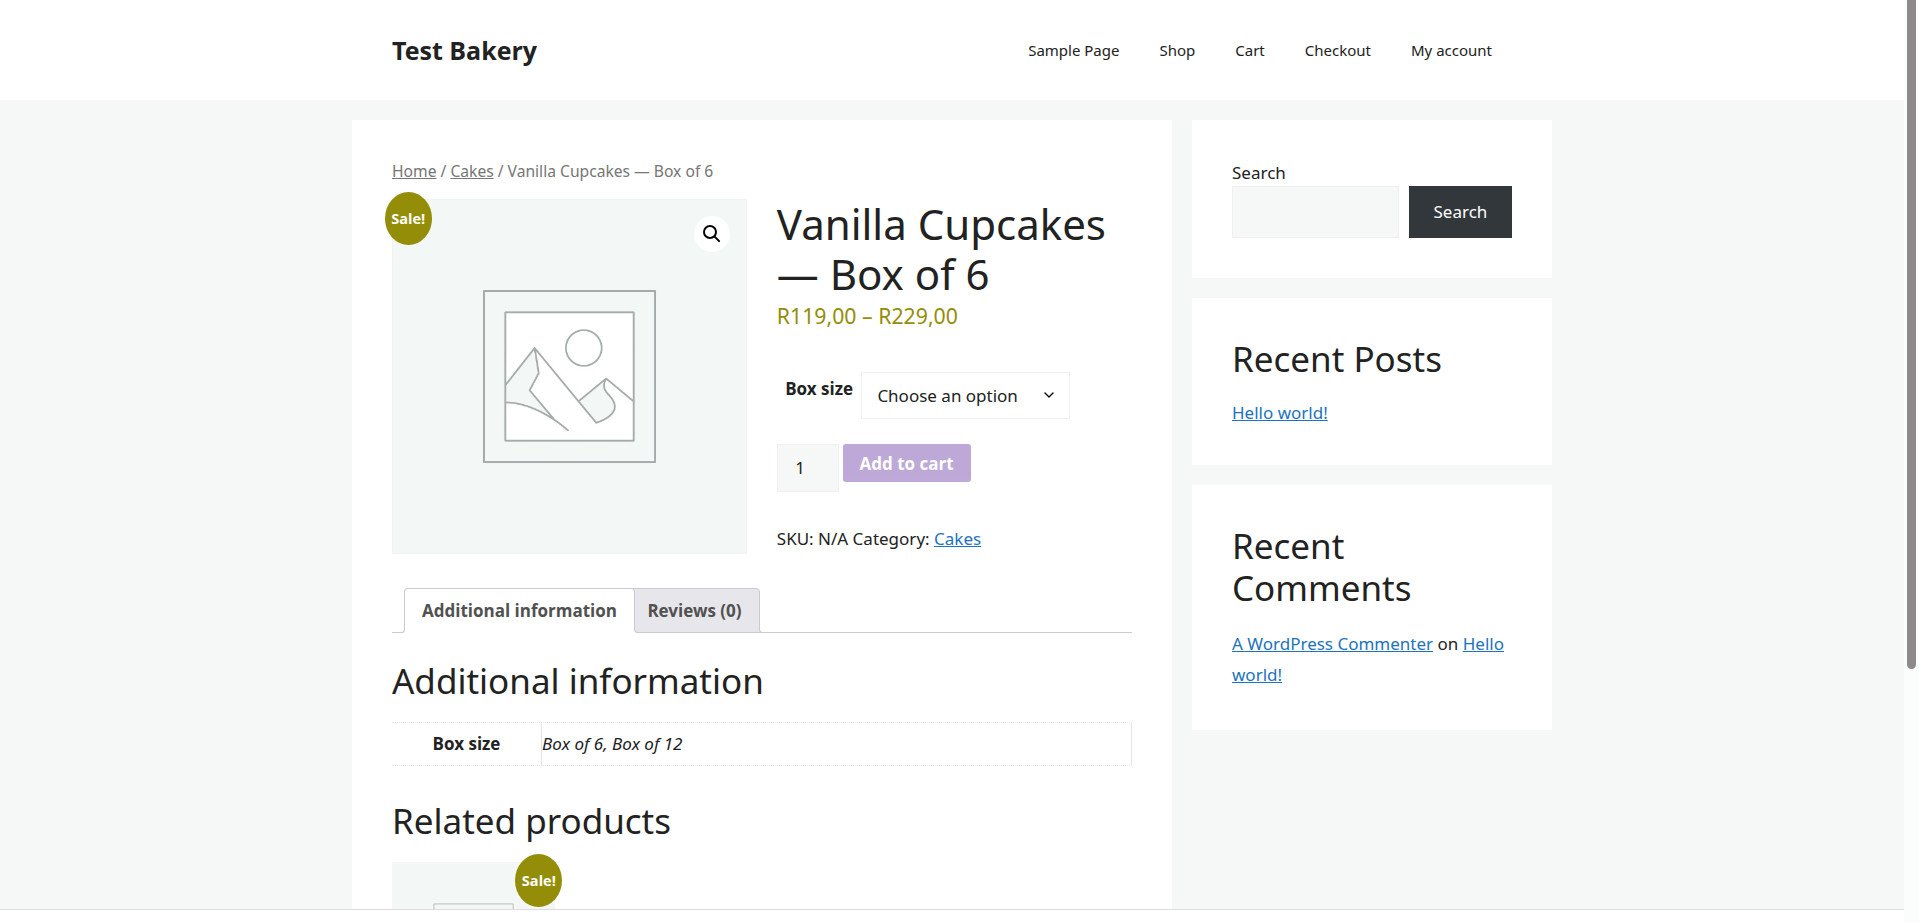
- Does the shop page show a price range — for example, “R119,00–R229,00” — instead of a single price? That is correct. The variations themselves only show on the product page.
What I tested — and what failed
What failed on the test install
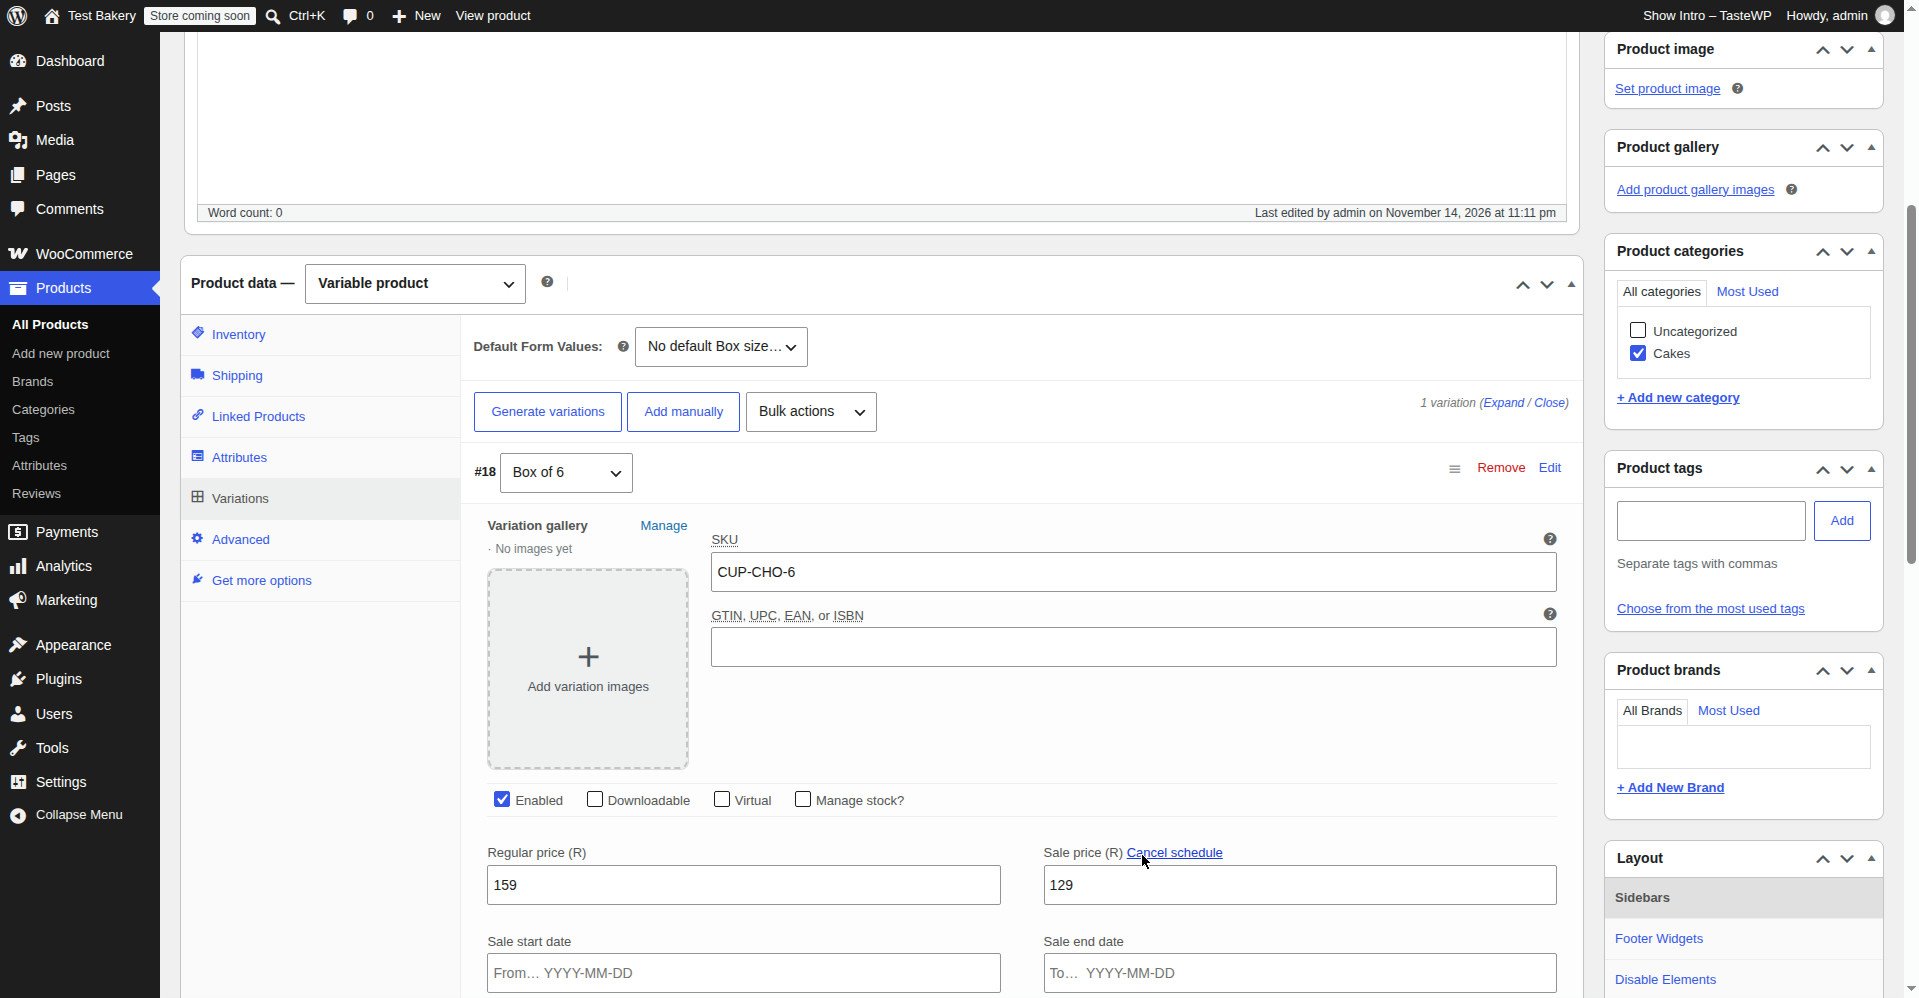
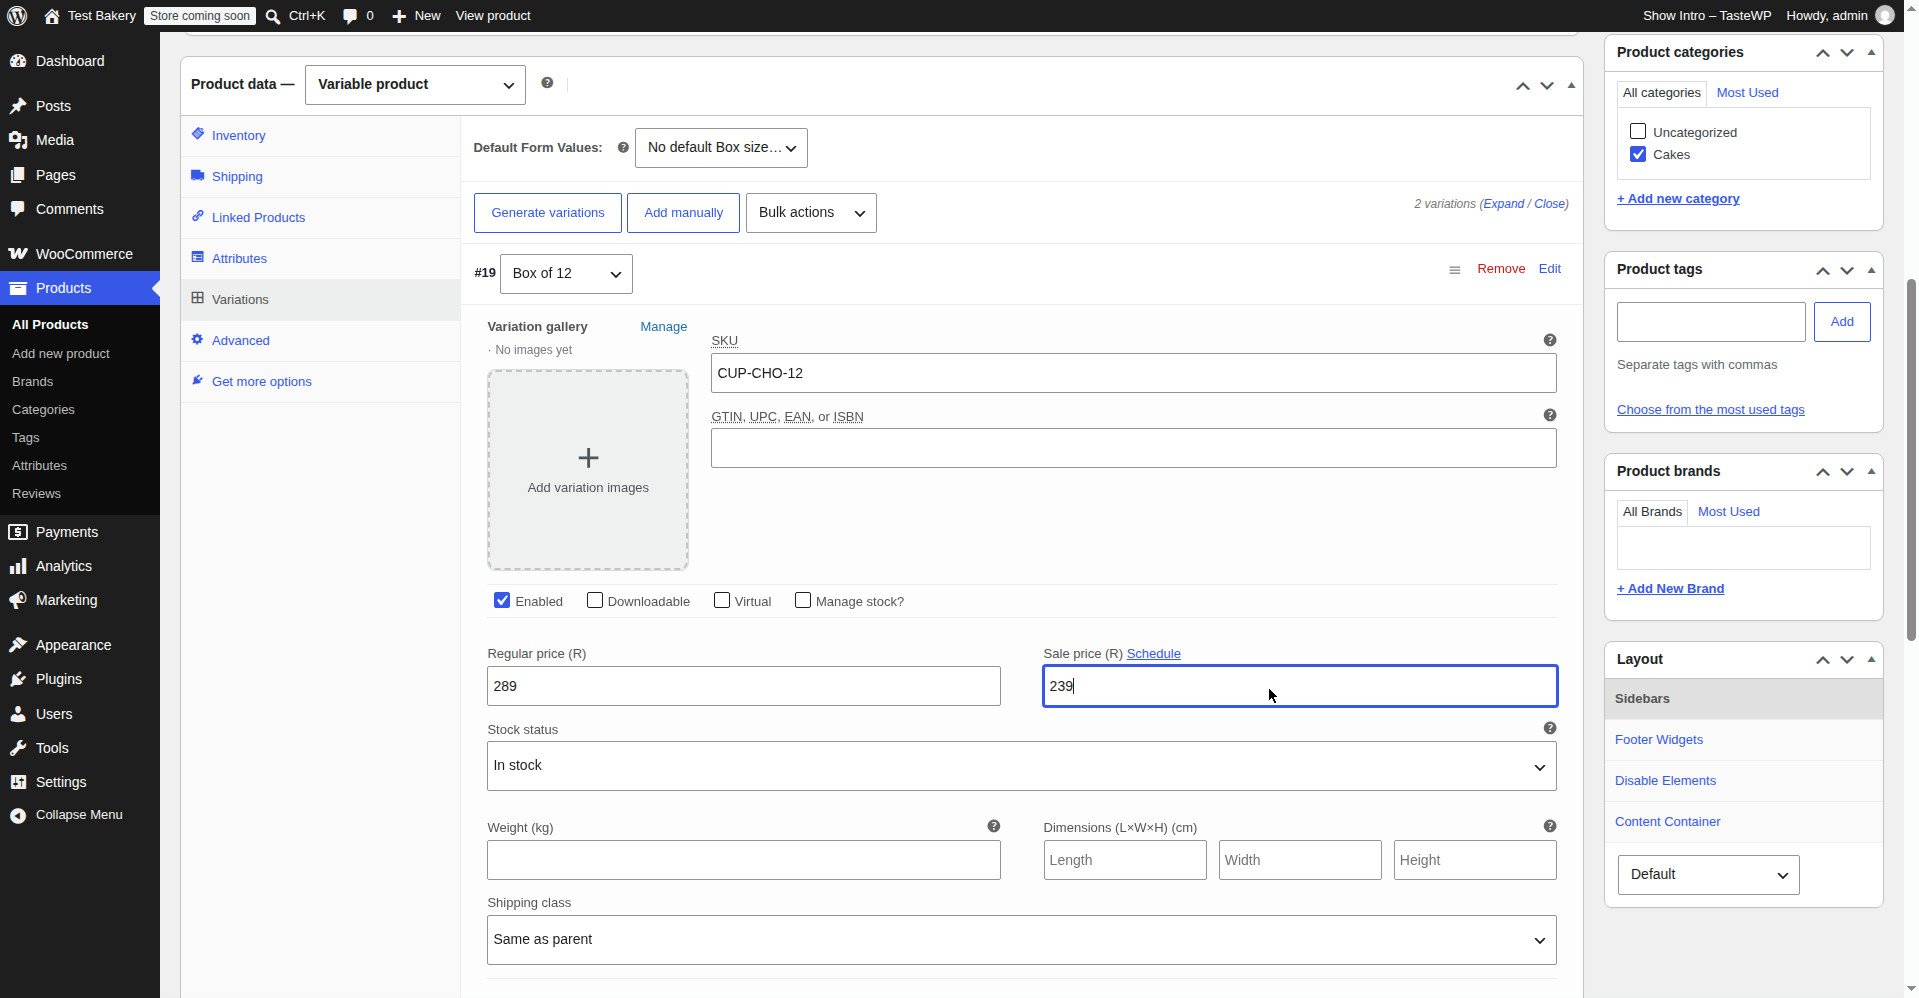
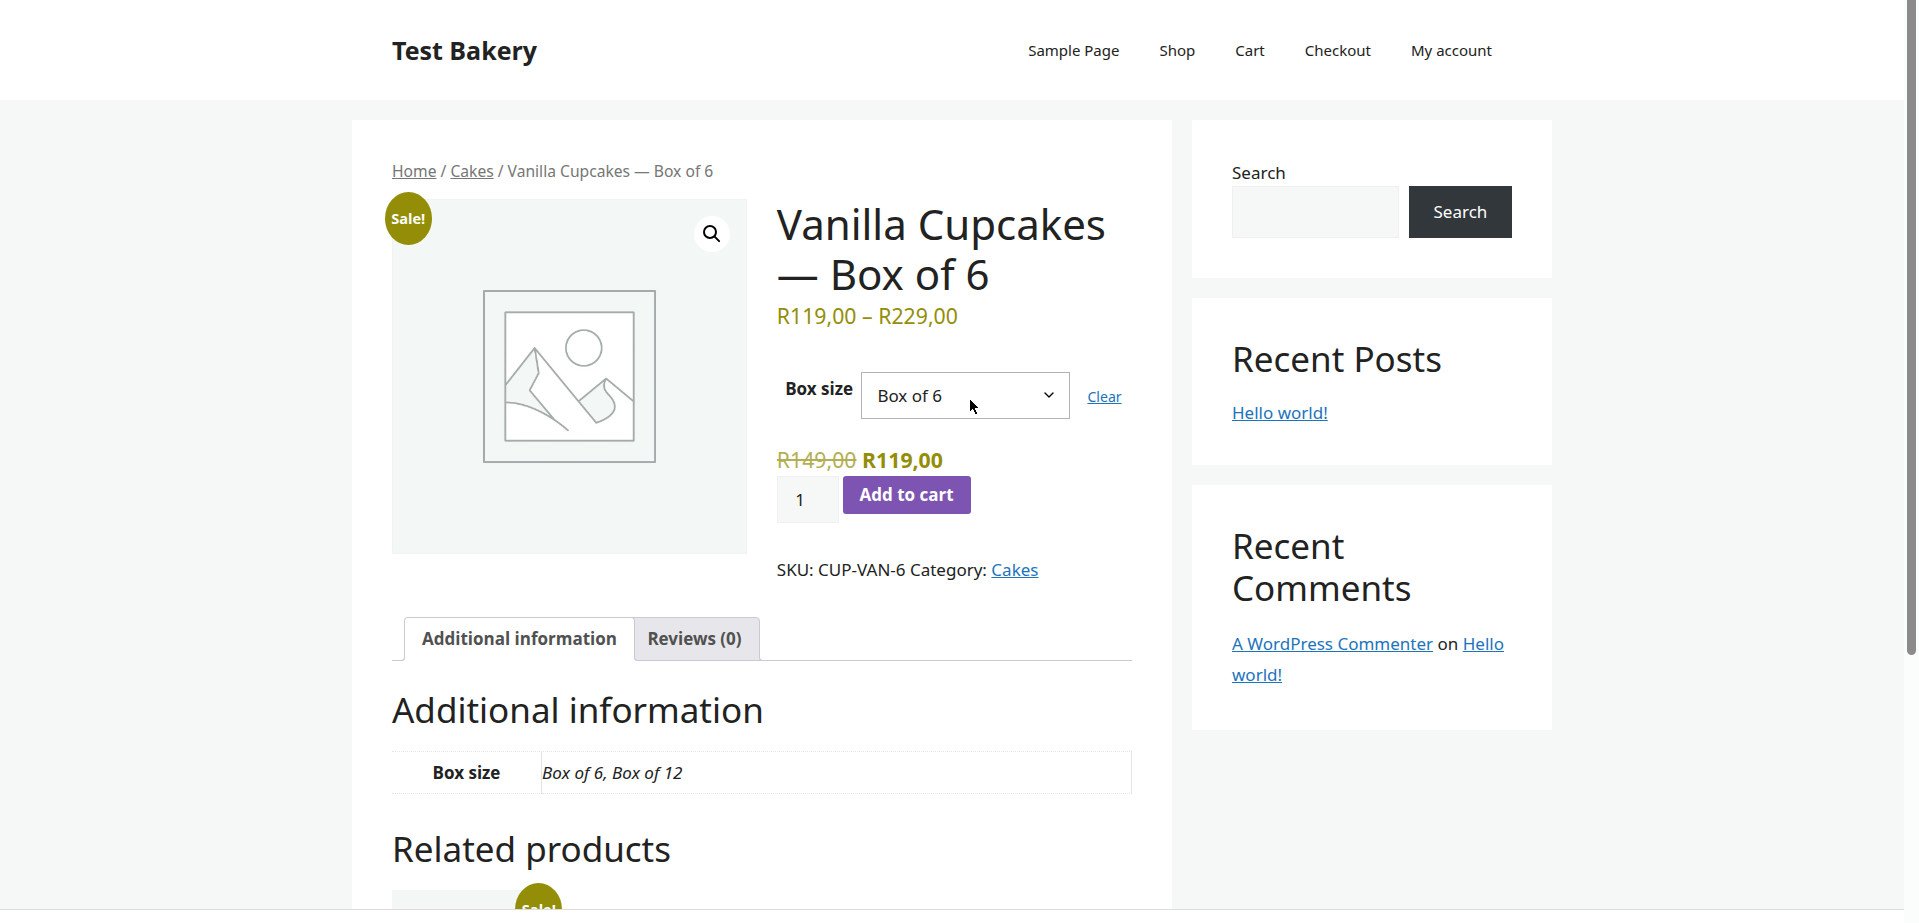
Two variable products were tested on the WordPress test install: Vanilla Cupcakes — Box of 6 (attribute “Box size”: Box of 6 | Box of 12) and Chocolate Cupcakes — Box of 6. Vanilla: Box of 6, SKU CUP-VAN-6, Regular price 149, Sale price 119; Box of 12, SKU CUP-VAN-12, Regular price 279, Sale price 229, with the sale scheduled 14–30 November 2026. Chocolate: Box of 6, SKU CUP-CHO-6, Regular price 159, Sale price 129; Box of 12, SKU CUP-CHO-12, Regular price 289, Sale price 239. On the front end, the Vanilla product shows R119,00–R229,00 with a Box size selector, and with Box of 6 chosen it shows R149,00 struck through and R119,00, SKU CUP-VAN-6.
What failed on the first attempt: “Generate variations” and “Add manually” did nothing until the product was first saved as a draft, and the bulk “Generate variations” flow never created the variations automatically — both variations were added manually. The screenshots in this guide show the tested cupcake products, and the step-by-step text follows the same tested Vanilla Cupcakes product.
Tests to run, on the Vanilla Cupcakes example (Box size: Box of 6, Box of 12):
- Variation with no price. Give a price to one variation, leave the other blank, save, and check the product page in a private window. Is the unpriced combination hidden, or does it show with no price?
- “Used for variations” unticked. Add Box size but do not tick “Used for variations”, save, and check the product page. Is there a dropdown at all?
- The 50-per-run cap. If the test product has enough combinations to exceed 50, run Create variations from all attributes once and count how many were created. Did WooCommerce stop at 50? Then run it again and record whether the next batch appears.
- More than 30 variations on the front end. If the test product has more than 30 variations, check the dropdowns in a private window: do they update each other, or do all options show at once?
Record the one thing that did not work on the first attempt, what caused it, and the fix — with before and after screenshots. If nothing failed, say so plainly and show the working result instead.
Always do your final check in a private window, logged out. If the dropdowns, the price and the Add to Cart button all behave, the product is ready.
Troubleshooting: WooCommerce variations not showing
Work through this table top to bottom. Check one row, test the product page again in a private window, then move to the next.
| Symptom | Likely cause | Fix |
|---|---|---|
| No dropdown at all, just a normal Add to Cart button | Product type is not Variable product, or the attribute is not marked for variations | Set Product data to Variable product; tick Used for variations for each attribute, click Save attributes, regenerate the variations |
| Dropdown shows for one attribute but not another | That attribute’s Used for variations box is unticked | Tick it for that attribute, click Save attributes, regenerate the variations |
| Dropdown shows, but it is empty, or some combinations are missing | No variations were created, or the missing ones are disabled, out of stock, or have no price | Create the missing variations, tick Enabled, set Stock status to In stock, give every variation a Regular price |
| A variation is in the dropdown but has no price and cannot be added to cart | That variation has no Regular price | Expand that variation, enter a Regular price, click Save changes — or use Bulk Actions → Set regular prices |
| “Please select some product options” will not go away | The customer has not picked every dropdown, or a variation is disabled / out of stock for that combination | Pick every dropdown. If one combination still will not select, check that variation: Enabled, price, stock status |
| “Sorry, this product is unavailable. Please choose a different combination” | The chosen combination has no matching variation — often after attribute terms were renamed, or the variation was deleted | Check the variation exists for exactly that combination; if terms were renamed, delete and regenerate the variations |
| Half the variations vanished after saving | PHP max_input_vars limit — the server dropped form fields on save | Check WooCommerce → Status → Server environment → PHP Max Input Vars (default is typically 1000). If it is low, ask your host to raise it, or save the variations in smaller batches |
| More than 50 combinations, but only 50 variations were created | WooCommerce creates up to 50 variations per run | Run Create variations from all attributes again for the next batch, or delete the combinations you do not sell |
| More than 30 variations, and the dropdowns no longer filter each other | WooCommerce switches to static dropdowns above 30 variations by default | This is expected, not a bug. All options show at once. The threshold can be changed with code (woocommerce_ajax_variation_threshold), but only if you are comfortable editing code |
| Product shows a price range on the shop page, but no variations | That is normal — variations only show on the product page, never on the shop page | Do not try to fix it. If customers ask, add one line to the description: “Choose your box size on the product page.” |
| Variation image does not change when a different variation is picked | No image set on that variation, or the theme overrides the gallery | Set an image on that variation (Step 8). If it still does not change, check with a default theme whether the theme is the cause |
| Whole product vanished from the shop | All variations are out of stock, and the store hides out-of-stock items | Set at least one variation to In stock, or untick Hide out of stock items from the catalog under WooCommerce → Settings → Products → Inventory |
| Add to Cart button not showing on a variable product | No variation is purchasable — no price, all disabled, or all out of stock | Work through the rows above: price, Enabled, stock status, on every variation |
If you have worked through the whole table and the variations still do not show, go to WooCommerce → Status → Tools and click Regenerate next to Product lookup tables, then check again in a private window. If the product has more than 30 variations, also check whether the dropdowns are behaving as described above.
How many variations should one product have? There is no hard limit, but keep it under 30 if you can — the dropdowns update dynamically, the page stays fast, and customers are not overwhelmed by choice.
Frequently asked questions
How do I create a variable product in WooCommerce?
Go to Products → Add New, set Product data to Variable product, add your attributes on the Attributes tab, tick Used for variations for each one and click Save attributes, then go to the Variations tab, choose Create variations from all attributes and click Go. Expand each variation, give it a regular price, stock status and image if needed, click Save changes, and publish.
Why are my WooCommerce variations not showing?
The most common reasons, in order, are: the product is not set to Variable product; the attribute is not ticked Used for variations; a variation has no price, is disabled, or is out of stock; or the variations were never created. Work through the troubleshooting table above, one row at a time.
Why is there no Add to Cart button on my variable product?
Because no variation is purchasable yet. Either the customer has not picked every dropdown — WooCommerce only shows Add to Cart once a full combination is chosen — or no variation is purchasable at all: check price, Enabled tick, and Stock status: In stock.
Do variations show on the shop page?
No. The shop page shows the product once, with a price range — for example, “R119,00–R229,00” — and the dropdowns only appear on the product page itself.
How many variations can WooCommerce handle?
There is no hard limit, but WooCommerce creates up to 50 variations per run from Create variations from all attributes, and the front-end dropdowns stop updating dynamically above 30 variations by default. Performance also matters: hundreds of variations make the product page slow to save and slow to load.
What is the difference between a global and a custom attribute?
A global attribute is created once under Products → Attributes and reused on many products — Box size. A custom attribute is created on one product only, and is a good fit for options that only belong to that product.
What to read next
- How to add products in WooCommerce — the simple product, the foundation this guide builds on.
- How to set a sale price in WooCommerce — sale prices, sale schedules, stock per variation and SKUs in detail.
- How to add product images in WooCommerce — image sizes, galleries, and a different image for each variation.
- How to import products in WooCommerce with CSV — adding many products at once from a spreadsheet, including variable products with parent and child rows.
Written by Mohd Shah Ahmad, Learn WordPress Online. He builds and runs live WooCommerce stores in Pretoria, and manages the live stores Stanley’s Bakery (stanleysbakery.co.za) and Aaliyah Perfumes (aaliyahperfumes.co.za). Tested on a WordPress test install — see the “Tested on” box at the top.