
Quick answer
This is part of the Build a WooCommerce Store hub, which walks through setting up your shop, adding products and taking payments. Orders only exist once the store is running, so start with how to set up WooCommerce for the first time if you have not done that yet; the orders themselves come from the products you sell and the discounts you offer — see how to add coupon codes in WooCommerce — and the delivery side is covered in how to set up WooCommerce shipping zones. To manage orders in WooCommerce, go to WooCommerce → Orders. Every order has a status: Pending payment (waiting for payment), Processing (paid, being prepared), On hold (payment needs checking), Completed (delivered or fulfilled), Cancelled, Refunded, or Failed (payment did not go through). Open an order to change its status, refund it, add a note, or resend the customer email. You can change several orders at once with Bulk actions. Place a test order yourself and watch it move through each status — this guide does exactly that.
Two corrections from this guide’s test, because the textbook version is wrong on both. First, a cash-on-delivery order does not sit on Pending payment waiting for you — it passes through Pending payment the moment it is placed and arrives on Processing by the time you open it. Second, no order email was delivered in this test at all — the test host has no working mail function, so every order email failed. The order management itself was tested end to end; the emails were not.
Tested on: WordPress 7.1.4 · WooCommerce 11.3.0 · Theme: GeneratePress 3.6.1 · PHP 8.4.27 · Test store “Righteous Bit”, currency ZAR · Product “Test Product R499”, R499.00, stock 20 · Shipping zone “South Africa”, Flat rate R50 · Tested 15 November 2026 on a WordPress test install. HPOS (the custom orders table) is ON by default.
What you need before you start
- WooCommerce installed and set up — country, currency and a Shop page in place. If you have not done that yet, see how to set up WooCommerce.
- At least one product, priced and in stock — how to add products in WooCommerce.
- A payment method you can test with. Cash on delivery works for learning the statuses, because you control when the order moves. A PayFast test-mode order was not tested in this guide — the gateway reported “Invalid Payfast credentials” on the test install and was never offered at checkout — so the paid-order flow below is described from the cash-on-delivery test only.
- A test install, not your live store — test orders there create real orders and emails.
In WooCommerce 11.x, orders are stored in the custom orders table (HPOS), and the Orders screen is WooCommerce → Orders. On a much older WooCommerce version, the screen may look different.
How to manage orders in WooCommerce, step by step
Step 1: Place a test order the way a customer would
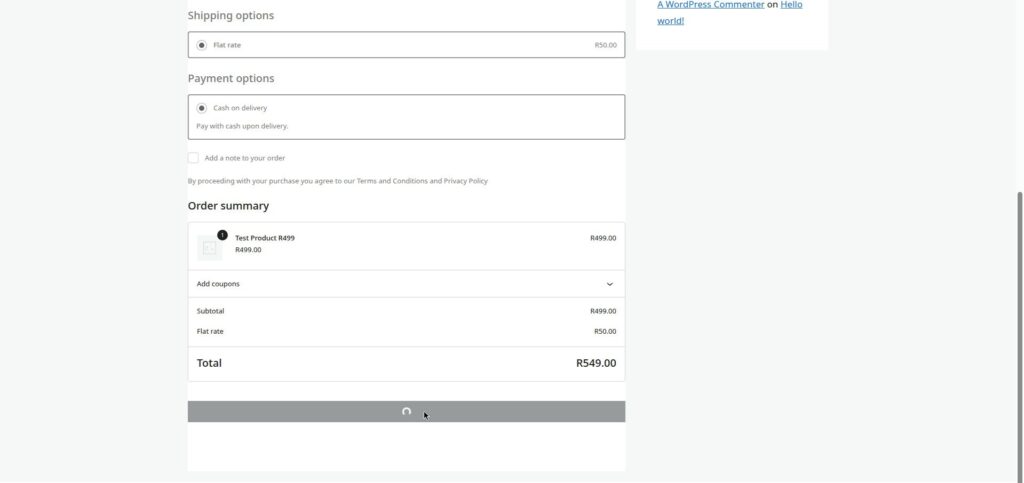
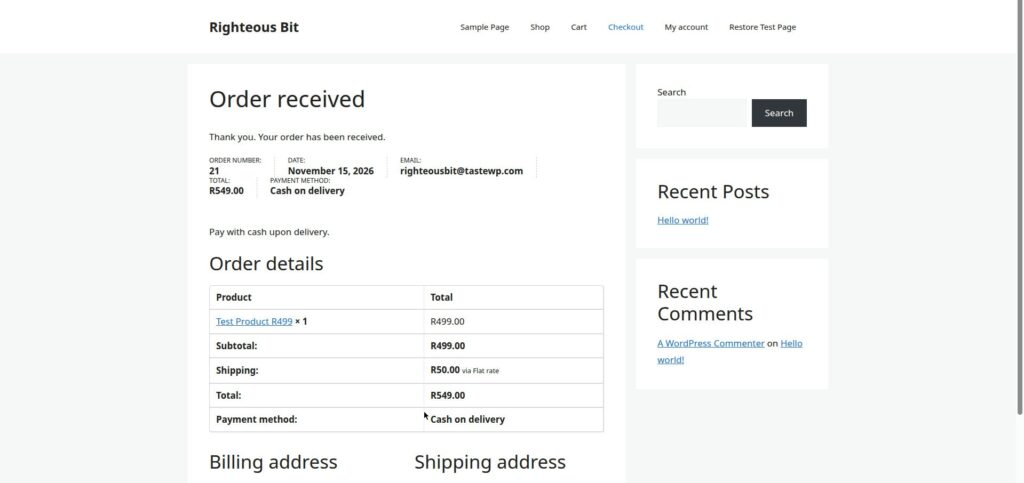
Open your test shop as a customer, add your test product to the cart, go to checkout, fill in a test name, address and email address you control, choose Cash on delivery, and place the order. Write down the order number on the confirmation page — you will follow this order through every step below.
In this test the product was “Test Product R499” at R499.00, with Flat rate shipping of R50, for a total of R549.00. The order placed was Order 21. A private window is the cleanest way to browse as a customer; the browser used for this test has no private window, so the orders were placed in the normal window as a guest checkout.
Step 2: Find the order in WooCommerce → Orders
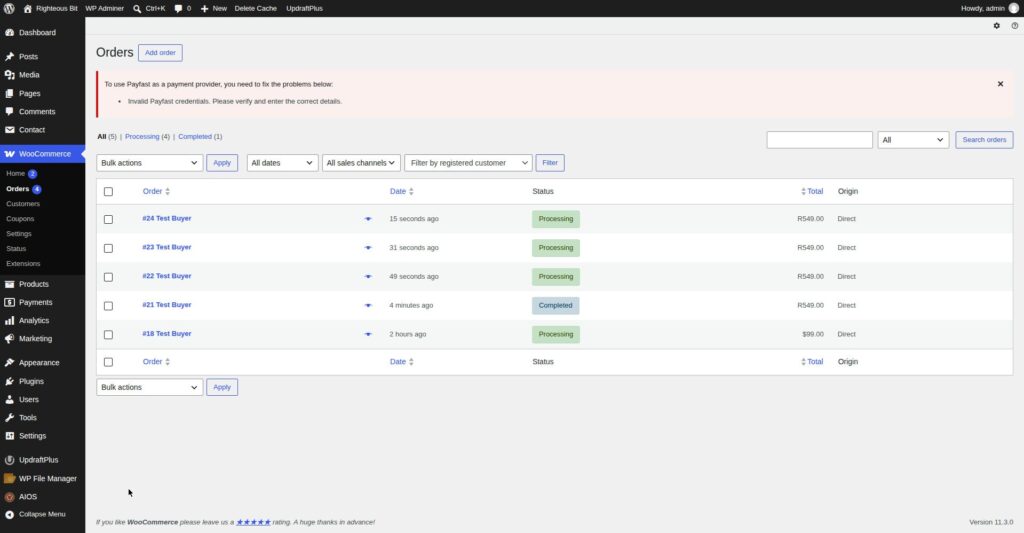
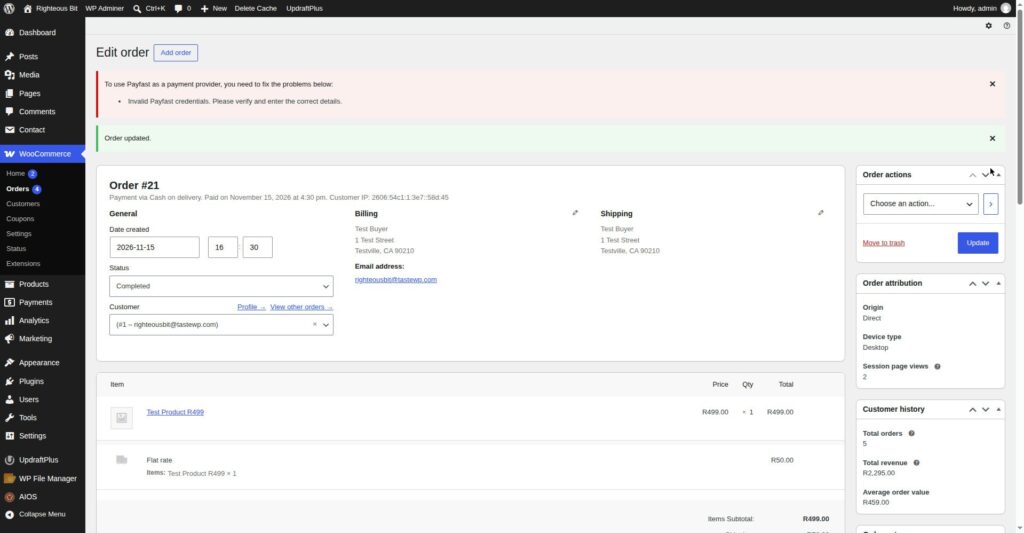
In the dashboard, go to WooCommerce → Orders. Find your test order in the list. Correction from this test: its status will not be Pending payment. Order 21 was already on Processing when it was opened — the Order notes recorded “Payment to be made upon delivery. Order status changed from Pending payment to Processing.” A cash-on-delivery order passes through Pending payment automatically the moment it is placed. Click the order number to open it.
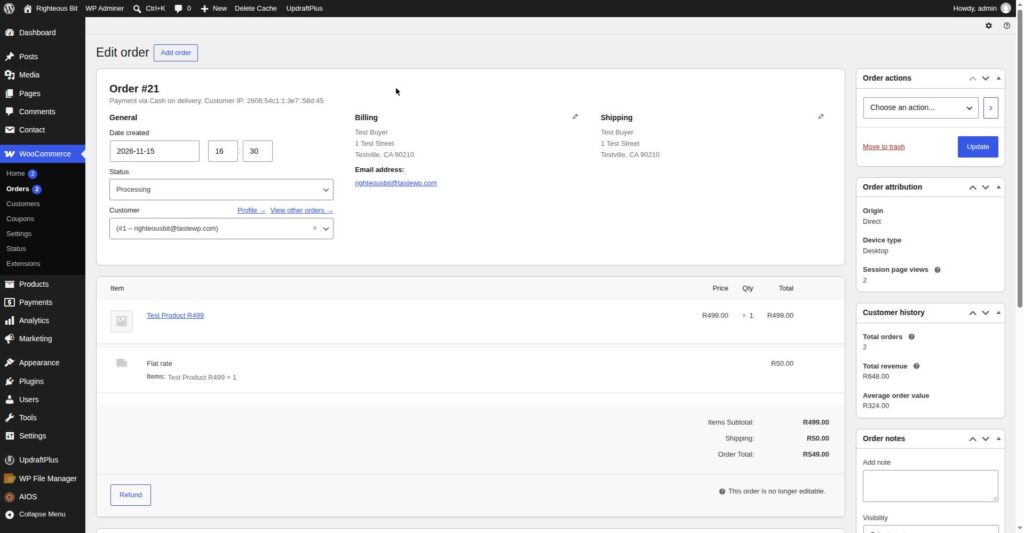
The order screen has three parts: General (customer details and status), Items (products and prices), and Order notes (a log of everything that happened to the order).
Step 3: Learn every order status
These are the seven statuses WooCommerce uses. Learn them once and the whole Orders screen makes sense.
| Status | What it means | What to do next |
|---|---|---|
| Pending payment | Order placed, payment not confirmed yet | Wait for payment, or cancel it |
| Processing | Payment received, order being prepared | Pack it; move to Completed when sent |
| On hold | Payment needs checking before you proceed | Check the payment, then move to Processing or Cancelled |
| Completed | Order delivered or fulfilled | Nothing — the order is done |
| Cancelled | Cancelled by you or the customer, or never paid | Nothing — stock held for the order is released |
| Refunded | Payment returned to the customer | Nothing — check the refund went through |
| Failed | Payment failed or was declined | Contact the customer to try again, or cancel the order |
A normal order travels Pending payment → Processing → Completed. On hold is a pause in the middle, and Cancelled, Refunded and Failed are the exits when something goes wrong. For cash on delivery, the Pending payment stage happens automatically at checkout — you will normally first see the order on Processing.
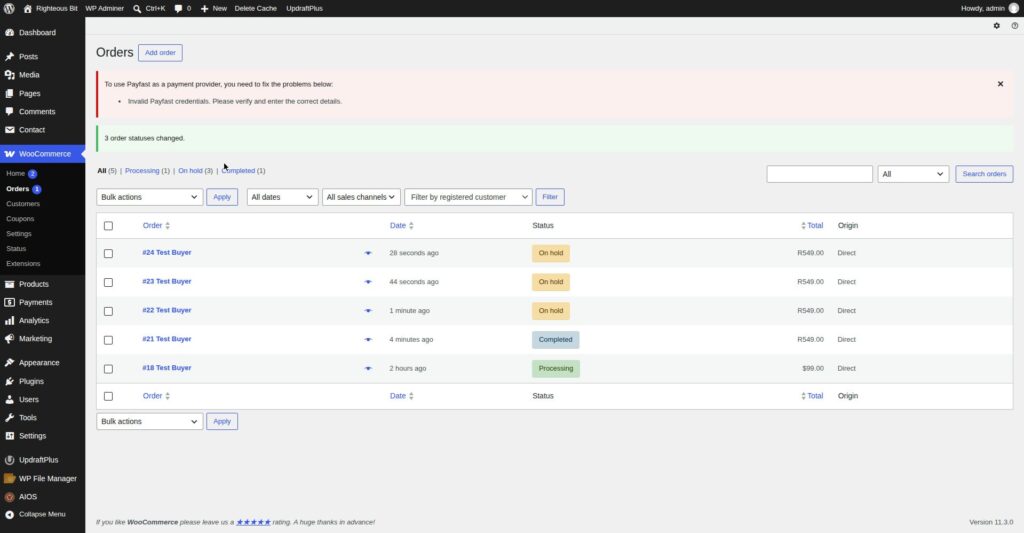
The seven statuses are also the filter links at the top of the Orders list (visible in the screenshot in Step 2): All, Pending payment, Processing, On-hold, Completed, Cancelled, Failed, Refunded.
Step 4: Move the order through its lifecycle
Open your test order. In the General section, the Status dropdown shows the current status. Change it and click Update. WooCommerce records each change in Order notes and — on a host where mail works — sends the customer the matching email.
In this test, Order 21 was moved from Processing to Completed by changing the dropdown and clicking Update. The Order notes recorded “Order status changed from Processing to Completed.” and the order showed “Paid: R549.00” and “November 15, 2026 via Cash on delivery”. Order 22 was moved through the same steps. A paid gateway order was not tested — PayFast reported invalid credentials on the test install and was never offered at checkout, so this guide cannot say from its own test whether a PayFast order lands on Processing automatically.
Step 5: Change order status in bulk
When several orders need the same change, do not open each one. On WooCommerce → Orders, tick the checkbox next to each order, open Bulk actions, choose the status change — for example Change status to on-hold or Change status to processing — and click Apply. Check the list after: a wrong tick means the wrong order changes status, so read the list once before you click Apply, and once after.
In this test, Orders 22, 23 and 24 were changed to On-hold in one bulk action, and the list confirmed “3 order statuses changed.” They were then changed back to Processing the same way.
Step 6: Refund an order — full and partial, with restock
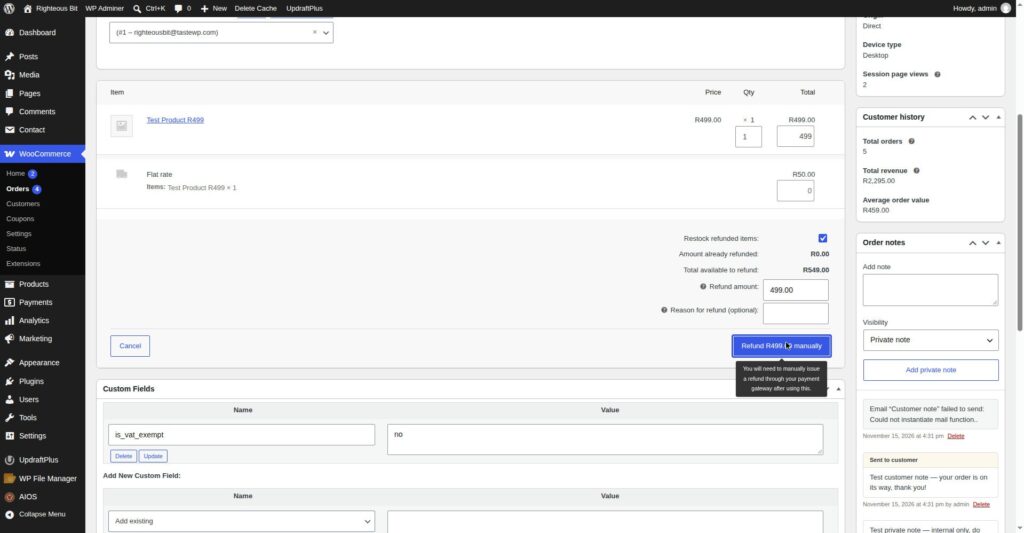
Not completed in this test. The refund panel was opened and filled in, but the refund itself was never recorded — the browser used for this test dismissed WooCommerce’s confirmation step, so no refund went through and no order changed to Refunded. The panel below is real; the completed refund is not.
Refunds only apply to orders that were actually paid. If an order is still Pending payment, there is no payment to return — cancel it instead.
To refund a paid order, open it, scroll to Items, and click Refund. Enter the amount: a full refund is the whole order total, and the status changes to Refunded; a partial refund is part of the total — one item from a two-item order, or a discount you agreed with the customer. If the product is coming back, tick Restock refunded items before you confirm — otherwise the stock stays reduced and the product can show as out of stock.
Then click the refund button: for a gateway payment this sends the money back through the gateway; for cash on delivery, record it as a manual refund. Order notes logs the refund, the amount, and whether items were restocked.
In this test the panel showed “Refund R499.00 manually” for the cash-on-delivery order, “Restock refunded items” ticked by default, and “Total available to refund: R549.00”. The button was clicked, but the browser dismissed the confirmation dialog and no refund was recorded. A human in a normal browser should be able to complete it — the panel itself works. Because no refund was recorded, the restock behaviour was not confirmed in this test either.
Step 7: Deal with failed and cancelled orders
A Failed order means the payment did not go through — the card was declined, the customer closed the payment page, or the gateway rejected it. Contact the customer, ask them to try again or use a different payment method. If they do not want to continue, change the status to Cancelled. A failed payment was not triggered in this test, so the Failed row is documentation, not a tested result.
A Cancelled order will not be fulfilled — the customer changed their mind, you could not supply the item, or payment never arrived. Cancel it by changing the status to Cancelled; any stock held for it is released. This was tested: Order 24 was cancelled, and the held stock came back — the product stock went from 16 back to 17. Do not delete failed or cancelled orders — a customer who comes back asking about a payment will need that order number.
Step 8: Add order notes and resend order emails
Open any order and scroll to Order notes. There are two kinds: a Private note, which only you and your staff see — “customer phoned, will collect on Friday”; and a Note to customer, which the customer gets by email — delivery updates, or an answer to a question about their order. Type the note, choose the kind, and click Add note.
Both were tested. The private note — “Test private note — internal only, do not send to customer.” — stayed staff-only. The customer note — “Test customer note — your order is on its way, thank you!” — was sent, and appears in the notes list under a yellow “Sent to customer” header.
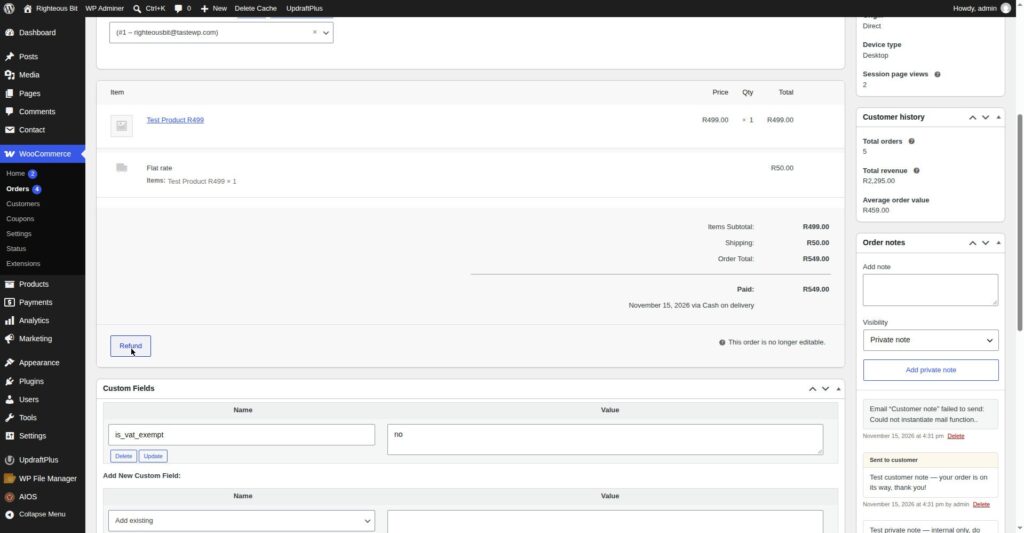
If a customer never got their confirmation email, use the Order actions dropdown to resend it, then check that it arrived. The dropdown on WooCommerce 11.3.0 offers “Send order details to customer”, “Resend new order notification” and “Regenerate download permissions” (visible at the top right of the order screen in the Step 4 screenshot).
But in this test, no order email was delivered at all. Every order email failed with the same message: “Could not instantiate mail function.” The test host provides no working mail function. The resend actions exist and were listed, but the emails they trigger could not be delivered here. If order emails keep going missing on your own store, the problem is usually email delivery — see how to fix WordPress not sending email.
Step 9: Check what the customer sees
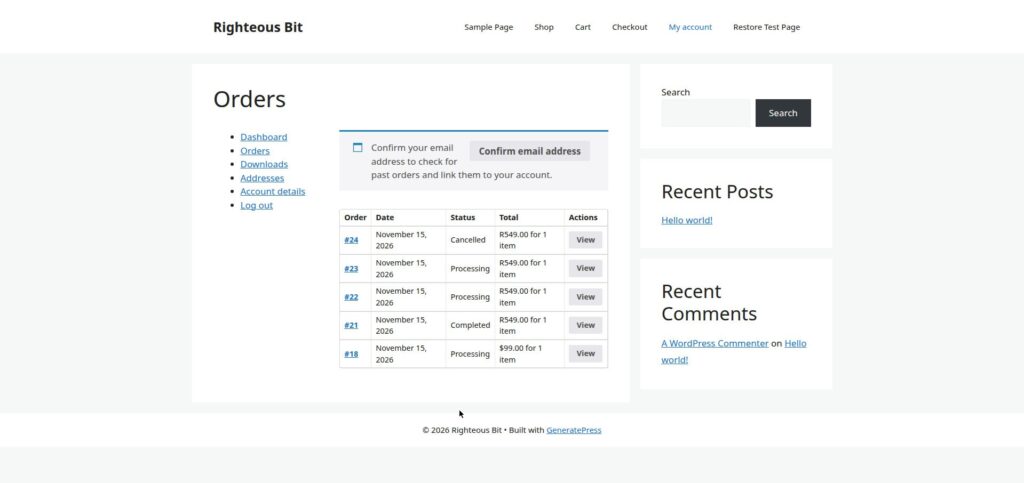
Check the customer side once. My Account → Orders lists the customer’s orders and statuses, and View shows the items and total. In this test it showed Order 24 Cancelled, Orders 23 and 22 Processing, and Order 21 Completed — all R549.00 — plus the older Order 18 on Processing at $99.00 from the earlier test run. Status changes send emails too — when you move an order to Processing or Completed, the customer gets an email saying so, on a host where mail works. The confirmation email did not arrive in this test, because mail does not work on the test host — so treat My Account → Orders as the reliable customer view, not the email.
What can go wrong
| Symptom | Likely cause | Fix |
|---|---|---|
| Order stuck on Pending payment | Payment not confirmed | For a gateway order, check the payment in the gateway’s dashboard; for cash on delivery, move it to Processing yourself — though in this test a COD order arrived on Processing automatically |
| Order not showing in WooCommerce → Orders | Wrong date or status filter on the list | Clear the filters and search by the order number |
| Refund button missing | Order was never paid — still Pending payment | Cancel the order instead; refunds only apply to paid orders |
| Refund clicked but nothing happens | The browser dismissed the confirmation dialog | Complete the refund in a normal browser — this happened in this guide’s test, and no refund was recorded |
| Stock did not come back after a refund | Restock refunded items was not ticked | Restock the product by hand — Products, open the product, Inventory tab — and tick the box next time |
| Customer did not get the order email | Email delivery problem, not an order problem | Resend it from Order actions; if emails keep going missing, see how to fix WordPress not sending email |
| PayFast never offered at checkout | Invalid PayFast credentials | Check the Merchant ID, Merchant Key and passphrase in the PayFast settings — this happened on the test install used for this guide |
| All order emails fail with “Could not instantiate mail function” | The host provides no working mail function | Use an SMTP plugin with a real provider account — see the email guide linked above |
Frequently asked questions
What do the WooCommerce order statuses mean?
Pending payment: placed but not paid. Processing: paid and being prepared. On hold: payment needs checking. Completed: delivered or fulfilled. Cancelled: will not be fulfilled. Refunded: payment returned. Failed: payment did not go through. A normal order travels Pending payment → Processing → Completed. For cash on delivery, the Pending payment stage happens automatically at checkout.
How do I refund an order in WooCommerce?
Open the order, scroll to Items, click Refund, enter the full or partial amount, tick Restock refunded items if the product is coming back, and confirm. The status changes to Refunded. Refunds only apply to paid orders. In this guide’s test the refund panel was filled in but the confirmation step was dismissed by the test browser, so no refund was recorded — complete it in a normal browser.
How do I change order status in bulk?
On WooCommerce → Orders, tick each order, open Bulk actions, choose the status — for example Change status to on-hold — and click Apply. Check the list afterwards. In this test three orders changed to On-hold in one action.
Why is my WooCommerce order stuck on Processing?
Because nobody moved it on. An order stays on Processing until you change it to Completed. Mark orders Completed when they are handed over, collected, or delivered.
Why is my order stuck on Pending payment?
The payment has not been confirmed. With a gateway, check the payment in the gateway’s dashboard. With cash on delivery, move it to Processing once you accept it — though in this test a COD order arrived on Processing automatically. If the customer never pays, cancel the order.
Recap checklist
- Placed a test order as a customer and found it in WooCommerce → Orders
- Can explain all seven statuses
- Moved a test order Processing → Completed (a COD order arrives on Processing, not Pending payment)
- Changed several orders at once with Bulk actions
- Opened the refund panel and confirmed the amount and restock tick — the refund itself was not completed in this test
- Added a private note and a note to the customer
- Listed the Order actions resend options (emails did not deliver on the test host)
- Checked what the customer sees in My Account → Orders
What to read next
- Adding the products you will sell — how to add products in WooCommerce
- Prices and sale prices on those products — how to set sale price in WooCommerce
- Taking payments so orders move to Processing — how to set up PayFast in WooCommerce
- Running a promotion on an order — how to add coupon code in WooCommerce
- Setting up the store itself — how to set up WooCommerce
Written by Mohd Shah Ahmad, Learn WordPress Online. He builds and runs live WooCommerce stores in Pretoria, and designed the websites for Aaliyah Perfumes and Stanley’s Bakery. Tested on a WordPress test install — see the “Tested on” box at the top.