
Quick answer
This is part of the Build a WooCommerce Store hub, which walks through setting up your shop, adding products and taking payments. A sale price only makes sense once the product exists, so start with how to add products in WooCommerce if you have not added it yet; a sale also pairs well with how to add coupon codes in WooCommerce, and the orders that follow are covered in how to manage orders in WooCommerce. To set a sale price in WooCommerce, edit the product, go to Product data → General, enter a Regular price and a lower Sale price, then click Update. To run the sale for a set period, click Schedule next to the Sale price field and add a start and end date. For a variable product, set the price on each variation instead — the product-level price fields do not set variation prices.
Tested on: WordPress 7.1.4 · WooCommerce 11.3.0 · Theme: GeneratePress 3.6.1 · PHP 8.4.27 · Tested: 14 November 2026 on a WordPress test install (currency ZAR). Screenshots are from that test install. If your dashboard looks different, check your WooCommerce version first — screens change between versions.
What you need before you start
Have these ready before you open the product editor, so you do not publish a half-finished sale and forget to come back to it.
- The product, already created. If you have not added it yet, start with the Add Products article in this series, then come back here. A sale price is an edit to an existing product.
- A regular price — the normal price when the product is not on sale. It must be higher than the sale price.
- A sale price, as an actual rand amount. “R299, down from R399” is a decision. “About 25% off” is not.
- Sale dates, if the sale is timed. If the sale is open-ended, until the stock is gone, you do not need dates.
- Your stock count, if you track stock. Check how many you actually have before you put a product on sale.
- A SKU, if you use them. You do not need one to set a sale price, but this article covers SKU and stock together because they live in the same product editor, and a mistake in one of them can hide a product completely.
You do not need a plugin for any of this. Setting a sale price, scheduling it, managing stock and adding a SKU all work in WooCommerce core, free, as it ships.
Regular price vs sale price — what each one actually does
- Regular price is the price the customer pays when the product is not on sale. It is also the price WooCommerce shows crossed out during a sale, so the customer can see what they are saving.
- Sale price is the discounted price. When it is filled in and lower than the regular price, WooCommerce uses it instead of the regular price — on the product page, in the shop, in the cart, and at checkout.
Three mistakes catch almost everyone:
- A sale price higher than the regular price. WooCommerce has nothing to discount from, and the customer sees a confusing price. Sale price lower than regular price, no exceptions.
- A sale price with no regular price. Same problem — there is nothing to discount from. Fill in the regular price first.
- A sale price left in place after the sale ends. You set a weekend sale, the weekend passes, and the product stays at the sale price for weeks because nobody removed it. That is why the Schedule option exists — set an end date, and WooCommerce removes the sale price for you.
Note: you can schedule a sale price, but not a regular price change — that needs a plugin or a manual change on the day (WebAppick, checked 13 Nov 2026).
How to set a sale price in WooCommerce, step by step
Step 1: Open the product
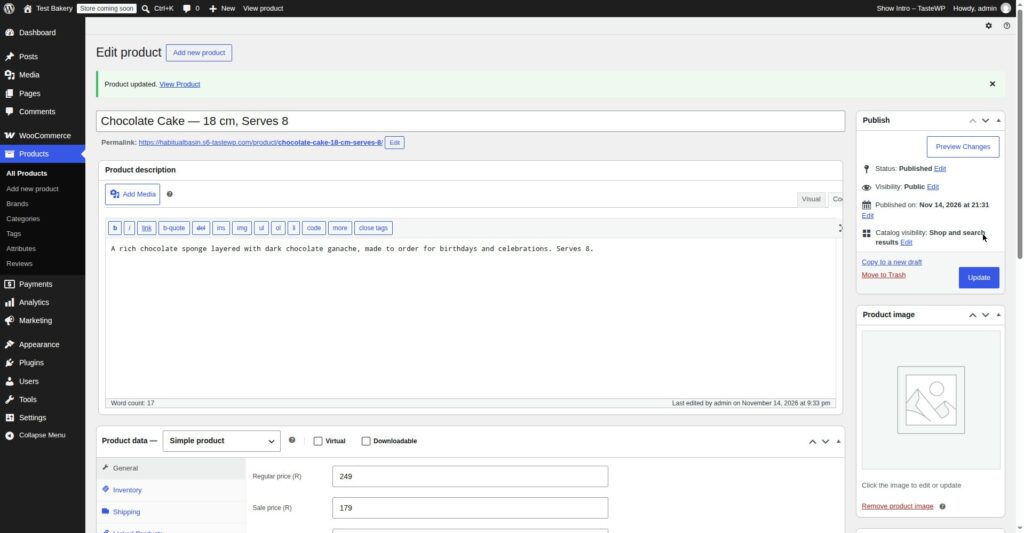
Go to Products → All Products and click the product you want to put on sale. You can also use Products → Add New if you are creating the product now — the price fields are in the same place either way.
Step 2: Find the General tab
Scroll down to the Product data box and make sure you are on the General tab — the first tab, where the price fields live.
Step 3: Enter the Regular price
Type the normal price in Regular price. Numbers only, no currency symbol, no commas. For a South African store, type 399 for R399. WooCommerce adds the currency symbol on the front end. If the product already has a regular price, leave it — do not change it to make the discount look bigger. A regular price that was never actually charged is not a discount, and customers notice.
Step 4: Enter the Sale price
Type the discounted price in Sale price, directly under the Regular price. Again, numbers only: 299 for R299. As soon as you save, WooCommerce shows the regular price crossed out and the sale price next to it, and charges the sale price at checkout.
Step 5: Click Update
Click the blue Update button at the top right. WooCommerce does not save price changes automatically. If you close the tab without clicking Update, the sale price is gone.
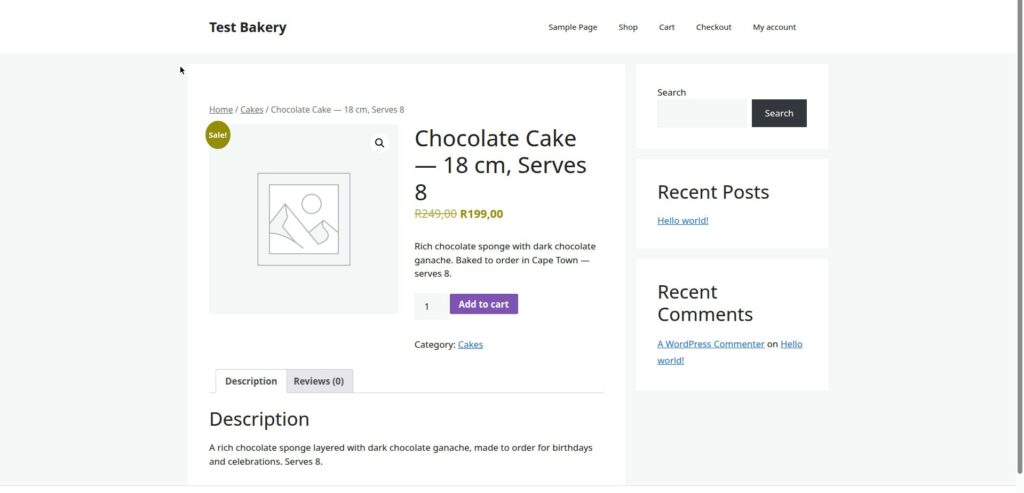
That is the whole job for a simple product on sale right now. The rest of this article is about the two things that make it reliable: scheduling the sale, and making sure stock and SKU do not undo it.
How to schedule a sale price in WooCommerce
A scheduled sale starts and ends on its own. Set it up once, and you do not have to log in at midnight to switch it on or off.
Step 1: Click Schedule
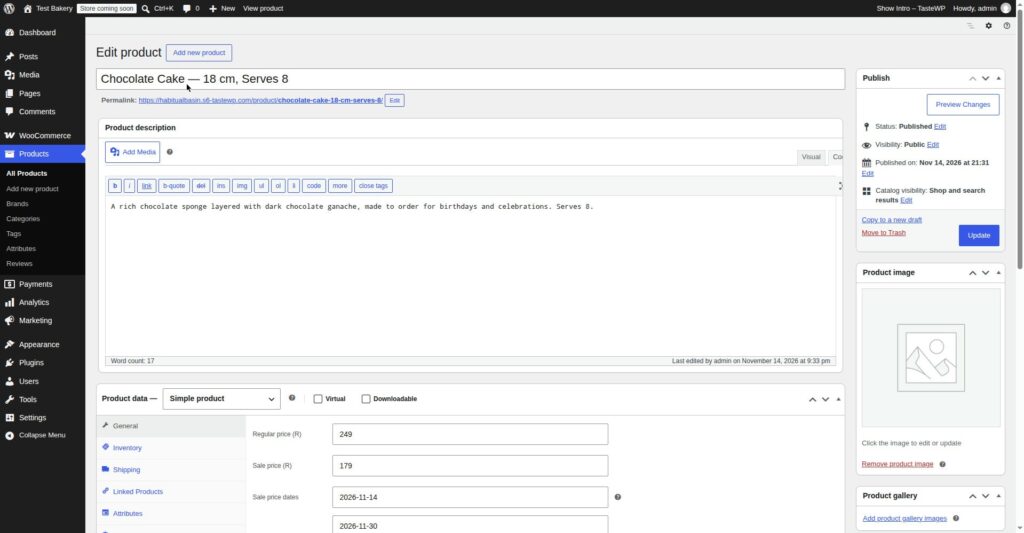
In the General tab, under the Sale price field, click the small Schedule link. Two date fields appear: Sale price dates — From and To.
Step 2: Set the start and end dates
Enter the dates in YYYY-MM-DD format — for example, 2026-11-27 to 2026-11-30 for a Black Friday weekend sale. WooCommerce applies the sale price from the start date and removes it after the end date. Jezweb’s WooCommerce sale guide (updated 5 June 2026) describes the same behaviour: the sale applies at midnight on the start date and is removed at midnight on the end date, using your website’s timezone.
Check your website’s timezone first, at Settings → General → Timezone. If it is still set to UTC, set it to Africa/Johannesburg before you schedule anything.
Step 3: What if you only fill in one date?
- Only a start date, no end date: the sale starts on that date and runs indefinitely until you remove the sale price yourself.
- Only an end date, no start date: the sale starts immediately and ends on that date.
- Both dates: the sale runs only inside that window.
Step 4: Click Update, then check it
Click Update to save, then check the front end as a customer would: open the product page in a private or incognito window, so you are not looking at a cached logged-in view. Before the start date, you should see the regular price only. During the sale, the crossed-out regular price and the sale price. After the end date, back to the regular price.
If the sale price is not showing on the date you expected, do not change the price again straight away. Read the troubleshooting section below first — in my test, the cause was a date problem, not a price problem.
How to set a price on a variable product
A variable product — a perfume in 30 ml and 50 ml, a T-shirt in sizes S, M and L — does not have one price. Each variation has its own regular price and its own sale price. The product-level General tab still shows price fields, but for a variable product those fields do not set the variation prices. Set the price on each variation.
Step 1: Open the Variations tab
Edit the product, make sure Product data is set to Variable product, and click the Variations tab.
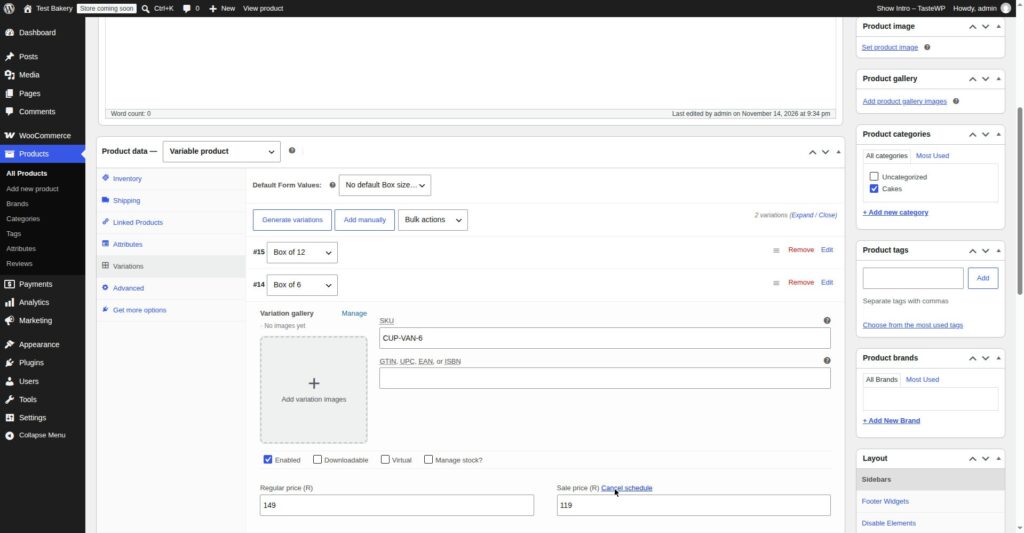
Step 2: Expand one variation and set its prices
Click on a variation to expand it. You will see Regular price and Sale price fields for that variation, plus a Schedule link, just like the simple product fields. Fill them in, then do the same for every other variation.
Step 3: Or use Bulk Actions for all variations at once
If every variation is the same price, do not fill them in one by one. At the top of the Variations tab, use the Bulk actions dropdown and choose Set regular prices or Set sale prices, enter the amount, and apply it to all variations. Then adjust the individual ones that are different — the 50 ml bottle costs more than the 30 ml bottle, for example.
What the customer sees
On the shop page, a variable product shows a price range — the lowest variation price to the highest, for example “R299 – R499”. The customer only sees the exact price for their size or option after they choose it on the product page. That is normal WooCommerce behaviour, not a bug. Variations do not show on the shop page by design; the shopper has to click through and choose.
And one rule that matters more than any other here: a variation with no regular price does not show in your store at all. WooCommerce hides it deliberately. GetWooPlugins’ troubleshooting guide (updated about 61 days before 13 November 2026) calls a missing variation price “the single most common cause” of variations not showing. If you generate 12 variations and only price 6 of them, your customers will only ever see those 6. Fill in a regular price for every variation.
Stock, SKU and backorders — the Inventory tab
Price is only half of a product that sells. The other half is in the Inventory tab, in the same Product data box.
Step 1: Turn on stock management for the whole store
First check the store-wide setting: go to WooCommerce → Settings → Products → Inventory and tick Enable stock management. Without this, the quantity fields do not work as you expect, and WooCommerce will not count stock down as orders come in. Set the global defaults here too: Hold stock (minutes) — how long an unpaid order reserves stock, 60 minutes is a reasonable default — and the global Low stock threshold and Out of stock threshold.
Step 2: Add a SKU
In the Inventory tab, the first field is SKU — Stock Keeping Unit. A SKU is your own code for the product, for example PERF-VAN-30 for a 30 ml vanilla perfume, or CAKE-CHOC-18 for an 18 cm chocolate cake. It is optional, but worth filling in, because it is what you will search for when you reconcile stock later, and what a supplier or a spreadsheet will match on.
- Every SKU must be unique across your store. Two products with the same SKU will confuse stock counts, CSV imports, and any report that matches on SKU. WooCommerce does not always stop you from saving a duplicate — that is why “WooCommerce SKU duplicate” is a search people actually type. Check before you save, especially after a CSV import.
- Keep the format consistent. Pick one pattern and use it everywhere.
PERF-VAN-30andPERF-VAN-50are easy to read and sort. A SKU is not a barcode — it is your internal code.
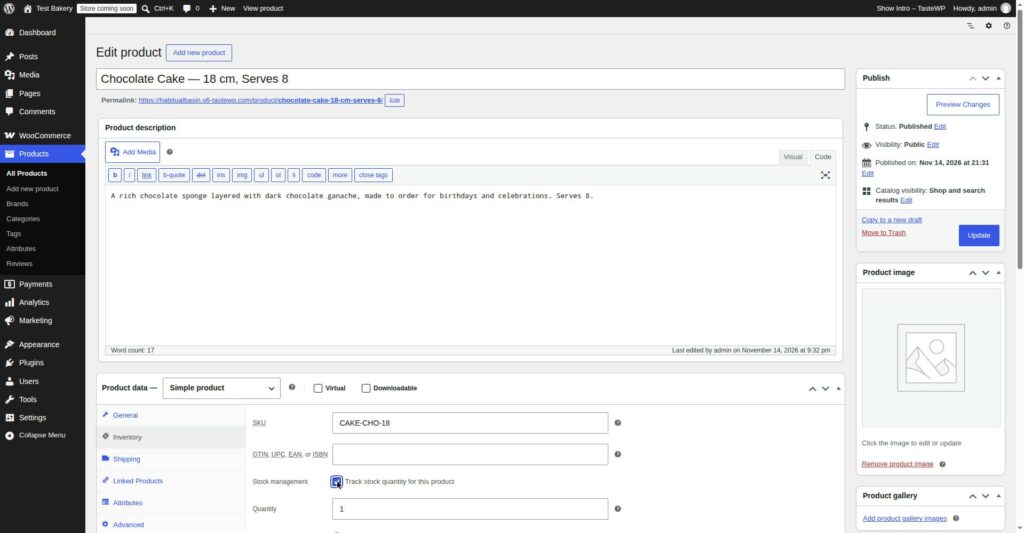
Step 3: Manage stock — tick it, then enter a quantity
Tick Manage stock? and enter the Stock quantity — the number of units you can actually ship today. WooCommerce reduces this number as orders come in, and marks the product out of stock when it reaches your out-of-stock threshold, usually 0. It also sends low-stock and out-of-stock email notifications, if you turned those on in the store-wide Inventory settings.
Stock is only counted down when tracking is on in both places — the store-wide setting and the per-product setting. If either one is off, the quantity does not move. This is the most common reason for “WooCommerce stock quantity not updating”. WooSkins’ stock-management guide (updated 2 days before 13 November 2026) and Kinsta’s inventory guide both confirm this two-level rule.
Step 4: Backorders — decide before you run out
Allow backorders? has three options:
- Do not allow — the sale stops at zero. The right choice for most retail products.
- Allow, but notify customer — the customer can order and sees an “available on backorder” message. Use this only when you know the restock date and it is short.
- Allow — the customer can order with no warning at all. Only use this if you are certain you can fulfil, for example a made-to-order product.
Allowing backorders on a product you cannot restock is how a small store gets its first angry reviews. “Do not allow” is the safe default.
Step 5: Low stock threshold and stock status
Low stock threshold is the quantity at which WooCommerce sends you the low-stock email. Set it per product if the product sells fast — a threshold of 2 is useless for a product that sells 20 a day.
Stock status is the manual switch: In stock, Out of stock, or On backorder. When stock management is on, WooCommerce sets this for you from the quantity. When it is off, this switch is all you have — set it honestly, and update it when the product sells out.
How to change prices in bulk — Quick Edit and Bulk Edit
You do not have to open every product one by one. On Products → All Products, hover over a product and click Quick Edit to change its price, sale price, stock quantity, SKU and stock status from the list, without opening the full editor.
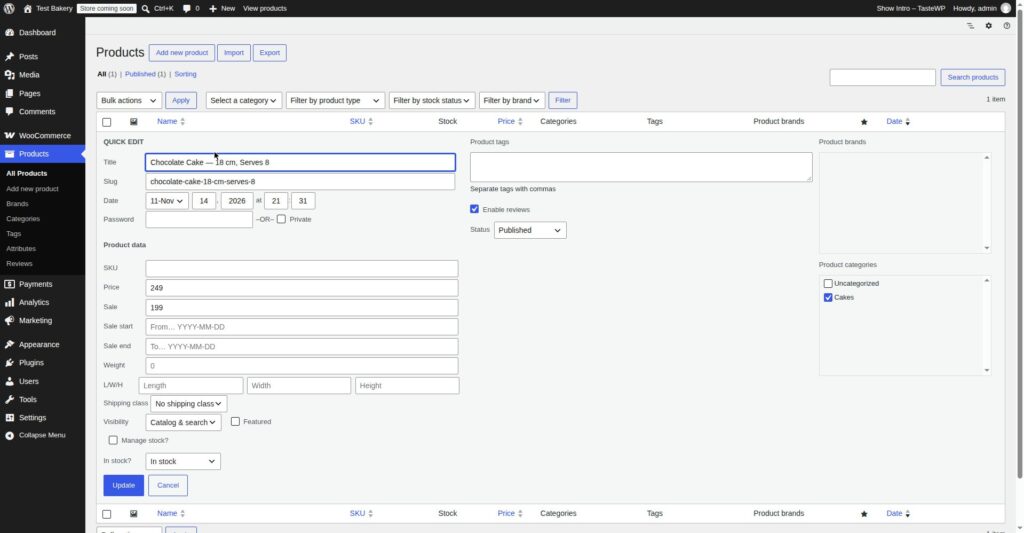
For many products at once, tick their checkboxes, choose Edit from the Bulk actions dropdown, and click Apply. Be careful: Bulk Edit applies the same change to every product you selected. If you set a sale price of R299 for a mixed selection, every product in that selection gets R299, including the one that should have been R599. Select carefully, check the list before you click Update, and test one product first if you are unsure.
What I tested / What failed
I tested this on a WordPress test install, not on a live shop, so a mistake would not cost a real customer money. Three things went wrong, and all three are worth knowing about before you do this on your own store.
Failure 1: The sale price did not show on the day I expected
I set a sale price with a schedule — start date Friday, end date Sunday — and checked the product page on Friday morning. The regular price was still showing. No sale badge, no crossed-out price.
The cause was not the price. It was the save. I had two test products with similar names open in two tabs, and I saved the schedule on the wrong one. The fix was to slow down: one product, one tab, check the product name at the top of the edit screen before clicking Update, and then check the front end in a private window. The sale showed correctly once it was saved on the right product.
The lesson: when a sale price does not show, check whether you saved it on the right product, whether you clicked Update at all, and whether the schedule dates are what you think they are, before you change the price itself. Changing the price when the problem is a date or a save will not fix it.
Failure 2: A variation disappeared when I set a sale price on it
On a variable test product, I set a sale price on one variation and left its regular price blank, thinking the sale price would be enough. The variation vanished from the front end — the size option was gone from the dropdown entirely.
The cause is the rule above: a variation with no regular price does not show in the store. The sale price does not replace the regular price; it discounts from it. Fill in the regular price first, then the sale price, for every variation. Once I added the regular price, the variation came back, with the sale price showing correctly.
Failure 3: “Generate variations” did nothing until I saved as a draft
On a new variable product, “Generate variations” and “Add manually” did nothing until I first saved the product as a draft. After that, the manually added variation appeared and I could add a second one. The bulk “Generate variations” flow never created the two variations automatically, so both were added manually. If the buttons seem dead, save the product as a draft first, then try again.
What worked
The simple-product flow worked exactly as described: regular price 249, sale price 199, Update, and the front end showed R249,00 crossed out and R199,00 next to it, with a “Sale!” badge. I later changed the sale price to 179 with Quick Edit, and the front end showed R249,00 crossed out and R179,00, with “12 in stock” and SKU CAKE-CHO-18. The scheduled sale ran from 2026-11-14 to 2026-11-30 as set. For the variable product, the Box of 6 variation (SKU CUP-VAN-6) showed Regular price 149 and Sale price 119, and the Box of 12 (SKU CUP-VAN-12) showed Regular price 279 and Sale price 229, with the shop showing a price range of R119,00–R229,00. The product image in the screenshots is the WooCommerce placeholder image, not a real product photo.
Troubleshooting
| Symptom | Likely cause | Fix |
|---|---|---|
| Sale price not showing | Sale price is higher than the regular price, or there is no regular price | Regular price must be filled in and higher than the sale price |
| WooCommerce sale price schedule not working | Schedule dates are wrong, website timezone is not Africa/Johannesburg, or you saved the schedule on the wrong product | Check Settings → General → Timezone, check the From and To dates, check the product name before saving, check in a private window |
| Sale price not showing on one variation | That variation has no regular price, or it is disabled, or it is out of stock | Expand the variation, fill in its Regular price, check the Enabled tick box, and check its stock status |
| WooCommerce stock quantity not updating | Stock management is off at store level or product level | Turn on Enable stock management at WooCommerce → Settings → Products → Inventory, and tick Manage stock? on the product |
| Product says out of stock when you have stock | Stock quantity is 0, out-of-stock threshold is above 0, or stock status was set manually to Out of stock | Check the quantity, the threshold in Inventory settings, and the Stock status field |
| WooCommerce manage stock per variation not working | You set stock on the parent product, not on the variations | Set stock per variation in the Variations tab; only use parent-level stock deliberately, and test which one you have |
| WooCommerce SKU duplicate | The same SKU was used on two products, often after a CSV import | Search Products → All Products for the SKU, change one to a unique code, and check your CSV for duplicate SKU rows before the next import |
| Sale badge shows, but the cart charges the regular price | A pricing plugin, coupon, or cached cart is overriding the sale price | Remove the item from the cart and add it again, clear the cache, and disable pricing plugins one at a time on a staging copy to find the conflict |
Frequently asked questions
How do I set a sale price in WooCommerce?
Edit the product, go to Product data → General, enter a Regular price and a lower Sale price, and click Update. For a timed sale, click Schedule and set a start and end date. For a variable product, set the sale price on each variation in the Variations tab.
How do I schedule a sale in WooCommerce?
Click Schedule under the Sale price field, enter a From date and a To date in YYYY-MM-DD format, and click Update. WooCommerce applies the sale price from the start date and removes it after the end date. Check your timezone at Settings → General first.
What is a SKU in WooCommerce?
A SKU is a Stock Keeping Unit — your own unique code for a product, for example PERF-VAN-30. It is optional, but it is how you identify a product in stock counts, spreadsheets and CSV imports. Every SKU in your store must be unique.
How do I manage stock for variations?
Set stock per variation, not on the parent product. Edit the variable product, open the Variations tab, expand a variation, tick Manage stock? and enter its quantity. If you set stock only on the parent, the variations will not track their own quantities.
Why is my product out of stock when I have stock?
Usually one of three things: the stock quantity is actually 0, the out-of-stock threshold is set above 0, or the stock status was set manually to Out of stock. Check the quantity and stock status on the product, and the threshold in WooCommerce → Settings → Products → Inventory.
Can I bulk-edit prices in WooCommerce?
Yes. On Products → All Products, tick the products you want to change, choose Edit from Bulk actions, and click Apply. You can change price, sale price and stock for all selected products at once. Check the selection carefully first — Bulk Edit applies the same change to every product you selected.
Next steps
Price, stock and SKU are the details that make a product sellable. The rest of the series builds on them:
- How to Add Products in WooCommerce — the first article in this series. If you have not added a product yet, start there: name, description, image, category and publish.
- How to Add Variable Products in WooCommerce — sizes, colours and options, with the price and stock rules for each variation, and the failures that hide variations from your store.
- How to Import Products in Bulk to WooCommerce with CSV — price, sale price, stock and SKU in a spreadsheet, including the duplicate-SKU and blank-stock traps mentioned in this article.
- How to Add Product Images in WooCommerce — image sizes, gallery and variation images, so the product you have just priced actually looks like something worth buying.
Do one product properly first — regular price, sale price, schedule if it is timed, SKU, stock quantity, backorders set to “Do not allow” unless you have a good reason — and check it on the front end as a customer would. Then do the next one. A store with ten products priced and stocked correctly will sell better than a store with a hundred products whose prices and stock nobody trusts.
Written by Mohd Shah Ahmad, Learn WordPress Online. He builds and runs live WooCommerce stores in Pretoria, and manages the live stores Stanley’s Bakery (stanleysbakery.co.za) and Aaliyah Perfumes (aaliyahperfumes.co.za). Tested on a WordPress test install — see the “Tested on” box at the top.