
Quick answer
This guide is part of the Start with WordPress hub. Next, learn how to create a child theme in WordPress, how to create a menu in WordPress, and how to use the WordPress block editor. Installing a WordPress theme takes two minutes: go to Appearance → Themes, click Add Theme (on WordPress 7.1.4 the button is called “Add Theme”, not “Add New Theme”), find a theme in the directory or upload a .zip file, preview it, then activate it. The important part is not the install — it is knowing how to switch back if the new theme breaks your layout. This guide shows the full round trip: install, preview, activate, and switch back to the original theme with the site fully restored.
Read this before you start, because two parts of this guide were not tested. The browser used for this test cannot upload local files, so the ZIP upload itself was not completed — the Upload Theme panel was verified, but no theme was installed from a .zip. The three upload errors in the troubleshooting table (“missing style.css”, “package could not be installed”, “the link you followed has expired”) only arise from a ZIP upload, so they were not triggered either. Everything else — directory install, preview, activation, and switching back — was tested for real.
Tested on: WordPress 7.1.4 · Theme: GeneratePress 3.6.1 · WooCommerce 11.3.0 · PHP 8.4.27 · Tested 15 November 2026 on a WordPress test install. The ZIP upload and the three upload errors were not tested — the browser cannot upload local files.
What you need before you start
- Access to the WordPress admin (an Administrator or a role that can switch themes).
- A backup of the site. If you do not have one yet, read How to Back Up Your WordPress Website first. Switching themes changes how your site looks and can change how menus and widgets behave — back up before you start, so you can restore if anything goes wrong.
- An idea of what you want the theme to do. A blog theme and a shop theme are different things. If your site will sell products, check that the theme supports WooCommerce — the theme directory shows this on the theme’s page.
How to install a theme, step by step
Step 1: Open Appearance → Themes
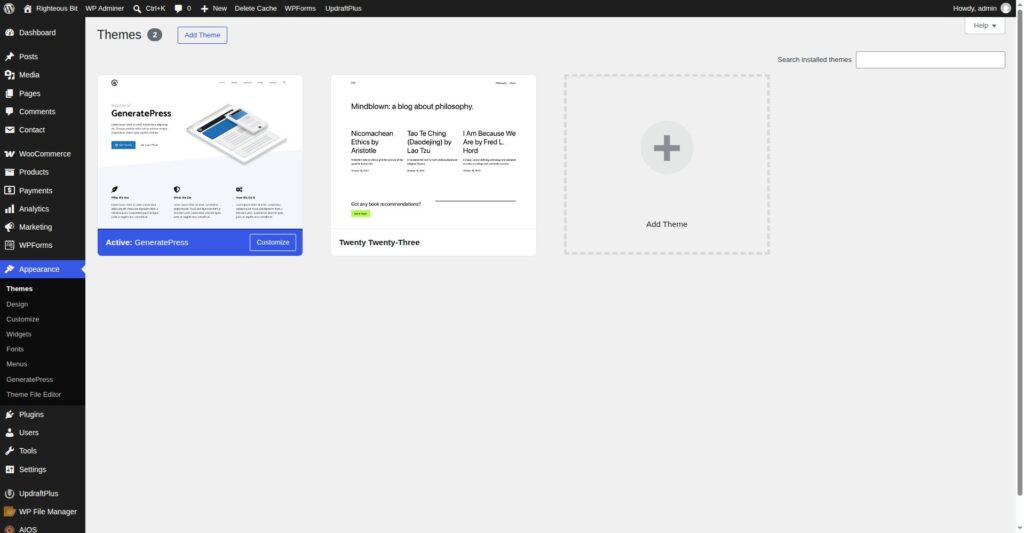
In the WordPress admin, go to Appearance → Themes. You will see the themes already installed on the site, with the active theme labelled “Active”. On the test install there were two themes installed: GeneratePress (active) and Twenty Twenty-Five, with Twenty Twenty-Three also installed.
Step 2: Find a theme in the directory
Click Add Theme at the top of the Themes page. The Add Themes directory opens, with tabs for Popular, Latest, Block Themes and Favorites, plus a “Feature Filter” and a search box. Search for a theme by name, or browse the tabs and filters until you find one that fits.
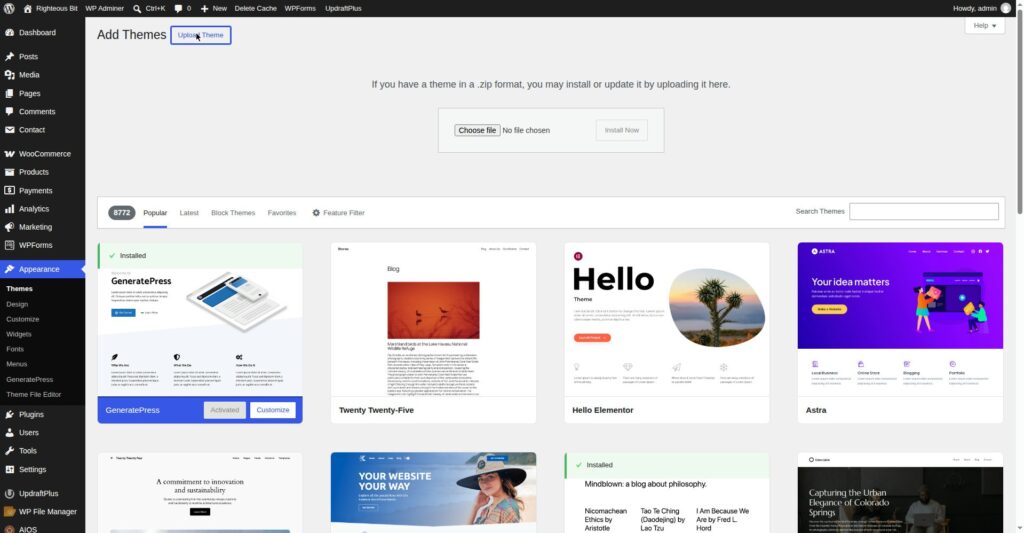
Hover over a theme and click Install, then Activate — or click Live Preview first to see it on your own site before you commit. Previewing is the safe way to check a theme: it shows your real content in the new theme without changing anything for visitors.
Step 3: Install a theme from a .zip file
Not tested — the ZIP upload was not completed. The panel below was verified; the upload itself could not run because the browser cannot upload local files.
If you bought a theme or downloaded one from somewhere other than the WordPress directory, you will have a .zip file. On the Add Themes page, click Upload Theme at the top. The panel that appears reads, verbatim:
If you have a theme in a .zip format, you may install or update it by uploading it here.
Below that is a “Theme zip file” field with a Choose file button, and an Install Now button that stays disabled until a file is chosen. Choose the .zip file, click Install Now, and WordPress uploads and extracts it. Then click Activate — or go back to Appearance → Themes and activate it from there.
Step 4: Preview the theme before you activate it
Tested. The preview opened the Site Editor, not the Customizer.
On WordPress 7.1.4, clicking Live Preview for a block theme opens the Site Editor, not the Customizer. The panel reads “Previewing Twenty Twenty-Five: Design”, with sections for Identity, Styles, Pages, Navigation, Patterns and Templates, and a blue Activate Twenty Twenty-Five button. Activating from the preview shows a “Review changes” dialog first.
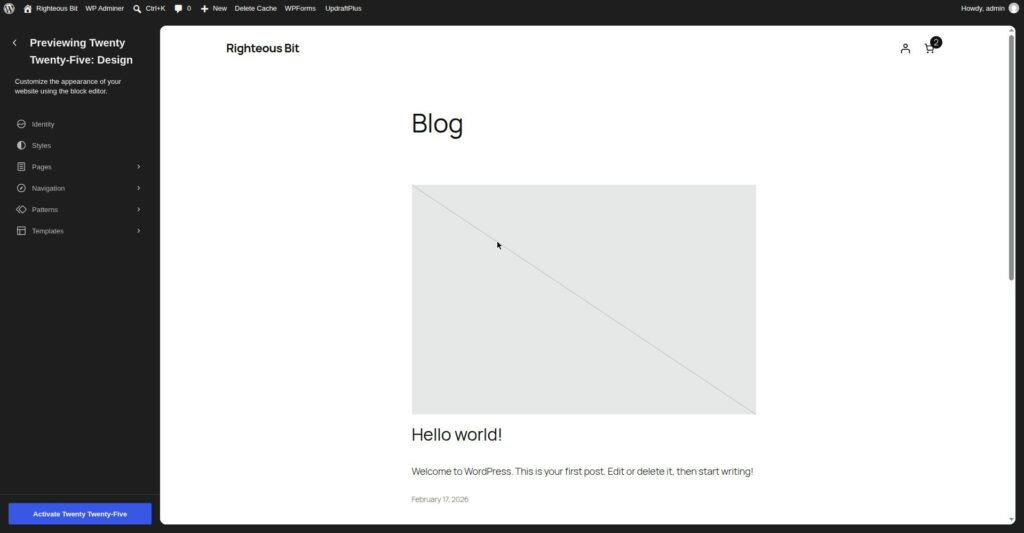
This matters if you are following an older tutorial that tells you to look for the Customizer: on a block theme, the preview is the Site Editor, and the Customizer you get afterwards is reduced (see Step 6).
Step 5: Activate the theme and check what changes
Click Activate — from the preview, or from Appearance → Themes. Then open your site in a new tab and look at what actually changed. In this test, activating Twenty Twenty-Five changed the site in ways the theme directory does not warn you about:
- The menu items reordered alphabetically. The custom menu order was gone.
- The GeneratePress sidebar disappeared. The widgets that lived in it were not shown.
- The admin bar changed: “Customize” became “Edit Site”.
- The Appearance menu shrank to Themes, Editor and Fonts.
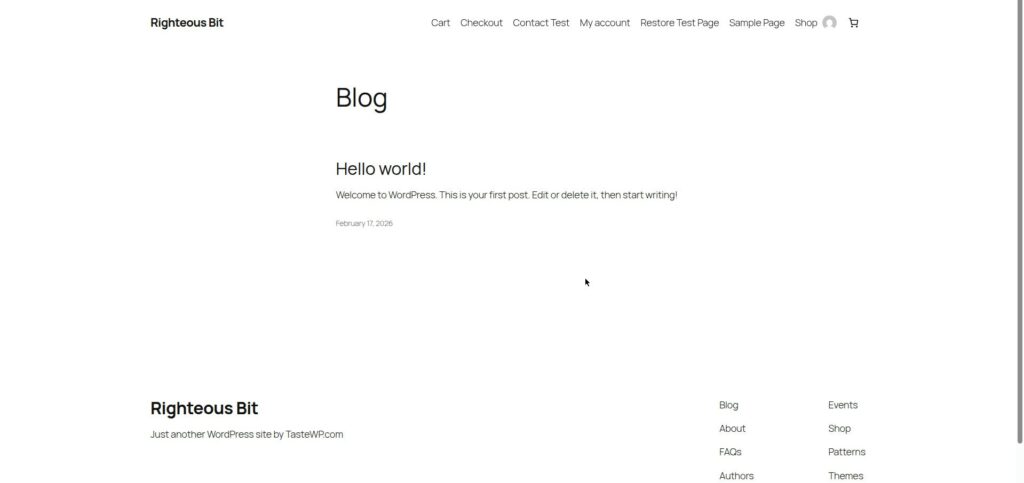
The shop page still worked under Twenty Twenty-Five — products and checkout were unaffected, because WooCommerce is separate from the theme.
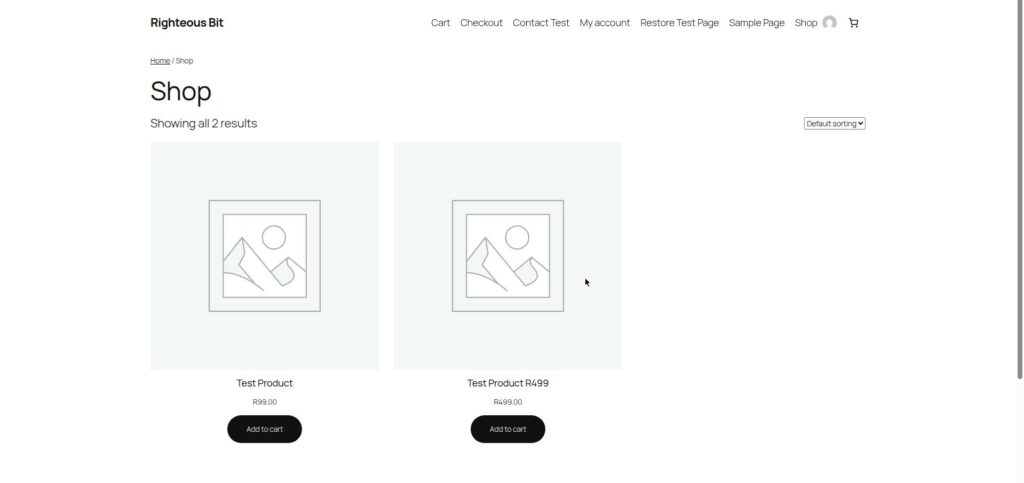
Reading Settings were unchanged by the theme switch — “Your latest posts” stayed as it was. So a theme change affects the look, the menus and the widgets, but not the content or the reading settings.
Step 6: If it does not suit you, switch back
Tested — the site was fully restored.
A theme change is reversible, and that is the safety net. If the new theme does not suit your site, go back to Appearance → Themes and activate your previous theme. In this test the site was switched back to GeneratePress, and the front end was fully restored: the menu order came back, the sidebar widgets returned, and the footer was as it was before.
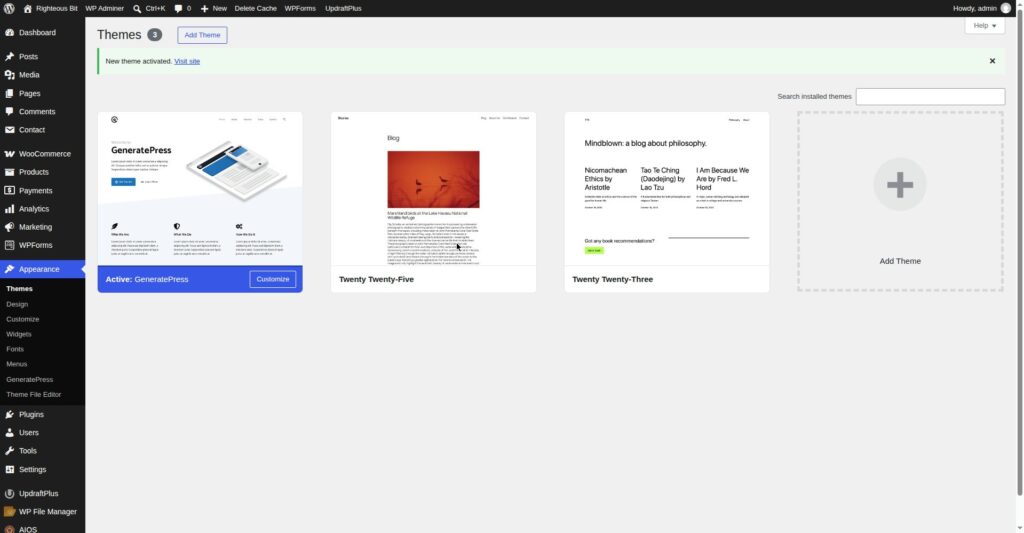
Two things to check after switching back: first, open the front end and confirm the menu order and widgets are back as they were. Second, check the Customizer and the Appearance menu — with GeneratePress active again, the full Customizer and the normal Appearance menu return.
Two more things this test found, worth knowing before you switch themes:
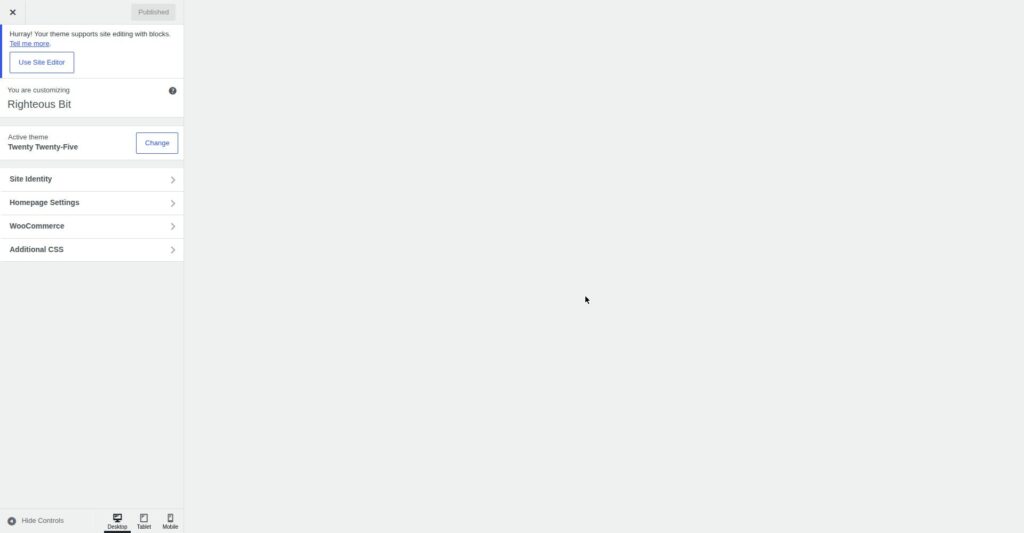
- Appearance → Customize under a block theme is reduced. With Twenty Twenty-Five active, the Customizer showed a banner reading “Hurray! Your theme supports site editing with blocks.” and only the sections Site Identity, Homepage Settings, WooCommerce and Additional CSS. The full Customizer only returns when you switch back to a classic theme.
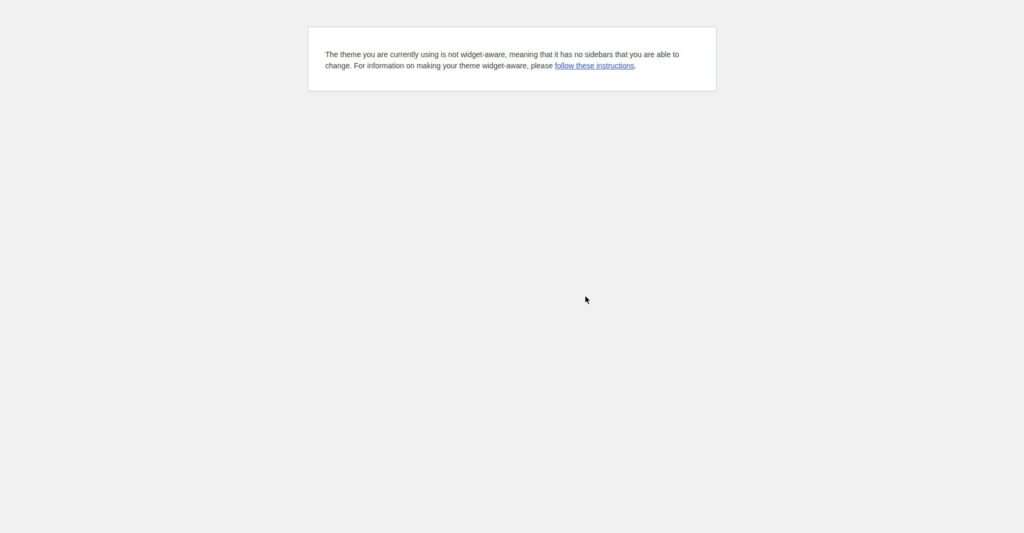
- Appearance → Widgets and Appearance → Menus show errors under a block theme. The Widgets screen reads: “The theme you are currently using is not widget-aware, so there is no way to add widgets to it.” The Menus screen reads: “Your theme does not support navigation menus or widgets.” Both return to normal when you switch back to a theme that supports them.
Step 7: Delete themes you do not need
On Appearance → Themes, click a theme you are not using, then click Delete in the bottom right of its details panel. Delete themes you will not use — they take up space and, more importantly, an old unused theme is one more thing that needs updating. Keep one spare theme installed (WordPress ships with one) so you always have a fallback if your active theme breaks. Do not delete the theme that is currently active.
What can go wrong
| Symptom | Likely cause | Fix |
|---|---|---|
| “The package could not be installed. The theme is missing the style.css stylesheet.” | The .zip file is not a theme, or it is a theme inside another folder | Unzip the file on your computer first and upload the inner folder’s .zip — or download the theme again from the source — the ZIP upload errors were not triggered in this test |
| “The package could not be installed.” with no detail | A corrupt or incomplete .zip | Re-download the theme and try again; if it keeps failing, install from the theme directory instead |
| “The link you followed has expired.” during upload | The upload took too long, or the file is bigger than the server allows | Try the upload again; if it keeps failing, check the upload limit with your host — the ZIP upload was not tested in this test |
| The theme installed but the site looks broken | The new theme does not support your menus or widgets | Check what changed (see Step 5), then switch back to your previous theme from Appearance → Themes |
| Menu items reordered after switching themes | Block themes reorder menus alphabetically | Switch back to your previous theme, or rebuild the menu order in the new theme’s navigation |
| Widgets disappeared after switching themes | The new theme has no widget areas, or it is a block theme | Switch back, or rebuild the widgets as blocks in the Site Editor |
| Appearance → Widgets shows “not widget-aware” | The active theme is a block theme and does not support widgets | Switch back to a classic theme, or use the Site Editor instead |
| The Customizer looks almost empty | The active theme is a block theme | Use the Site Editor for design changes, or switch back to a classic theme for the full Customizer |
| “Live Preview” opens the Site Editor, not the Customizer | That is normal on WordPress 7.1.4 for block themes | Use the Site Editor preview as shown in Step 4 — it is the correct preview for a block theme |
Frequently asked questions
How do I install a WordPress theme?
Go to Appearance → Themes and click Add Theme. Find a theme in the directory and click Install, then Activate — or click Live Preview first to see it on your site. To install a theme from a .zip file, click Upload Theme on the same page, choose the file and click Install Now. The ZIP upload itself was not tested for this guide — the browser cannot upload local files — but the Upload Theme panel was verified.
How do I install a WordPress theme from a .zip file?
On the Add Themes page, click Upload Theme. The panel reads “If you have a theme in a .zip format, you may install or update it by uploading it here.” Choose the .zip file with the Choose file button, click Install Now, then Activate. If the upload fails with “The theme is missing the style.css stylesheet”, the .zip is probably a theme inside another folder — unzip it on your computer and upload the inner .zip.
Can I preview a theme before activating it?
Yes. Hover over the theme in the directory and click Live Preview. On WordPress 7.1.4, previewing a block theme opens the Site Editor, not the Customizer — the panel reads “Previewing Twenty Twenty-Five: Design” with an Activate button. Previewing changes nothing for visitors until you click Activate.
What happens to my content when I change themes?
Your posts, pages, products and settings stay exactly as they are. What changes is the look: menus can reorder, widgets can disappear, and the Customizer can shrink — all of which happened in this test when Twenty Twenty-Five was activated. Reading Settings are unchanged. If the new theme does not suit you, switch back from Appearance → Themes and the site is restored.
How do I switch back to my old theme?
Go to Appearance → Themes and click Activate on your previous theme. In this test the site was switched back to GeneratePress and the front end was fully restored — menu order, sidebar widgets and footer all back as they were. Keep one spare theme installed so you always have a fallback.
Why does my theme not show in Appearance → Themes?
If you installed it from a .zip and it does not appear, the upload probably failed — check the error message. If you installed it from the directory and it is not listed, refresh the page. A theme only appears in the list once it has been installed; previewing a theme without installing it does not add it to the list.
Recap checklist
- Backed up the site before switching themes
- Found the theme in the directory, or verified the
.zipfile is a real theme - Previewed the theme with Live Preview before activating
- Activated the theme and checked the front end — menu order, sidebar, footer, shop page
- If it did not suit the site, switched back and confirmed the front end was restored
- Deleted themes that will not be used, keeping one spare as a fallback
What to read next
- Start from the beginning — How to Make a Website with WordPress
- Back up before you change anything — How to Back Up Your WordPress Website
- Customise the new theme — How to Use the WordPress Block Editor
- Add a plugin after the theme — How to Install a WordPress Plugin
Written by Mohd Shah Ahmad, Learn WordPress Online. He builds and runs live WooCommerce stores in Pretoria, and designed the websites for Aaliyah Perfumes and Stanley’s Bakery. Tested on a WordPress test install — see the “Tested on” box at the top.