
Quick answer
This guide is part of the Start with WordPress hub. If you have not built your site yet, start with how to make a website with WordPress, then learn how to use the WordPress block editor and how to install a WordPress theme. To create a menu in WordPress, go to Appearance → Menus, click Create a new menu, give it a name, add the pages you want in it, drag them into order, tick a display location (usually “Primary” or “Main Menu”), and save. Then open your site and check the menu shows where you expect it. If the header shows every page on your site instead of your menu, no display location was ticked — the theme has fallen back to listing all pages, which is the most common menu mistake.
Tested on: WordPress 7.1.4 · Theme: GeneratePress 3.6.1 · PHP 8.5.12 · Tested 16 November 2026 on a WordPress test install. The block-theme difference was also tested with Twenty Twenty-Five. See “What was not tested” at the end.
What you need before you start
- Access to the WordPress admin (an Administrator, or a role that can edit menus).
- The pages you want in the menu already created. A menu links to pages — if the page does not exist yet, create it first. The pages on the test install were Home, About, Contact and Blog.
- A backup of the site. If you do not have one yet, read How to Back Up Your WordPress Website first. Menu changes are low risk, but back up before changing site structure anyway.
How to create a menu, step by step
Step 1: Open Appearance → Menus
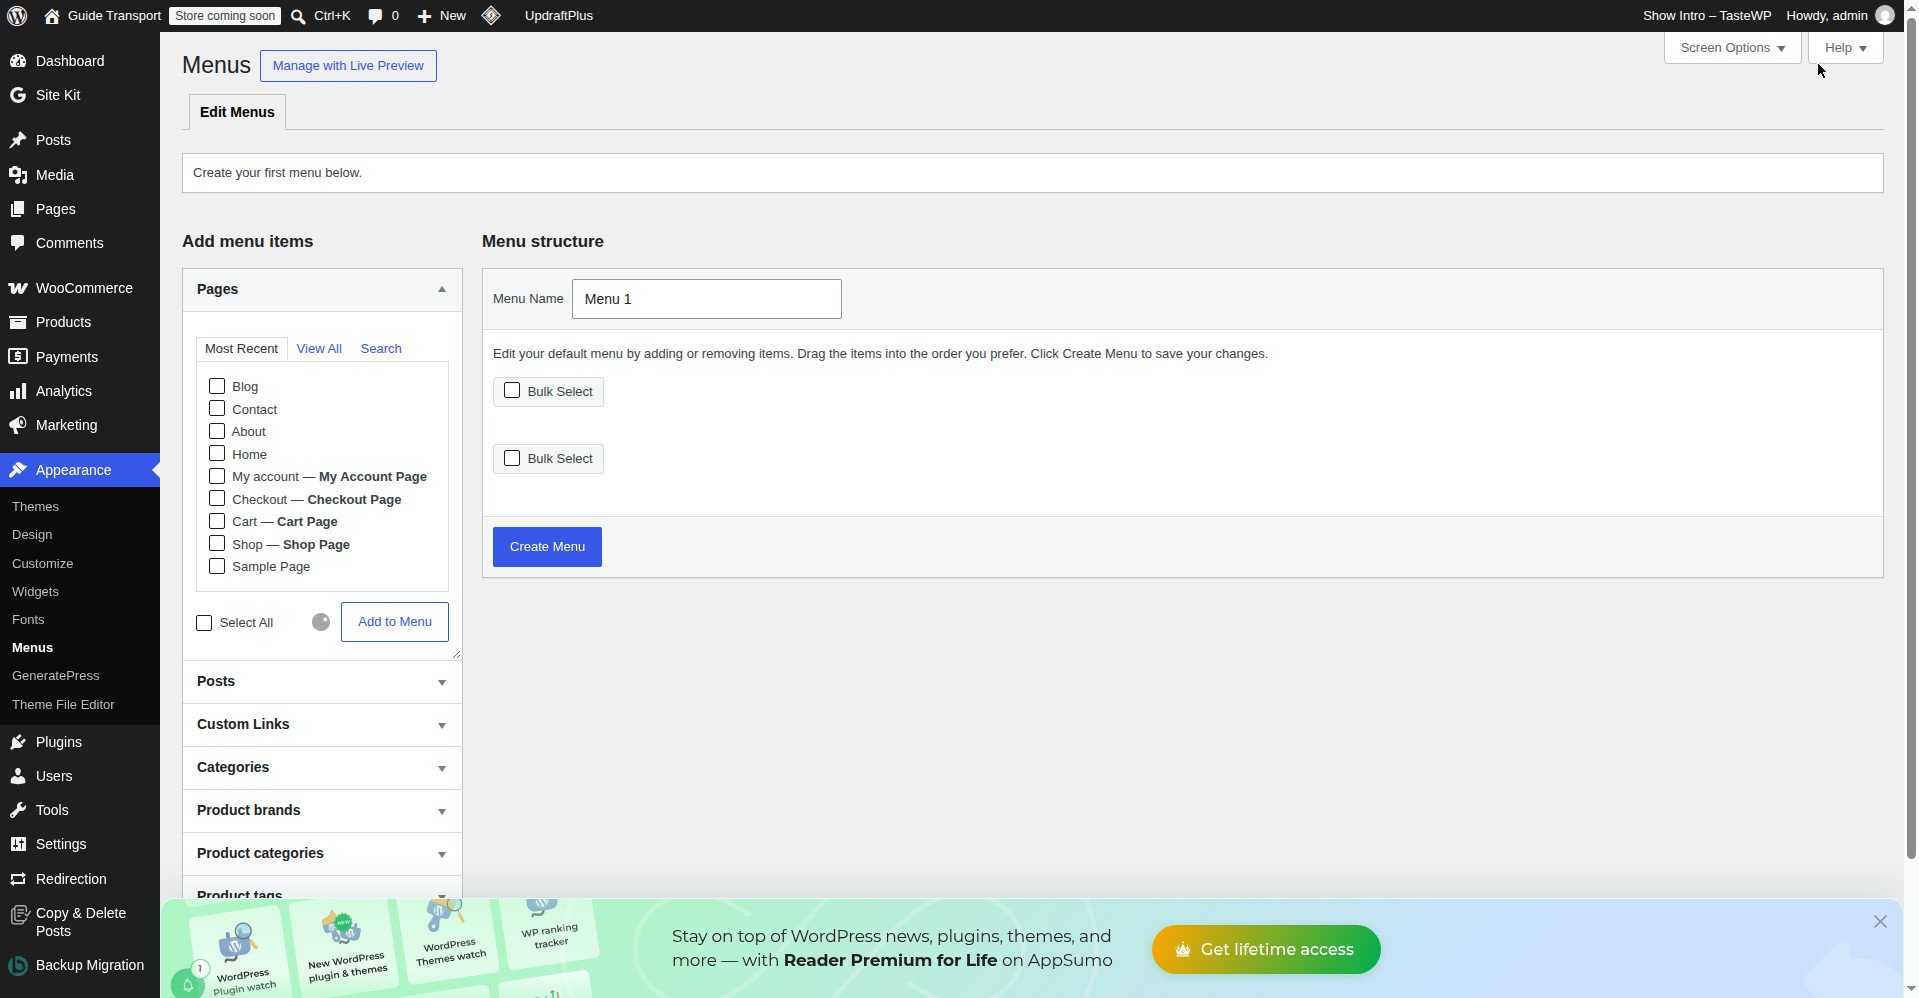
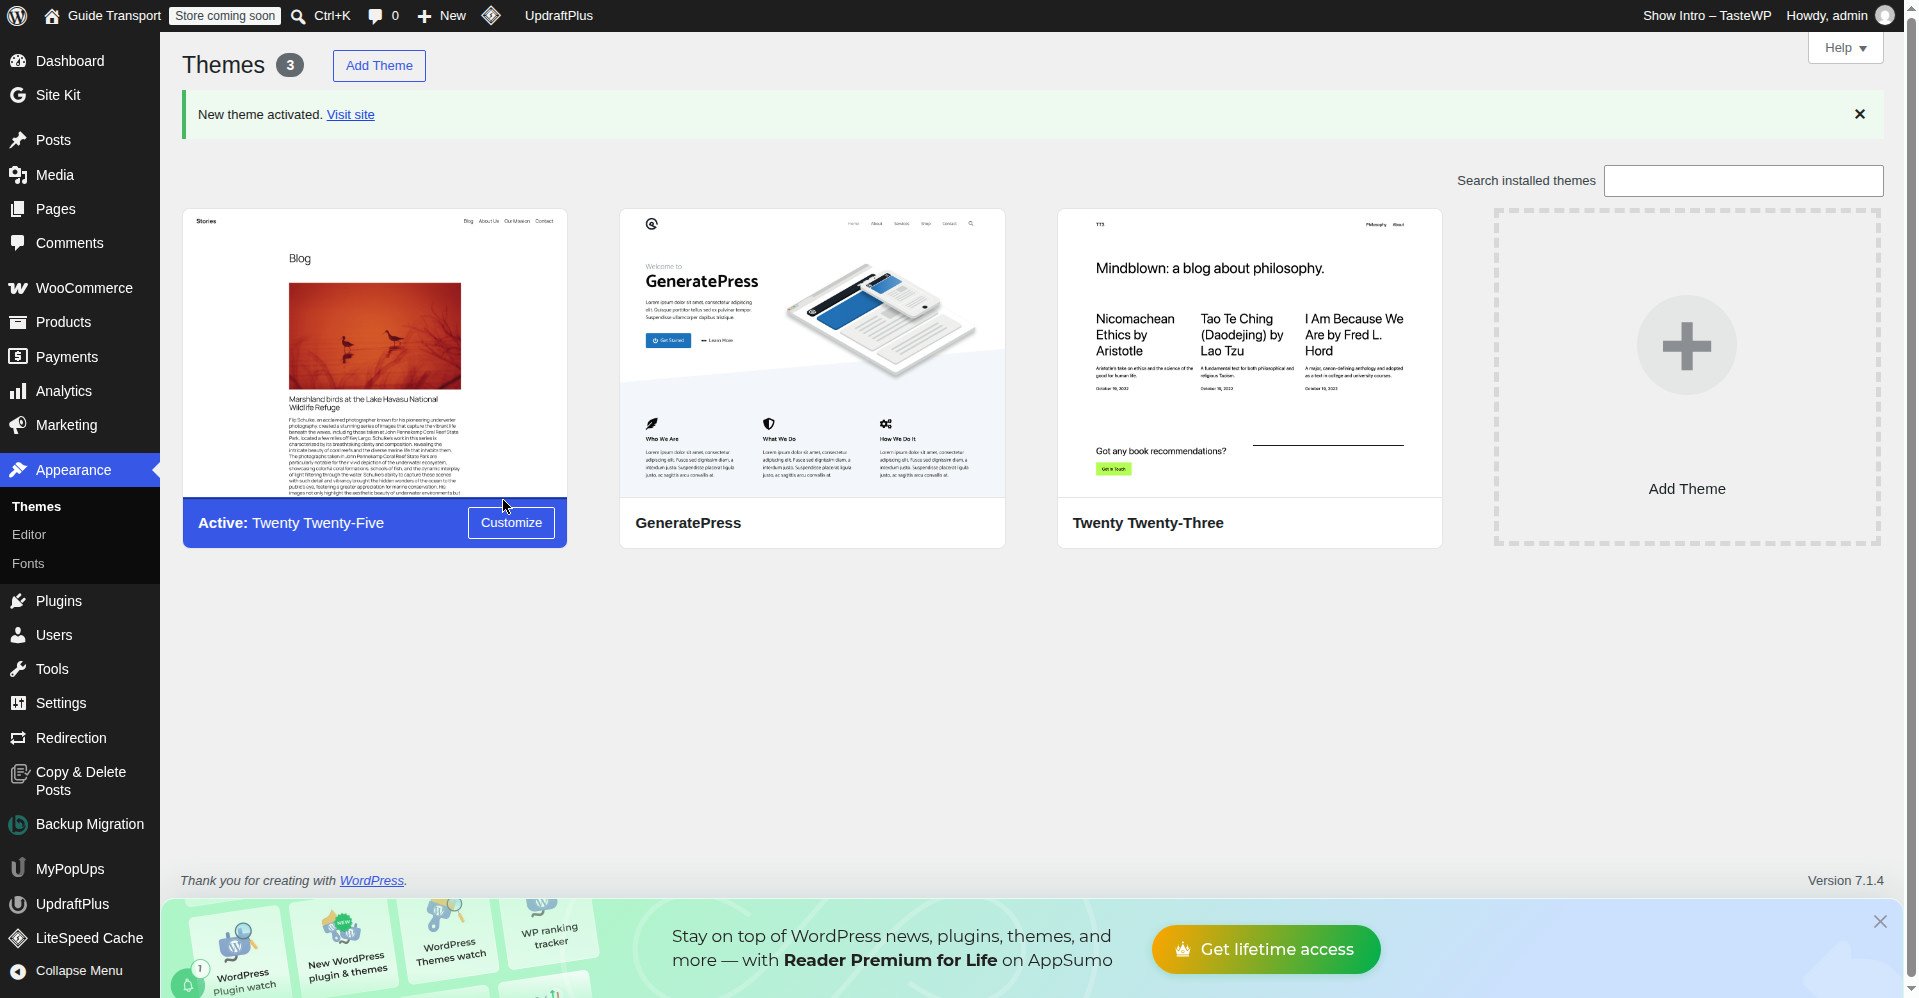
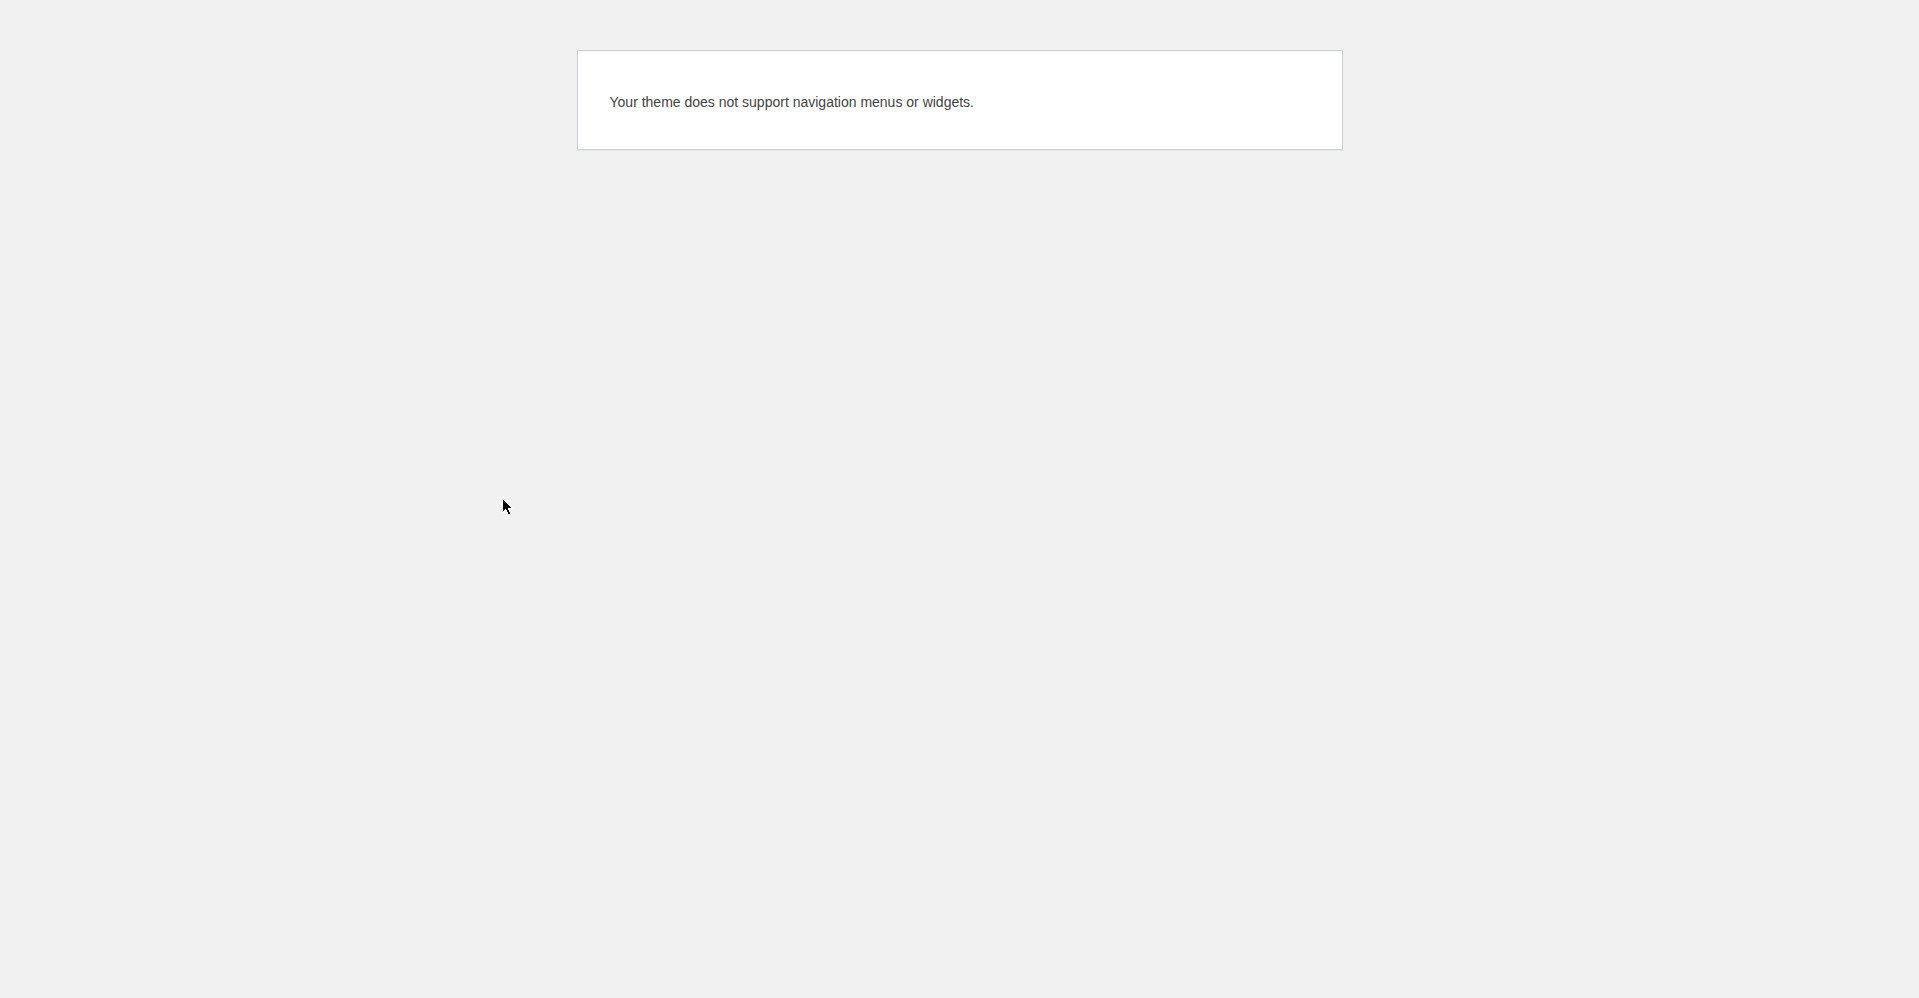
In the WordPress admin, go to Appearance → Menus. If you have never created a menu, the screen shows a “Create a new menu” form. If a menu already exists, it shows that menu, with a link to create a new one. One warning: on a block theme (like Twenty Twenty-Five), Appearance → Menus shows an error — “Your theme does not support navigation menus or widgets” — because block themes manage navigation in the Site Editor instead. This guide covers the classic menu screen, which is what GeneratePress and most classic themes use. The block-theme difference is covered in Step 5.
Step 2: Create the menu and name it
Type a name in the “Menu Name” box — for example “Main Menu” — and click Create Menu. The name is for you, in the admin; visitors never see it. Use a name that says what the menu is for: “Main Menu” for the header, “Footer Menu” for the footer.
Step 3: Add pages and arrange them
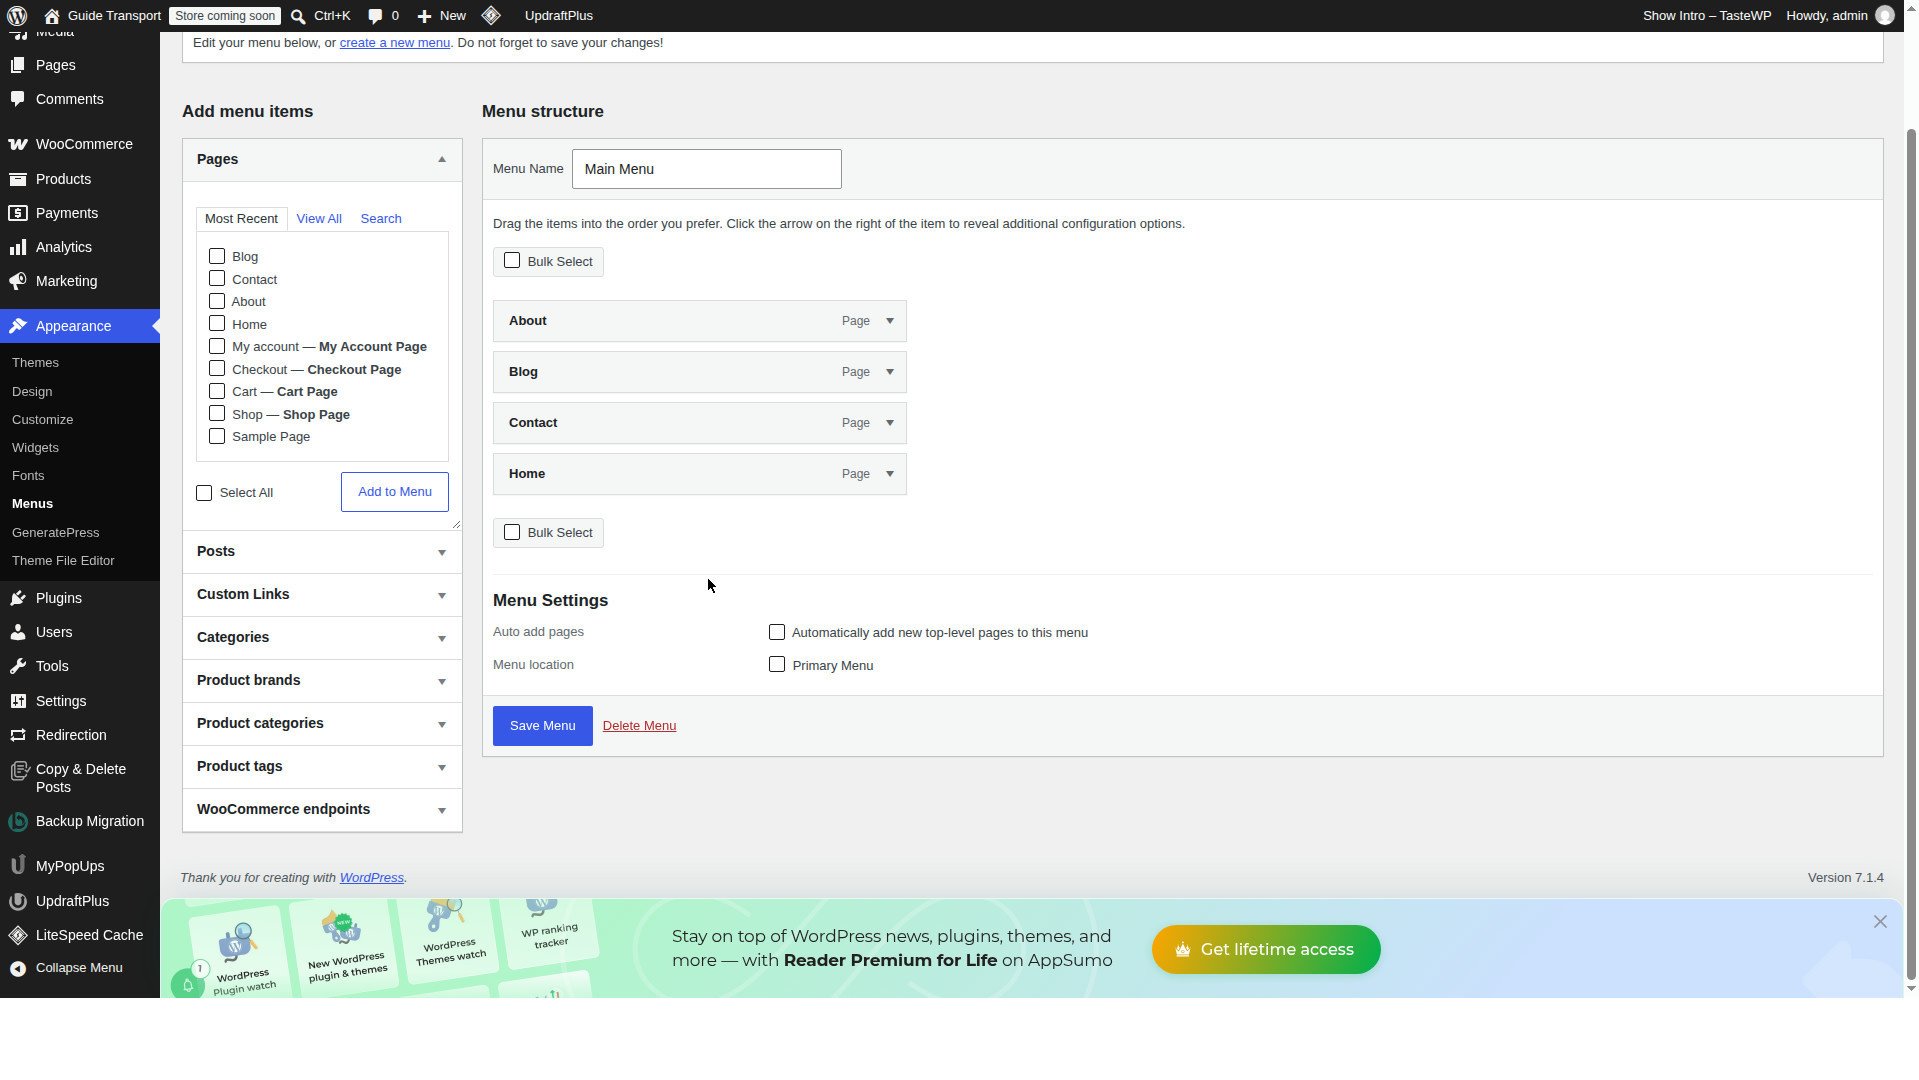
On the left of the Menus screen, tick the pages you want in the menu — Home, About, Contact, Blog — and click Add to Menu. The pages appear on the right as menu items. Drag them up and down into the order you want visitors to see them. To make a sub-menu item (a page that drops down under another page), drag it slightly to the right, under its parent — it will sit indented. Click Save Menu. Do not forget this save: adding pages without saving does nothing.
One real quirk from this test: when the menu was created on the test install, WordPress pre-populated it with 10 items — Home (Custom Link), About, Blog, Cart, Checkout, Contact, Home (Page), My account, Sample Page and Shop. The six unwanted items (the Home Custom Link, Cart, Checkout, My account, Sample Page and Shop) had to be removed first, with Bulk Select, before arranging the four pages. If your new menu already has items you did not add, remove the ones you do not want before you start arranging.
Step 4: Assign the menu to a display location
At the bottom of the Menus screen, under “Menu Settings”, tick a display location — on GeneratePress this is usually “Primary Menu” (the header). You can also tick a footer location if your theme offers one. Click Save Menu again. This is the step people forget: a menu with no display location ticked exists in the admin but does not control the header.
Step 5: Check it on the live site, and know what the fallback looks like
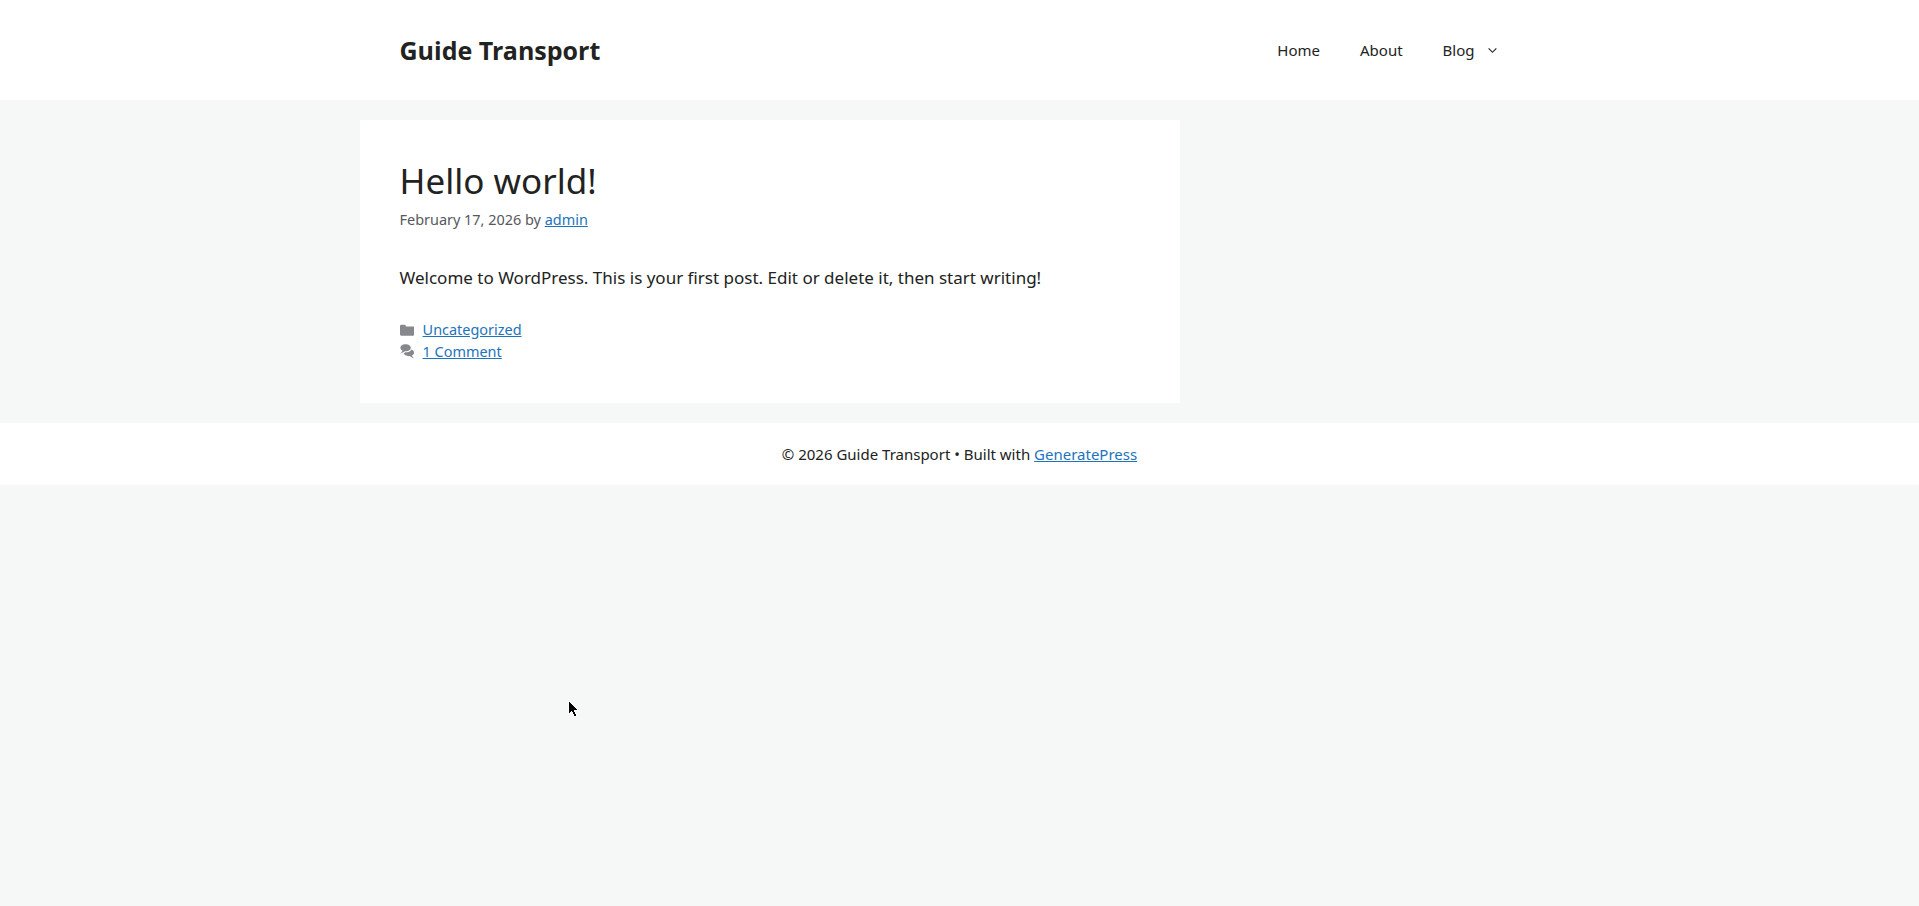
Open your site in a new tab and look at the header: the menu should show the pages in the order you set, with any sub-menu items dropping down. Click each item and confirm it goes to the right page. On the test install the header showed “Home”, “About” and “Blog” with a drop-down arrow, and hovering over Blog revealed “Contact” as the sub-menu item; each link landed on the right page.
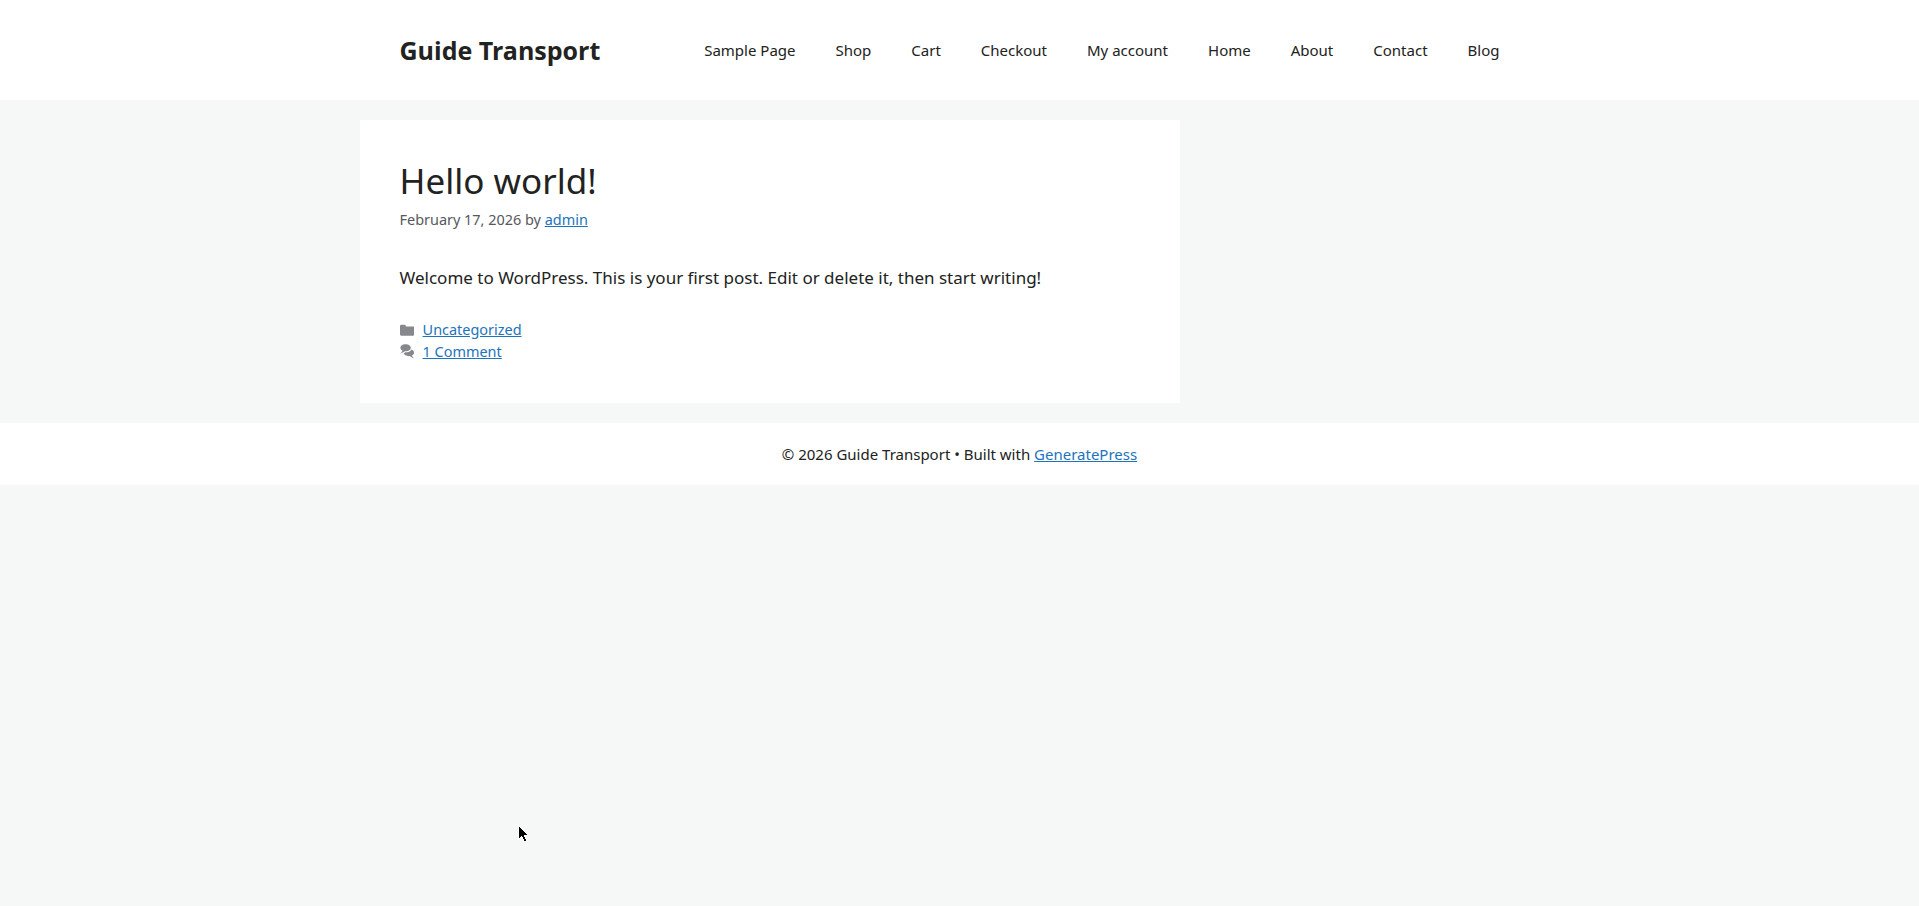
If a page is missing from the menu, go back to Appearance → Menus and check it was added and saved. And if the header shows EVERY page on your site instead of your menu, that is the theme’s fallback: on the test install, unticking Primary Menu and saving made the custom menu disappear from the header, but GeneratePress then listed all pages flat — Sample Page, Shop, Cart, Checkout, My account, Home, About, Contact, Blog — with no sub-menu and no drop-down arrow. Ticking Primary Menu again and saving brought the menu back. So “the menu does not show” usually means no location is assigned, and the giveaway is the header listing all your pages.
Two more things from this test. First, the “Home” menu item links to the Home page at /home/, while the site’s front page (/) still showed the blog (“Hello world!”) because no static front page was set. If your Home page is not your front page, the Home menu item and the site title may go to different places — set a static front page in Settings → Reading if you want them to match. Second, the drop-down itself was verified by hovering — no screenshot of the open drop-down was captured, so the open state is described here, not shown.
Step 6: If your theme is a block theme
If your theme is a block theme, menus work differently: there is no Appearance → Menus screen. On the test install, switching to Twenty Twenty-Five made Appearance → Menus show a plain error page with the exact wording “WordPress › Error — Your theme does not support navigation menus or widgets.” — and the Appearance menu no longer listed Menus at all.
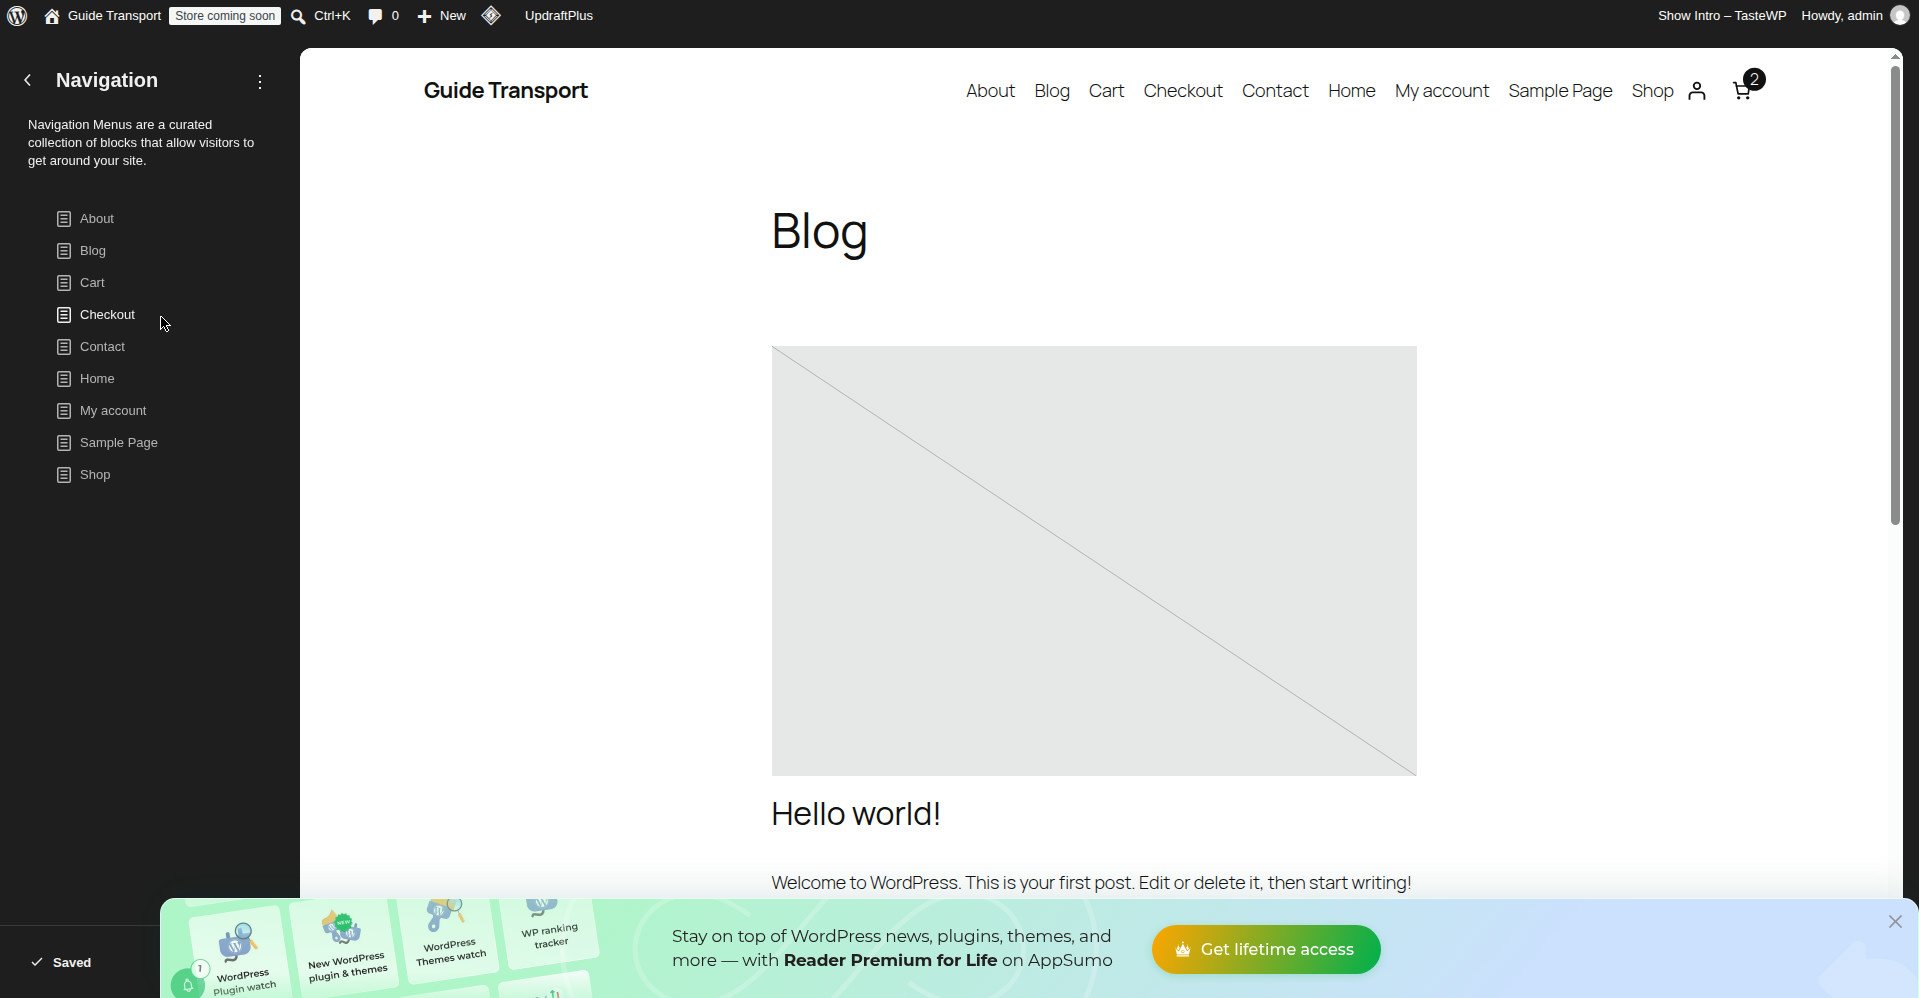
Instead, open Appearance → Editor, select the Navigation block in the header, and add pages there. Note that this is a SEPARATE block-based navigation, not your classic menu: on the test install it listed all 9 pages at Level 1 — About, Blog, Cart, Checkout, Contact, Home, My account, Sample Page, Shop — with no sub-item and no trace of the classic menu’s order or the Contact-under-Blog nesting. Switching back to GeneratePress restored the classic menu on the front end: Home, About, Blog with Contact as the drop-down sub-item.
What was not tested
No screenshot of the open drop-down menu was captured — the drop-down was verified by hovering over Blog, which revealed Contact, but the open state is described in text only. Everything else in this article was tested as described.
What can go wrong
| Symptom | Likely cause | Fix |
|---|---|---|
| The header lists every page instead of your menu | No display location was ticked, so the theme fell back to listing all pages | Open Appearance → Menus, tick the location under Menu Settings, save |
| A page is missing from the menu | It was never added, or the menu was not saved after adding it | Add the page and click Save Menu |
| Menu items are in the wrong order | They were added in the wrong order | Drag them into order on the Menus screen and save |
| A sub-menu item shows as a top-level item | It was not dragged far enough right | Drag it right until it sits indented under its parent, then save |
| “Your theme does not support navigation menus” | The active theme is a block theme | Edit the navigation in Appearance → Editor (Site Editor) instead |
| The menu shows on desktop but not on mobile | The theme hides it behind a mobile menu button | That is normal — check the mobile menu button (usually three lines) opens the menu |
| A menu item links to the wrong page | The wrong page was ticked when adding items | Remove the wrong item, add the right page, save |
| The new menu already has items you did not add | WordPress pre-populated it with pages | Remove the unwanted items with Bulk Select before arranging |
Frequently asked questions
How do I create a menu in WordPress?
Go to Appearance → Menus, create a new menu, add pages to it, drag them into order, tick a display location under Menu Settings, and save. Then check the live site.
Why is my WordPress menu not showing?
Almost always because no display location was ticked. On GeneratePress, the giveaway is the header listing every page on your site instead of your menu. Open Appearance → Menus, tick the location (usually Primary Menu), and save. If you are on a block theme, use the Site Editor instead — the Menus screen does not work there.
How do I add a page to a WordPress menu?
On Appearance → Menus, tick the page on the left, click Add to Menu, drag it into place, and click Save Menu. The page must exist first.
How do I make a drop-down menu in WordPress?
Drag a menu item slightly to the right, under the item it should drop down from. It will sit indented. Save the menu and check the live site — hovering over the parent should show the drop-down.
Can I have more than one menu in WordPress?
Yes. Create a second menu (for example “Footer Menu”) from Appearance → Menus and assign it to a different display location. Most themes offer a header and a footer location.
Where is the Menus screen in WordPress?
Appearance → Menus in the admin. If it is not there, or it shows an error about navigation menus, your theme is a block theme — use Appearance → Editor instead.
Recap checklist
- Pages you want in the menu already created
- Menu created in Appearance → Menus with a clear name
- Unwanted pre-populated items removed
- Pages added and dragged into the right order (sub-menu items indented)
- Display location ticked under Menu Settings
- Save Menu clicked
- Live site checked: menu shows in the header, each item goes to the right page
What to read next
- Start from the beginning — How to Make a Website with WordPress
- Customise the theme around the menu — How to Use the WordPress Block Editor
- Change the theme later — How to Install a WordPress Theme
- Back up before changing site structure — How to Back Up Your WordPress Website
Written by Mohd Shah Ahmad, Learn WordPress Online. He builds and runs live WooCommerce stores in Pretoria, and manages the live stores Stanley’s Bakery (stanleysbakery.co.za) and Aaliyah Perfumes (aaliyahperfumes.co.za). Tested on a WordPress test install — see the “Tested on” box at the top.