
Quick answer
This guide is part of the Start with WordPress hub. Once your site is live, learn how to install a WordPress theme, how to create a menu in WordPress, and how to use the WordPress block editor. To make a website with WordPress, you need a domain name, web hosting, and WordPress itself — installed on that hosting, usually with a one-click installer. Then choose a lightweight theme, create your essential pages (Home, About, Services, Contact), set your homepage and menu, add a few essential plugins, and publish your first post. A basic site can be live in an afternoon. No coding is needed, and the WordPress software itself is free — you pay for the domain and hosting.
This guide uses self-hosted WordPress, from WordPress.org: you own the site and can use any theme or plugin. WordPress.com is the hosted alternative — simpler, but with limits on themes and plugins on its lower plans.
When an install goes wrong, the cause is usually one of four things covered below: the homepage showing blog posts, the site not showing after install, the database-connection error, or a site that only works at /wp.
Tested on
- WordPress version: 7.1.4
- Theme: GeneratePress 3.6.1
- PHP version: 8.4.27
- Test environment: WordPress test install (WordPress pre-installed)
- Test date: 15 November 2026
WordPress was pre-installed on the test install — the site-building steps below were tested, not the hosting install. Tested 15 November 2026 on a WordPress test install.
Before you start: the three things you need
1. A domain name. Your address — yoursite.com or yoursite.co.za. Keep it short and easy to spell. Avoid hyphens and numbers. For a South African business, a .co.za domain signals local trust; for a global audience, a .com is safer. Keywords in a domain give no special ranking boost.
2. Web hosting. The server space where WordPress and your files live. For a first site, shared hosting is enough. Look for a one-click WordPress installer, a free SSL certificate (the padlock), daily backups, and a PHP version that meets WordPress’s current requirements (on the test install, PHP 8.4.27). Do not pick purely on price: cheap, slow hosting ruins everything downstream.
3. A plan for the site. Write down, in one sentence, what the site is for and what a visitor should do on it — for example, “a bakery website where customers can see the menu and place an order”. That sentence decides your pages, menu, and homepage.
Step 1: Register your domain and buy hosting
Register the domain and hosting together with the same provider if you can — it removes a layer of DNS setup, because the provider points the domain at the hosting for you. Choose a server location closest to your visitors.
Two warnings. First, intro prices are teasers — a plan advertised at a low monthly rate almost always renews higher, so check the renewal price before you pay. Second, do not pay for extras you do not need yet — paid security add-ons, premium email, and SEO packages sold at checkout are almost never needed on day one.
Your host will then send you login details for its control panel (often cPanel or DirectAdmin). Your domain may take a few hours to start working everywhere — normal DNS propagation, not a fault.
Step 2: Install WordPress with the one-click installer
Almost every good host has a one-click installer in its control panel — usually labelled “WordPress”, “Softaculous”, or “Website”:
- Open your hosting control panel and find the WordPress installer.
- Choose the domain you want to install WordPress on.
- Leave the directory field blank. If you type
wporbloghere, your site will only work atyoursite.com/wp— and fixing it later means moving the whole install. An empty field installs WordPress at the root, so your homepage isyoursite.com. - Set a site title, an admin username (never use “admin” — it is the first username attackers try), a strong password, and an admin email address you actually check.
- Click install and wait a minute or two.
Then log in at yoursite.com/wp-admin. Bookmark that address. If your host has no one-click installer, WordPress.org provides a free download with a manual installation guide.
No screenshot: the one-click install was not tested — WordPress was pre-installed on the test install, so the installer screen was never seen in this run.
Step 3: Take a tour of the dashboard — and delete the sample content
Spend ten minutes looking around before you change anything. The left-hand menu is where everything lives: Posts (blog articles, newest first), Pages (fixed content such as Home, About, and Contact), Media (images and files), Appearance (themes, menus, and the Site Editor), Plugins (extra features), and Settings (site title, homepage, permalinks, and more).
Delete the two pieces of default content: a sample post called “Hello world!” and a sample page. They are placeholders, and leaving them live is the easiest way to look unfinished — Google can index them before you notice.
Step 4: Choose a lightweight theme
Your theme controls how the site looks. WordPress installs a default block theme for you — on the test install, GeneratePress 3.6.1 was the active theme. For a first site, use the theme your host installed or switch to a lightweight free theme. Go to Appearance → Themes → Add New, search for the theme name, click Install, then Activate.
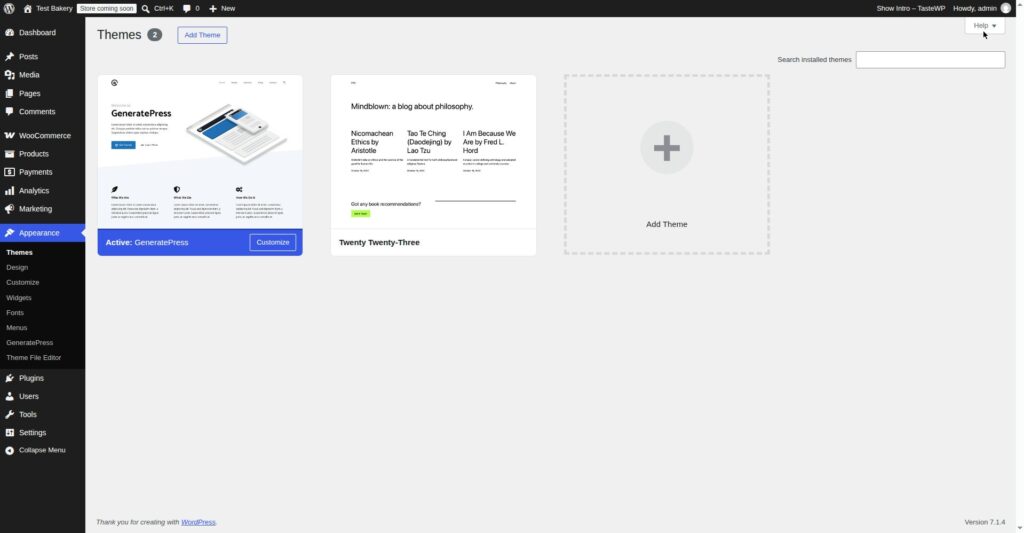
Three rules. Pick lightweight over flashy — a fast theme beats one with fifty animations. Check the theme is maintained — look at when it was last updated and whether it is compatible with your WordPress version. Do not judge a theme by its demo — demos use professional photography.
If you use a block theme, customise it in Appearance → Editor (the Site Editor). If you use a classic theme, use Appearance → Customize instead.
Step 5: Create your essential pages
Go to Pages → Add New to create the pages every site needs:
- Home — what you do, who it is for, and what the visitor should do next. One clear call to action beats five.
- About — who you are and why a visitor should trust you: where you are based, how long you have been doing this, and what you actually do.
- Services (or Products, or Menu) — what you offer, in plain language.
- Contact — how to reach you: a contact form plus a phone number or email address.
- Privacy Policy — required if you run analytics, a contact form, or ads. WordPress can generate a starter page under Settings → Privacy; adapt it rather than publishing it as-is.
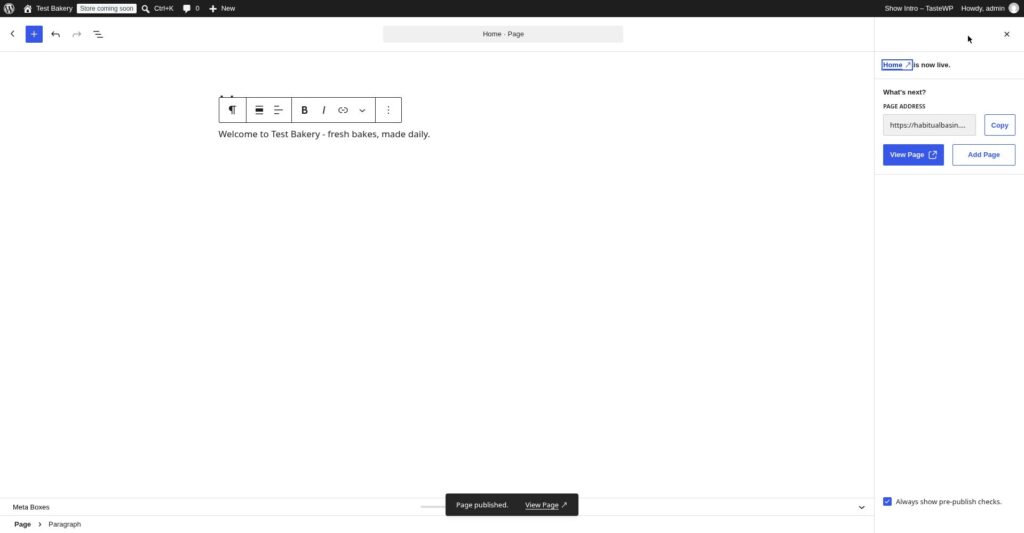
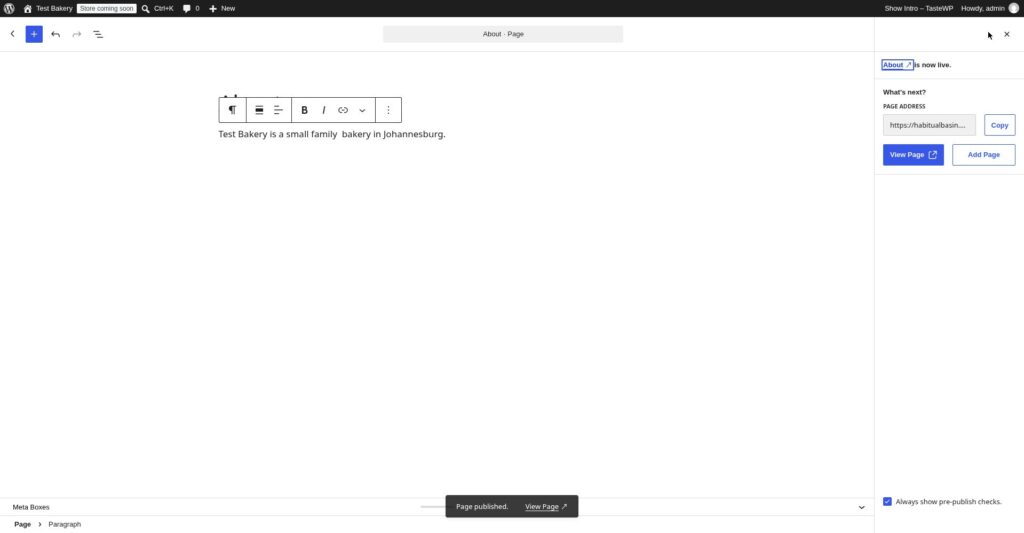
Write the page, click Publish, and repeat. A live page you can improve beats a perfect page that never ships.
Posts vs pages
A page is fixed content: Home, About, Contact. A post is dated, timely content: a blog article, a news update, an announcement. Posts appear in reverse chronological order on your blog page; pages do not. Timeless content goes in pages, timely content goes in posts.
Step 6: Set your homepage — fix for “WordPress homepage showing blog posts instead of homepage”
This is the most common “my site looks wrong” moment for beginners, with a one-minute fix. By default, WordPress shows your latest posts on the homepage. To fix it, set a static homepage.
- Create a page called Home and publish it.
- Optionally, create a blank page called Blog — do not add content to it; WordPress will fill it with your posts automatically. (On the test install, no Blog page was created and the Posts page was left as “— Select —”.)
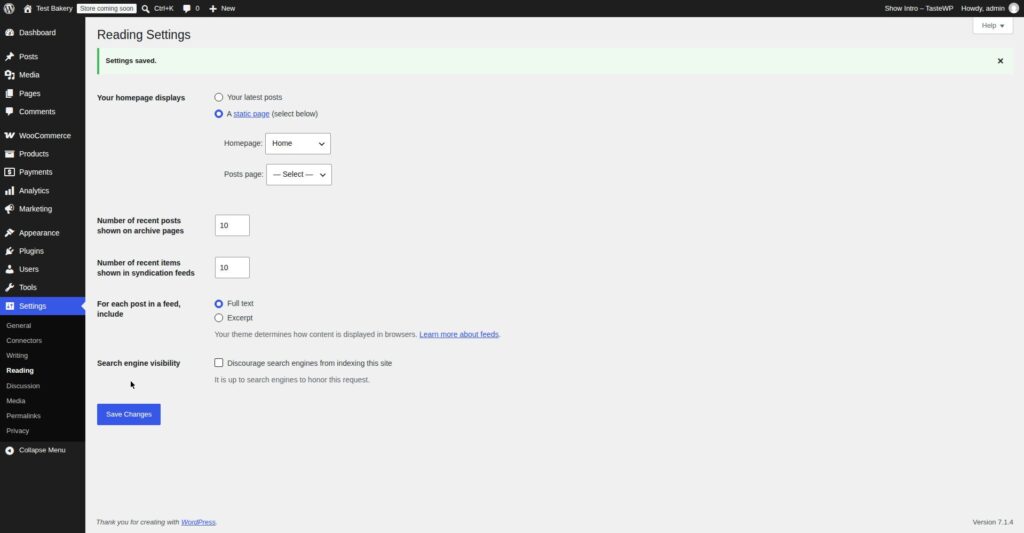
- Go to Settings → Reading, select A static page, choose Home as your Homepage, leave the Posts page as “— Select —”, then click Save Changes.
- Open your site in a fresh browser tab and check.
If the homepage still shows posts, check the Home page is actually Published, not a draft (WordPress falls back to the blog feed if it is a draft), and that your menu does not still link to the old blog URL.
Step 7: Build your navigation menu
Go to Appearance → Menus (classic themes) or use the Navigation block in the Site Editor (block themes). Add your pages — Home, About, Services, Contact — in the order a visitor would want them, and save.
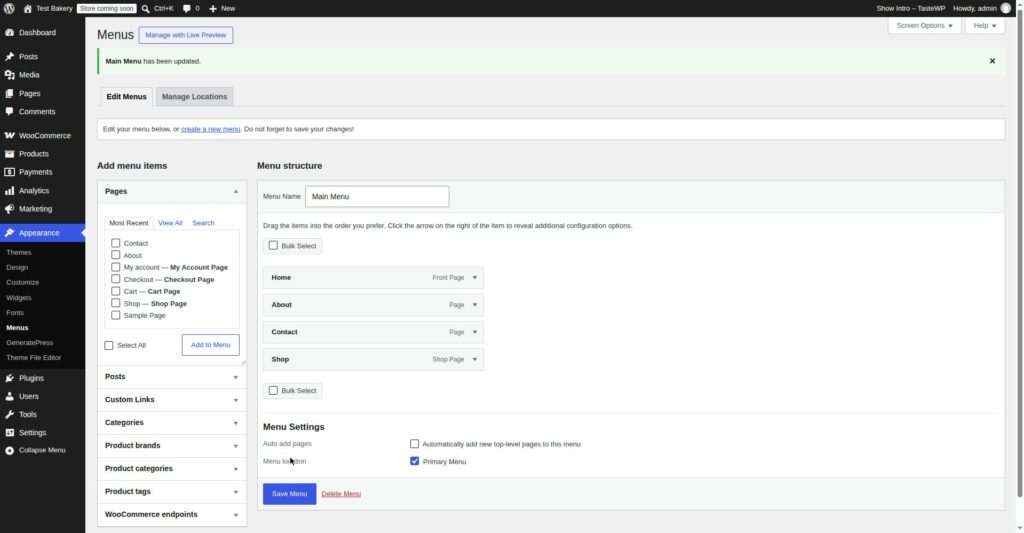
Keep it short: five or six links is plenty. Put the most important page first after Home, and Contact last. After Step 6, make sure the menu’s “Home” link points to your domain itself (yoursite.com), not to the blog feed.
Step 8: Set the essential settings
Work through these five settings before you launch — each takes a minute.
Site title — Settings → General. Make it your business name, not “My WordPress Site”, the default.
Permalinks — Settings → Permalinks. Choose Post name, so addresses are readable: yoursite.com/about-us instead of yoursite.com/?p=123. Set it on day one — changing it later breaks old links.
Timezone — Settings → General. Set it to your own timezone (for example, Africa/Johannesburg).
Comments — Settings → Discussion. For a business site, consider turning comments off on pages, or requiring approval before a comment appears. Unmoderated comments on a new site are almost entirely spam within weeks.
Site Health — Tools → Site Health. WordPress’s built-in screen flags real problems: an outdated PHP version, a missing SSL certificate, or a plugin conflict.
Step 9: Install a few essential plugins — and nothing else
Plugins add features, but the trap is installing too many — a site with thirty plugins is slower and more fragile than a site with five. Start with these, all free:
- An SEO plugin (Rank Math or Yoast SEO) — for titles, meta descriptions, and a sitemap.
- A contact form plugin (WPForms Lite or Contact Form 7) — so visitors can reach you without your email address being harvested by spammers.
- A backup plugin (UpdraftPlus) — back up automatically to a remote location, not just to the same server.
- A security plugin (Wordfence or Solid Security) — for login protection and basic hardening.
- A caching plugin (LiteSpeed Cache or WP Super Cache) — check with your host first; some hosts already handle caching at server level.
To install one, go to Plugins → Add New, search for the plugin name, click Install Now, then Activate. Check when it was last updated and whether it is compatible with your WordPress version.
One hard rule: never install a plugin from a random website or a “free premium plugin” download link. Nulled plugins are one of the most common ways WordPress sites get hacked.
Step 10: Publish your first post
Go to Posts → Add New and write your first article in the block editor. Each paragraph, heading, image, or button is a block, which you add with the + button.
Use one H1 only — your post title is the H1; inside, use H2 for main sections and H3 for subsections, in order. Add an image, properly — at least one image with descriptive alt text, shrunk before you upload. Write a short excerpt — the summary that shows on your blog page and in search results. Preview before you publish, and check it on your phone too. Then click Publish.
How to make a website with WordPress in South Africa
The steps above work anywhere. Three things are different for a South African site.
Domain and hosting in rand. A .co.za domain and local hosting are priced in rand. Prices were not checked in this test run — the test site came with WordPress pre-installed, not bought from HostAfrica — so check the renewal price, not just the first-year price, before you buy.
Softaculous / DirectAdmin — the screens you will actually see. Many South African hosts, including HostAfrica, use DirectAdmin with the Softaculous installer rather than cPanel. The steps are the same, but the buttons look different from the cPanel screenshots in most global guides — follow the labels on your own screen.
POPIA applies from day one. If your site collects personal information — a contact form, analytics, a newsletter signup — South Africa’s Protection of Personal Information Act (POPIA) applies. Publish a Privacy Policy that says what you collect and why, and do not add people to a mailing list without consent.
Troubleshooting: the errors beginners actually hit
Do not change files at random — match the symptom to the cause first.
WordPress website not showing after install
If WordPress installed but the site is not loading, or your domain shows your host’s placeholder page, the domain is probably still propagating, or it is pointed at the wrong server. Wait a few hours, check the DNS settings, and if it is still showing the placeholder after 24 hours, ask your host’s support to check it.
WordPress error establishing a database connection — fix for beginners
This message means WordPress has loaded, but it cannot talk to its database. If you installed manually, your wp-config.php is wrong — one wrong character is enough, and the password is the usual suspect. If you used a one-click installer, re-check the database details you entered. If you cannot see anything wrong in wp-config.php yourself; contact your host — the database service itself may be down.
No screenshot: the database-connection error was not reproduced on the test install in this run.
WordPress site only works at yoursite.com/wp
You installed WordPress into a subfolder — the directory field was not empty during installation (Step 2). For a brand-new, empty site, uninstall it and reinstall with the directory field blank. If the site already has content, follow WordPress’s own guide for moving WordPress to the root directory, or ask your host to do it.
“Not secure” in the browser, or no padlock
Your SSL certificate is not active yet, or your site address still uses http. Activate the free SSL certificate in your hosting panel first, then check Settings → General — both the WordPress Address and Site Address should start with https://. Do not enable any “force HTTPS” redirect until the padlock works on its own; forcing a redirect to a broken certificate locks you out of your own site.
Two smaller fixes: if pages show “404 Not Found”, go to Settings → Permalinks and click Save Changes without changing anything. If changes do not appear on the live site, clear your browser cache first, then any caching plugin’s cache.
Launch checklist
Before you tell anyone the site exists, check: sample content deleted; homepage is a static page showing your Home page; every menu link goes somewhere real; the padlock shows; the contact form works — submit a test message and confirm it arrives; the site reads well on your phone; an automatic backup exists; and you have proofread every page once.
What I tested / What failed
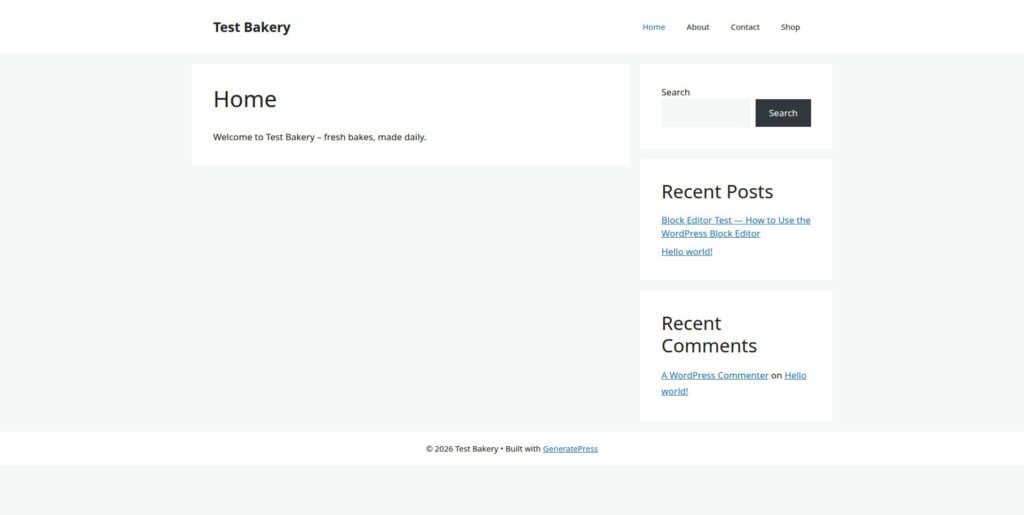
This section records what was actually tested on the WordPress test install on 15 November 2026. WordPress was pre-installed on the test install — the hosting install and the database-connection error were not tested. The site-building steps were tested: Home, About and Contact pages were created and published; Settings → Reading was saved with a static homepage (Home) and no Posts page; a Main Menu (Primary) was built with Home, About, Contact and Shop; and the front end was checked. The test script below records what each step showed.
Test environment: a WordPress test install — WordPress 7.1.4, GeneratePress 3.6.1, PHP 8.4.27, WooCommerce 11.3.0 active. WordPress was pre-installed on the test install; there was no fresh hosting account and no staging subdomain in this run.
Test script:
- One-click install, directory field blank — NOT TESTED: WordPress was pre-installed on the test install; the installer and the directory field were not run in this test, so there is no record of whether the site loaded at the root domain.
- Subfolder mistake — NOT TESTED: no second copy was installed with the directory field set to wp, so there is no root vs /wp result to record.
- Static homepage — TESTED: Home (ID 27), About (ID 29) and Contact (ID 31) pages were created and published; Settings → Reading was saved with “A static page” chosen, Homepage = Home, Posts page left “— Select —”; “Settings saved.” The homepage showed the welcome text, not the blog feed.
- Menu — TESTED: “Main Menu” (ID 18) was created and assigned to the Primary Menu with Home (Front Page), About, Contact and Shop. Clicking “View All” on the Menus screen had auto-added all 8 pages; Cart, Checkout, My account and Sample Page were removed one by one (expand item → Remove) before the menu was created. The menu appeared in the header.
- Permalinks — NOT TESTED in this run: the permalink setting was not changed on the test install.
- Plugins — NOT TESTED as part of this article’s run: no plugin was installed from each Step 9 category here. (UpdraftPlus and Health Check were installed in the separate Install a Plugin test run on the same test install.)
- SSL — NOT TESTED: the host’s free SSL certificate was not activated in this run and no padlock timing was recorded.
- First post — PARTLY TESTED: no blog post was published in this run; the test post was written in the separate Block Editor test run on the same test install (test post 24, published 15 November 2026 11:21), and it appeared correctly on the front end.
- Error reproduction — NOT TESTED: no troubleshooting error was triggered on the test install in this run.
Results: the site-building steps above were tested on 15 November 2026 on the WordPress test install. What failed: nothing in the steps tested failed, but the one-click install, the subfolder mistake, permalinks, SSL and error reproduction were not tested in this run (see the list above). The live site has no WooCommerce installed; the test install was a WordPress test install, not the live site.
Next steps
You now have a live WordPress website: domain, hosting, WordPress installed, a theme, your essential pages, a working menu, a few plugins, and your first post. That is the foundation — everything else is content and improvement.
From here: write regularly (two articles a week is a realistic pace); learn the block editor properly (patterns and the Site Editor save hours); set up Google Search Console and improve the pages Google actually shows first; and when you are ready to sell online, WooCommerce turns this same WordPress site into a shop — see our WooCommerce guides on adding products and setting up a store.
If you would like a website built properly rather than building it yourself, the author manages the live stores Stanley’s Bakery (stanleysbakery.co.za) and Aaliyah Perfumes (aaliyahperfumes.co.za).
— Mohd Shah Ahmad, WordPress & WooCommerce specialist based in Pretoria, South Africa.