
Quick answer
This is part of the Build a WooCommerce Store hub, which walks through setting up your shop, adding products and taking payments. A CSV import builds on what you already know from how to add products in WooCommerce and how to add variable products in WooCommerce, and the image rules below go with how to add product images in WooCommerce. To import products into WooCommerce with CSV, go to Products → All Products → Import, choose a CSV file with the right column headers, click Continue, map any columns WooCommerce did not recognise, choose Update existing products or Create new products, and click Run the importer. For a variable product, put the parent product on one row with Type set to variable, and each variation on the next rows with Type set to variation and the same Parent SKU as the parent. A CSV import will not import the images themselves — it only imports the image URLs or filenames, and the files must already exist in your Media Library or at a public URL. Images are the part of the import that fails most often, and the guide below shows how to make it work.
Tested on: WordPress 7.1.4 · WooCommerce 11.3.0 · Theme: GeneratePress 3.6.1 · PHP 8.4.27 · Tested: 15 November 2026 on a WordPress test install. Screenshots are from that test install. If your dashboard looks different, check your WooCommerce version first — screens change between versions.
What is a CSV file, and what does the importer actually do?
A CSV file is a spreadsheet saved as plain text, with one product per row and one field per column, separated by commas. You can make one in Google Sheets, Excel, or LibreOffice Calc, and save it as CSV (Comma delimited).
The WooCommerce Product CSV Importer is built into WooCommerce core, free, as it ships. It reads your file, creates or updates the products in it, and reports what it imported, what it skipped, and what it failed on. It does not import images themselves, it does not import orders or customers, and it does not import settings. It imports products, and only products.
The importer is the right tool for adding or updating many products at once. It is the wrong tool for adding one product — use Products → Add New for that, covered in how to add products in WooCommerce. It is also the wrong tool for moving a whole store from one website to another. For a full migration, use a migration plugin or a proper export/import tool, not a product CSV.
The two things people get wrong about CSV imports
- It will not import the images themselves. The CSV only contains the image URLs or filenames. The files must already exist in your Media Library, or at a public URL the importer can download from. If the file is not there, the product imports with no image, and the import report will tell you the image was skipped.
- It will not fix a bad spreadsheet. If your prices are in the wrong column, your SKUs are duplicated, or your file is saved in the wrong encoding, the importer will import exactly what you gave it — wrong prices, duplicate SKUs, broken characters — or it will skip those rows and tell you why. The work of a CSV import is in the spreadsheet, not in the importer.
What you need before you start
- WooCommerce installed and activated, with a Shop page set. You should already know how to add a product manually — if not, read how to add products in WooCommerce first, because this guide builds on it.
- A CSV file, with the right column headers. The exact headers are listed in the next section. You can download WooCommerce’s sample CSV from the Import screen and use it as a template.
- A spreadsheet editor that can save as CSV. Google Sheets is free and the safest choice, because it saves in UTF-8 by default. Excel works too, but you must save as CSV UTF-8 (Comma delimited), not plain CSV (Comma delimited), or special characters such as é and ñ will break.
- A backup of your store, or a test product to import first. Before you import 200 products, import two. If those two come in correctly, import the rest. If they do not, you have two products to delete, not 200.
- Your images, already uploaded or at a public URL. If your images are on your computer, upload them to Media → Library first, or the import will skip them.
- Your SKUs, decided in advance. Every product needs a unique SKU if you use them, and the importer matches existing products by SKU. If you do not use SKUs, the importer matches by ID, which is harder to control.
Back up first. Before any bulk import, back up your database, or at least export your existing products at Products → All Products → Export. If the import goes wrong, you can delete the imported products and start again, but you cannot undo a bulk update that overwrote your prices. The export takes two minutes. Do it.
The CSV format — the columns you need
Required columns
These are the minimum for a simple product to import:
| Column | What to put in it | Example |
|---|---|---|
| ID | Leave blank for a new product. Fill it in only if you are updating an existing product by its WordPress post ID. | (blank) |
| Type | simple, variable, grouped, or external. Use simple for a normal product. | simple |
| SKU | Your unique code for the product. Must be unique across your store. | PERF-VAN-30 |
| Name | The product name. | Vanilla Perfume 30 ml |
| Published | 1 for published, 0 for draft, -1 for private. Use 0 for a test import. | 0 |
| Regular price | The normal price, numbers only, no currency symbol. | 399 |
| Sale price | The discounted price, numbers only. Leave blank if the product is not on sale. | 299 |
| Stock | The quantity you have, if you manage stock. Leave blank if you do not. | 12 |
| Categories | Category names, separated by commas, with > for a sub-category. | Perfumes > Vanilla |
| Images | Image URLs or filenames, separated by commas. The first one is the main image, the rest are gallery images. | https://yourstore.co.za/wp-content/uploads/vanilla-perfume.jpg |
Useful columns
| Column | What to put in it | Example |
|---|---|---|
| Description | The long description, in HTML if you need formatting. | <p>A warm vanilla perfume…</p> |
| Short description | The short description, shown next to the price. | Warm vanilla, 30 ml, in a glass bottle. |
| Weight (kg) | The weight in kilograms, numbers only. | 0.2 |
| Length (cm), Width (cm), Height (cm) | The dimensions in centimetres, numbers only. | 10, 5, 5 |
| Tax status | taxable, shipping, or none. | taxable |
| Tax class | The tax class, if you use one. Leave blank for standard. | (blank) |
| Backorders | 0 for do not allow, 1 for allow but notify, 2 for allow. | 0 |
| Sold individually | 1 if the customer can only buy one, 0 if they can buy more than one. | 0 |
| Attribute 1 name, Attribute 1 value(s), Attribute 1 visible, Attribute 1 global | For a variable product, the attribute name, the values separated by commas, whether the customer sees it (1 or 0), and whether it is a global attribute (1 or 0). | Size, S, M, L, 1, 1 |
| Parent SKU | For a variation row, the SKU of the parent product. | TSH-BLU |
| Parent | For a variation row, the parent product’s SKU. Used with Parent SKU. | TSH-BLU |
How to get the exact headers
Do not type the headers from memory. Download WooCommerce’s sample CSV from the Import screen — it has every column, in the right order, with example values — and use it as your template. Delete the example rows, keep the headers, and fill in your own products. That way you cannot misspell a header, and the importer will recognise every column.
The rules that matter
- One row per product. One row per variation too. A variable product with six variations is seven rows: one parent row, six variation rows.
- The first row is the header row. The importer treats the first row as column names, not as a product. Do not put a product in the first row.
- Do not change the header names.
Regular priceis notPrice, andSKUis notSku. The importer matches on the exact header text. If it does not recognise a column, it will ask you to map it manually on the next screen — but it is easier to get the headers right in the first place. - Use UTF-8 encoding. Save the file as CSV UTF-8. If you save it in another encoding, special characters such as é, ñ, and — will turn into question marks or boxes.
- Use a comma as the separator. If your spreadsheet uses a semicolon — common in some European locales — change it to a comma, or the importer will treat the whole row as one column.
How to export your existing products first (the template trick)
The fastest way to get a CSV with the right headers is to export the products you already have, then edit that file.
Go to Products → All Products, click Export, choose All products or Filtered products, and click Generate CSV. WooCommerce downloads a CSV with every product, in the exact format the importer expects. Open it in Google Sheets, delete the rows you do not want to change, edit the ones you do, and save it as CSV UTF-8. Import that file back, and choose Update existing products on the import screen. That is how you bulk-update prices, stock and descriptions without touching each product one by one.
How to import products with CSV, step by step
Step 1: Prepare the CSV
Open your CSV in Google Sheets or Excel. Check the headers against the table above. Check that every product has a unique SKU. Check that prices are numbers only, with no currency symbol and no commas. Check that the file is saved as CSV UTF-8 (Comma delimited).
Step 2: Go to Products → All Products → Import
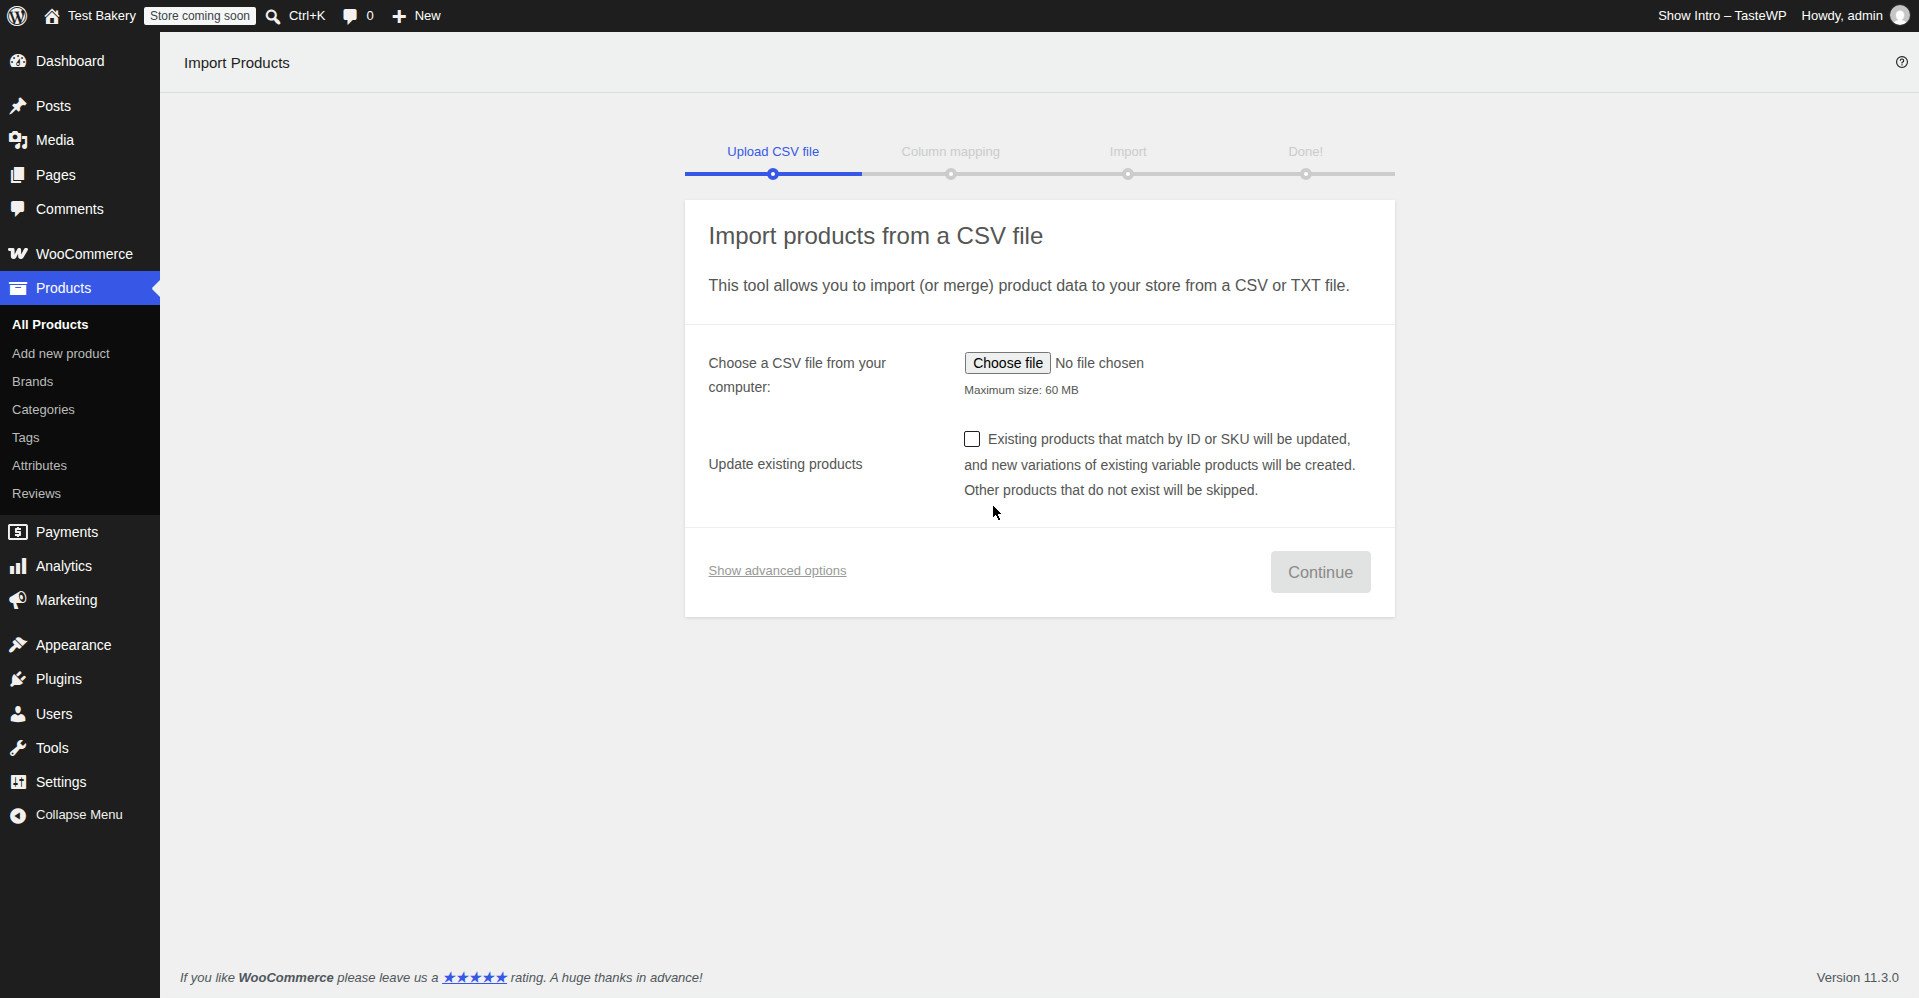
In the WordPress admin, go to Products → All Products and click the Import button at the top. Or go to Tools → Import → WooCommerce products (CSV). Both open the same screen.
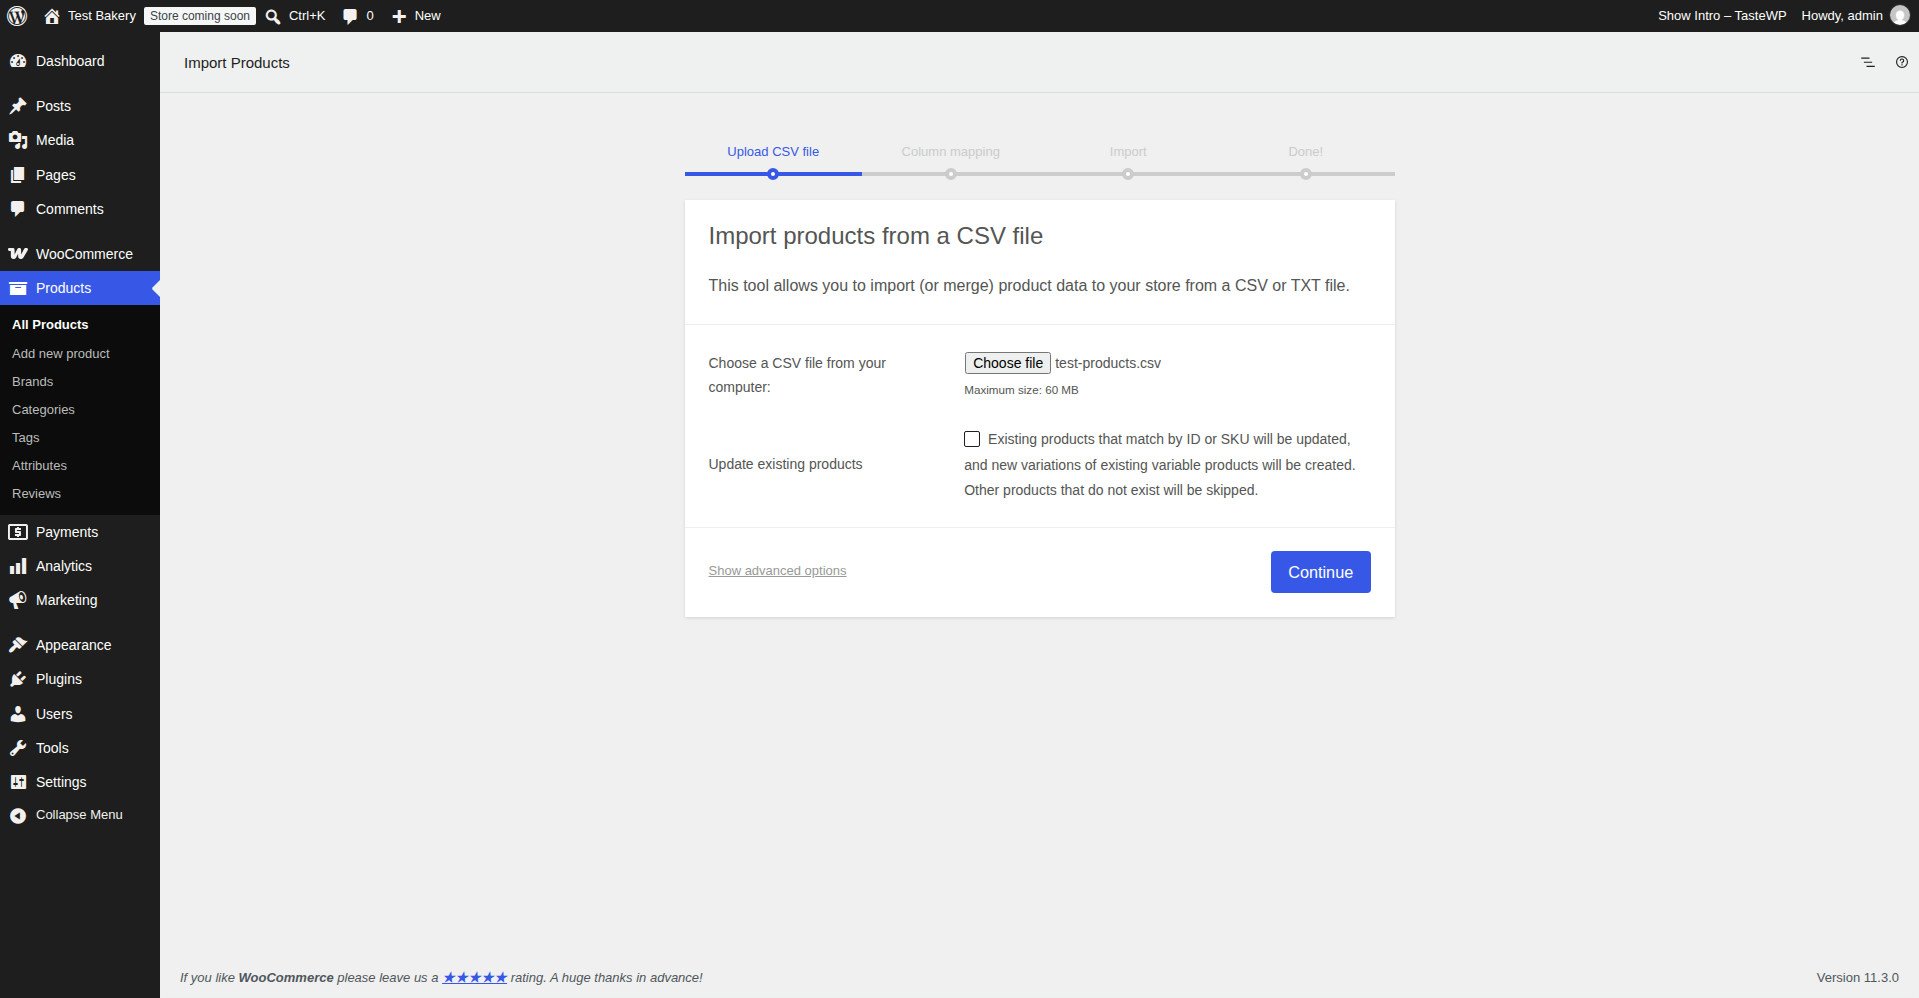
Step 3: Choose the file and click Continue
Click Choose File, select your CSV, and click Continue. WooCommerce reads the file and shows you the Column Mapping screen.
Step 4: Map the columns
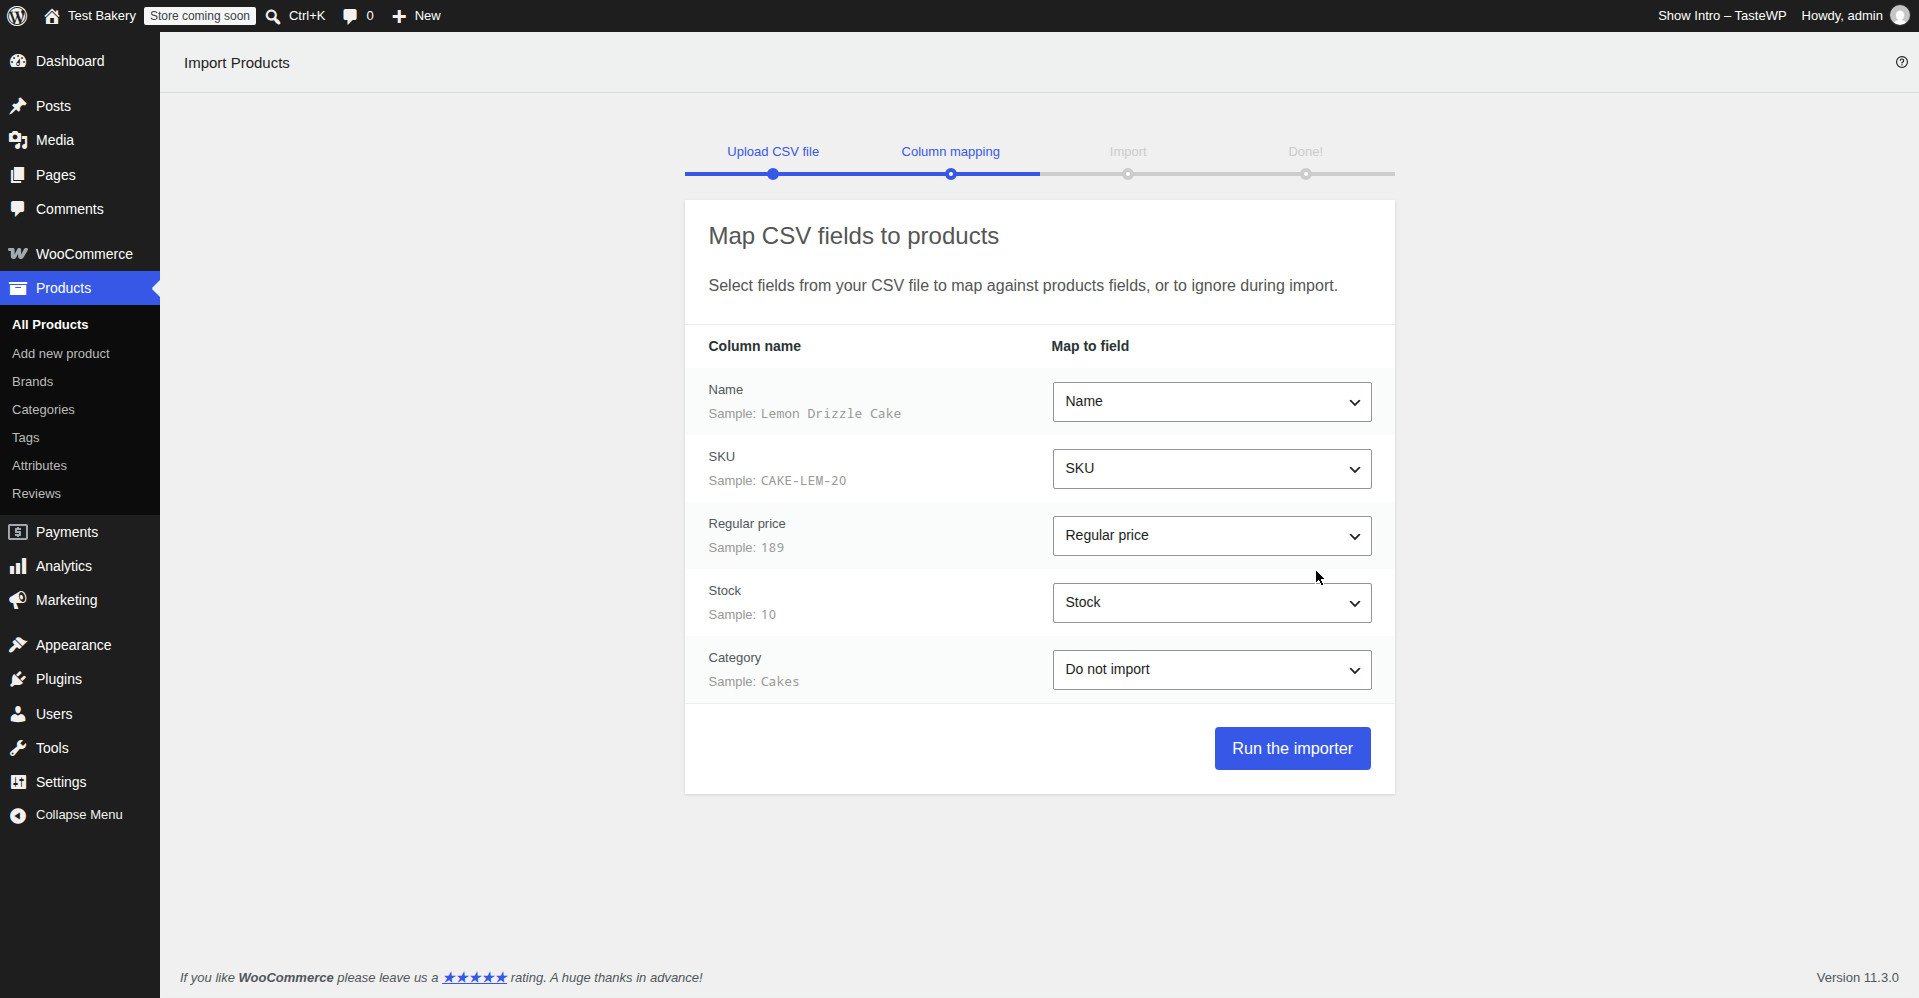
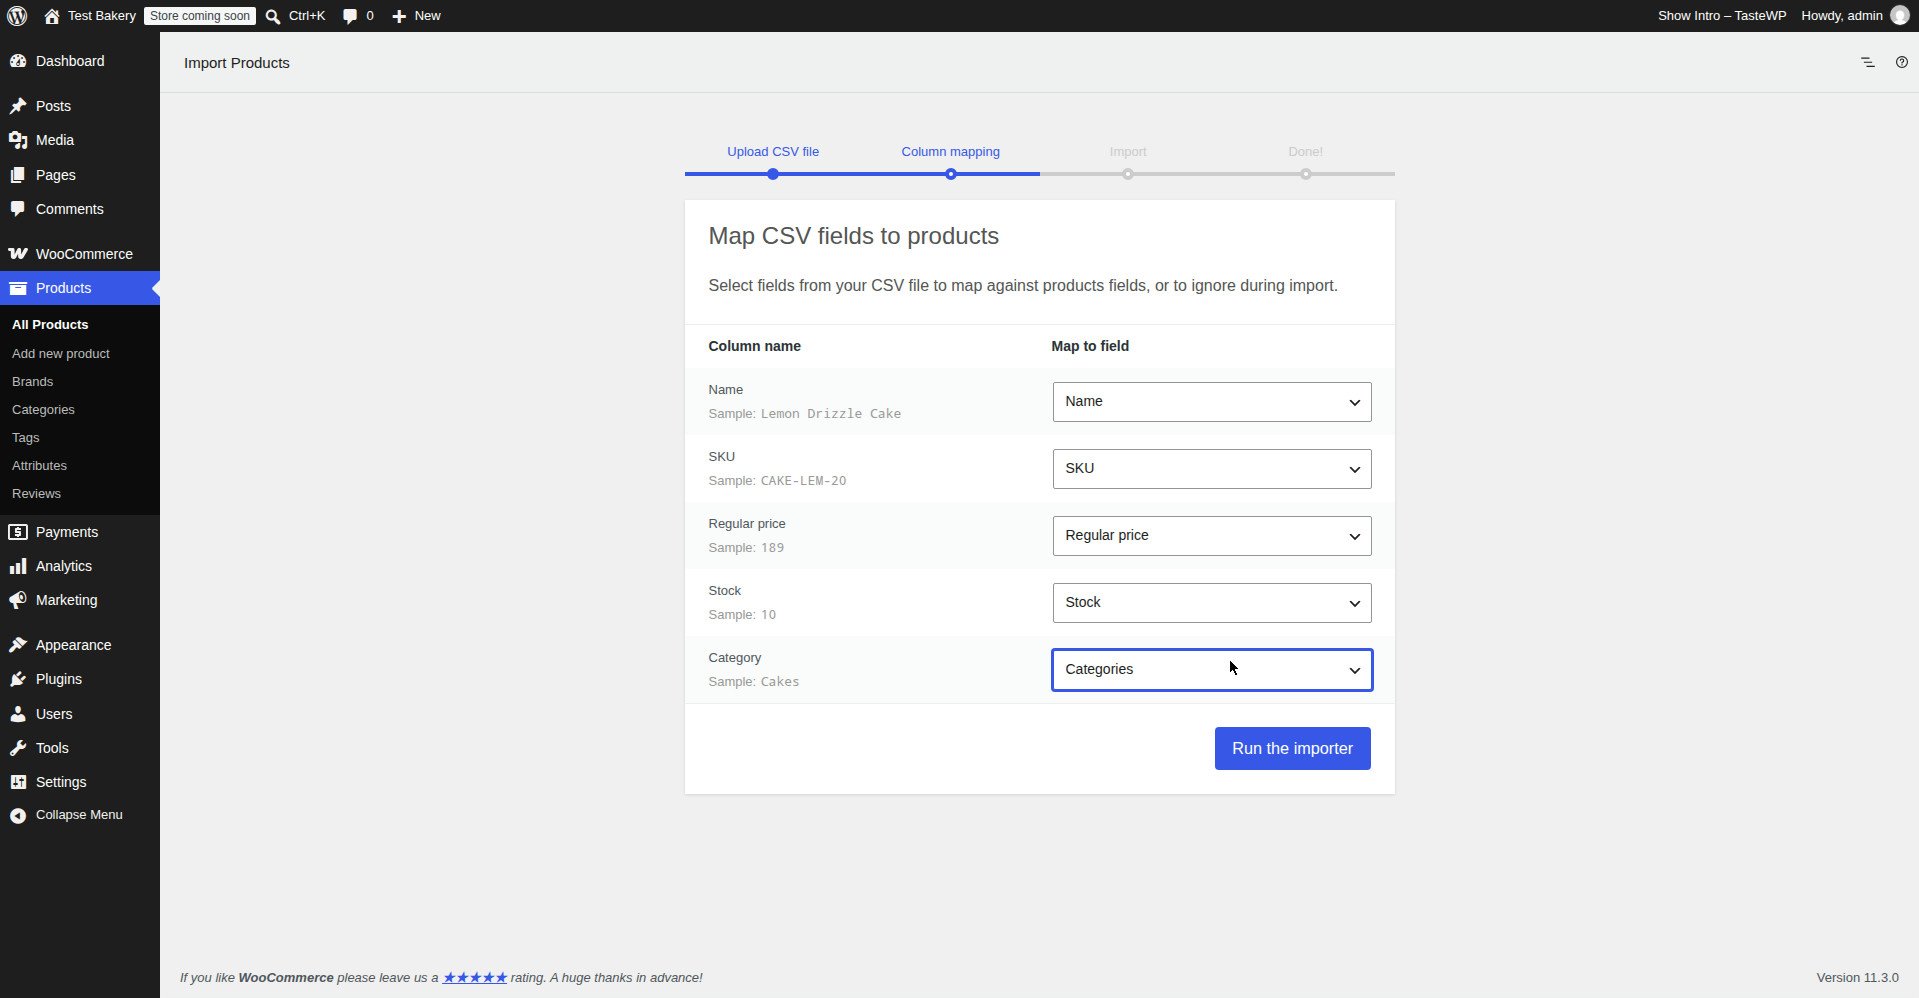
WooCommerce tries to match each column in your file to a product field. Most columns will be recognised automatically. If a column is not recognised, choose the right field from the dropdown next to it. If a column should be ignored, choose Do not import. Check the preview row at the bottom — it shows the first product in your file, with the fields filled in. If the preview looks wrong, the mapping is wrong. Fix it before you continue.
Step 5: Choose Update or Create, and run the importer
On the next screen, choose what to do with existing products:
- Update existing products — the importer matches rows to existing products by SKU (or by ID, if you filled in the ID column) and updates them. Products that are not in the file are left alone.
- Create new products — the importer creates a new product for every row. If a SKU already exists, that row is skipped, and the report will tell you why.
Then click Run the importer. WooCommerce imports the products, one by one, and shows a progress bar. Do not close the tab while it is running. For a large file — more than 500 products — the import may take several minutes. Wait for it to finish.
Step 6: Read the import report
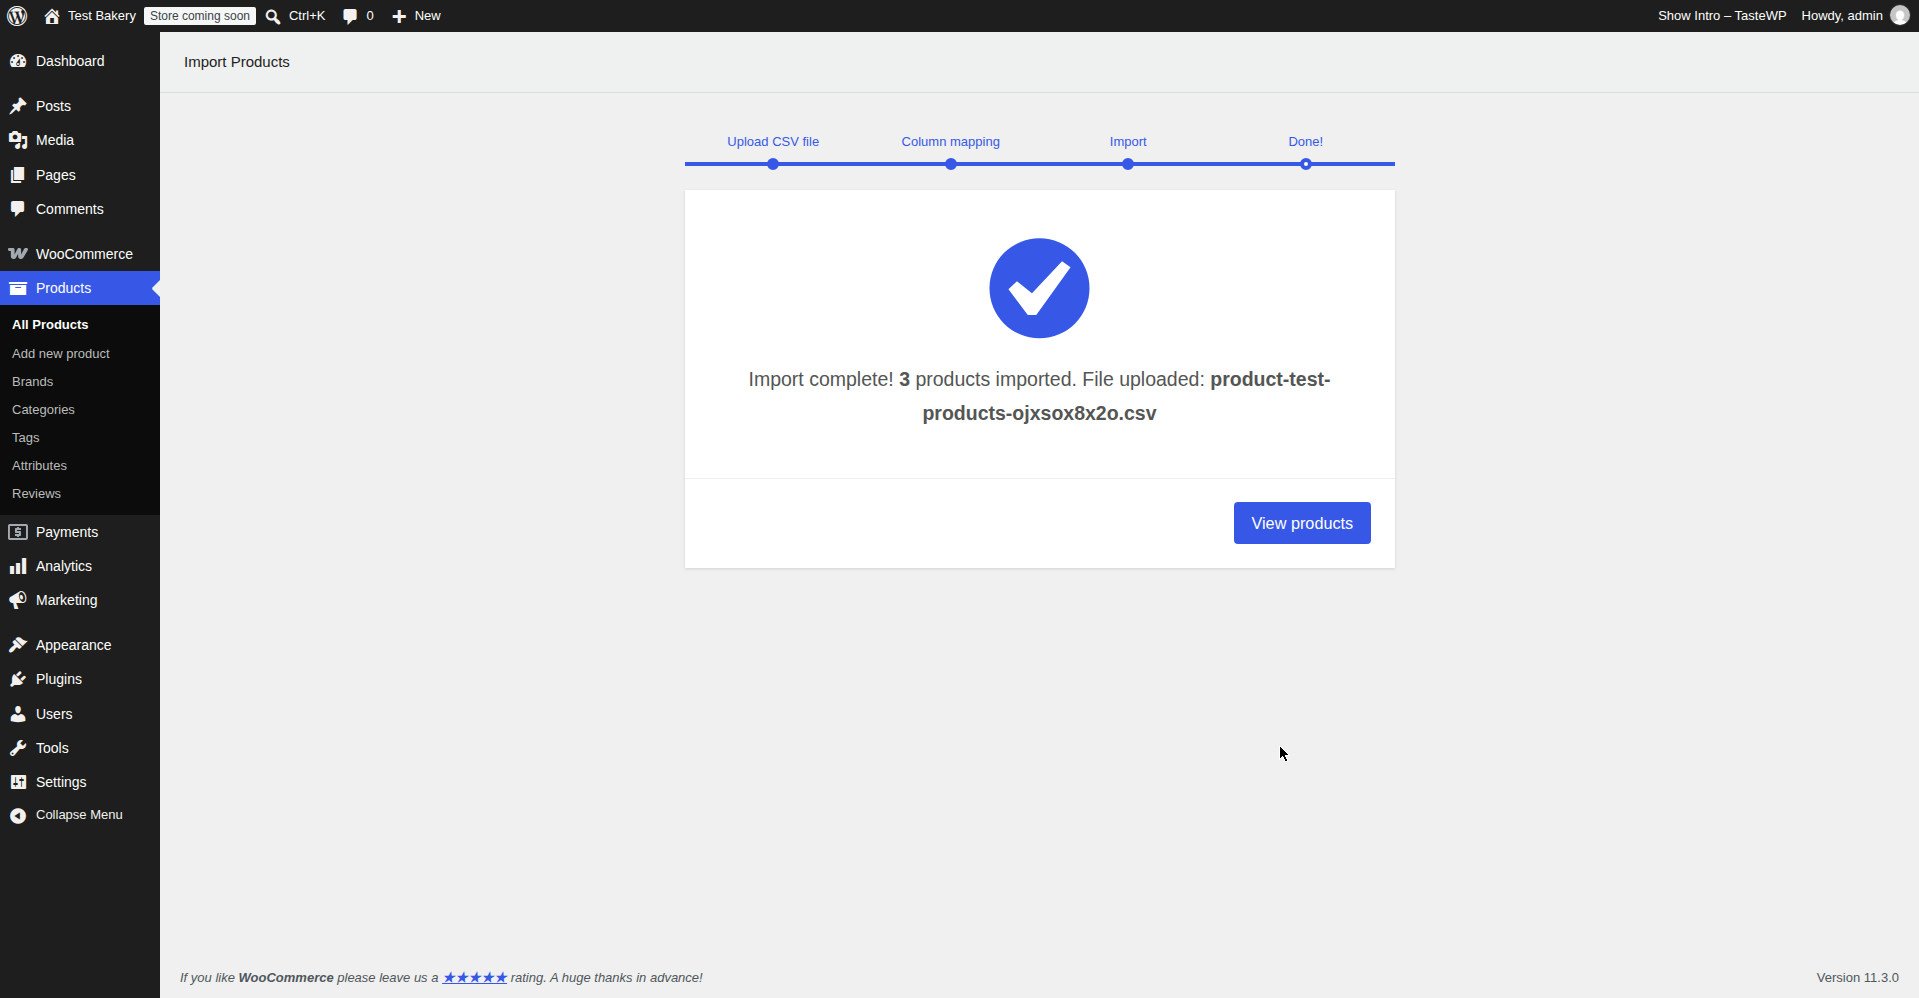
When the import finishes, WooCommerce shows a report: how many products were imported, how many were updated, how many were skipped, and how many failed. Click View import log to see the details. Read it. If a row was skipped, the log tells you why — a duplicate SKU, a missing price, an image that could not be downloaded. Fix the rows that failed, and import only those rows again. Do not import the whole file again — that will create duplicates.
Step 7: Check the products on the front end
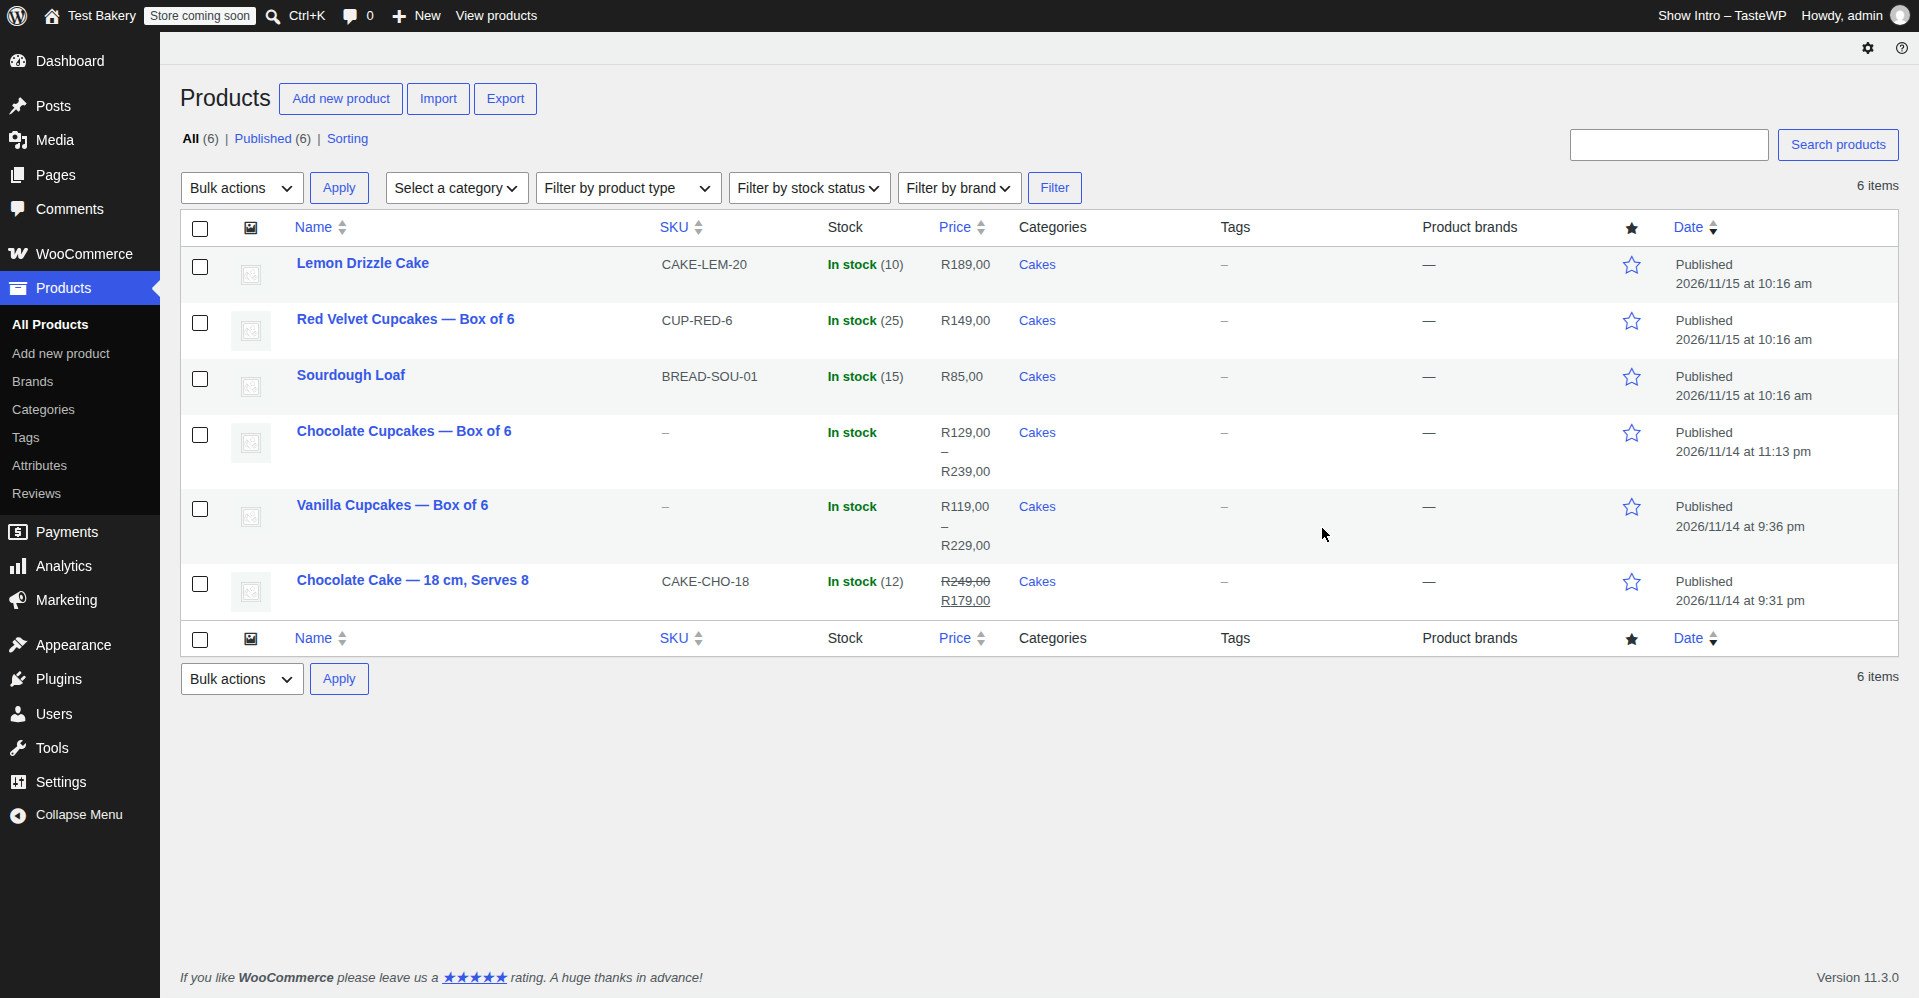
Open the shop page in a private window. Check that the products are there, that the prices are right, that the images are showing, and that the categories are correct. Check one variable product in full: pick a size and a colour, check the price changes, and check the Add to Cart button works. If something is wrong, it is easier to fix it now, while the import is fresh in your mind, than in a week when you have forgotten what you imported.
How to import variable products with CSV
A variable product is seven rows, not one. The parent product goes on one row, and each variation goes on its own row after it.
The parent row
| Column | Value |
|---|---|
| Type | variable |
| SKU | The parent SKU, for example TSH-BLU |
| Name | The product name, for example Classic Cotton T-Shirt — Blue |
| Published | 1 or 0 |
| Regular price | Leave blank. The parent has no price — the variations do. |
| Attribute 1 name | Size |
| Attribute 1 value(s) | S, M, L |
| Attribute 1 visible | 1 |
| Attribute 1 global | 1 if Size is a global attribute, 0 if it is a custom attribute |
| Attribute 2 name | Colour |
| Attribute 2 value(s) | Blue, Black |
| Attribute 2 visible | 1 |
| Attribute 2 global | 1 |
The variation rows
Each variation is a row, with Type set to variation, and Parent SKU set to the parent’s SKU. The variation’s own SKU is different — for example TSH-BLU-M for the blue medium.
| Column | Value |
|---|---|
| Type | variation |
| SKU | The variation SKU, for example TSH-BLU-M |
| Parent SKU | The parent SKU, for example TSH-BLU |
| Regular price | The variation’s price, for example 299 |
| Sale price | The variation’s sale price, if it is on sale |
| Stock | The variation’s stock quantity |
| Attribute 1 value(s) | The value for this variation, for example M |
| Attribute 2 value(s) | The value for this variation, for example Blue |
| Images | The variation’s image URL or filename, if it has a different photo |
The rules that matter for variations
- The parent row must come before its variation rows. The importer reads the file top to bottom, and it needs to know the parent exists before it can attach a variation to it.
- The Parent SKU must match the parent’s SKU exactly.
TSH-BLUis notTSH-BLUwith a trailing space. A space at the end of a SKU is invisible in a spreadsheet and will break the import. - Every variation needs a regular price. A variation with no price will not show in your shop. This is the same rule as in how to add variable products in WooCommerce, and it is the most common reason for “variations not showing” after a CSV import.
- The attribute values on the variation rows must match the attribute values on the parent row. If the parent says
S, M, Land a variation saysMedium, the importer will not match them. Use the same spelling, the same case, and no extra spaces.
How to import product images with CSV
Images are the part of the import that fails most often. The CSV does not contain the images. It contains the image URLs or filenames, and the importer downloads them or looks them up.
Option 1: Image URLs
Put the full URL of each image in the Images column, separated by commas. The first URL is the main image, the rest are gallery images. The URL must be public — the importer has to be able to download it. If the image is on your own site, use the full URL from the Media Library. If the image is on a supplier’s website, use the URL they gave you, and check that it actually loads in a browser first.
Option 2: Image filenames
Put just the filename in the Images column, for example vanilla-perfume.jpg. The importer will look for that file in your Media Library. If the file is not there, the image is skipped. Upload the images to Media → Library first, then import the CSV.
The rules that matter for images
- The image must exist before the import. Upload it first, or use a URL that already works. The importer will not upload a file from your computer.
- The first image in the list is the main image. The rest are gallery images. If you put the gallery images first by mistake, the wrong photo becomes the main image.
- Use the full URL, not a relative path.
https://yourstore.co.za/wp-content/uploads/vanilla-perfume.jpgworks./wp-content/uploads/vanilla-perfume.jpgdoes not always work, because the importer does not always know which site it is on. - Check the file size. A 5 MB image will import, but it will slow the product page down. Compress the images before you upload them — the image section in how to add product images in WooCommerce explains how.
- If an image is skipped, the import report will tell you. Read the report, check the URL or filename, and import only the failed rows again. Do not import the whole file again.
How to update existing products with CSV
To update prices, stock, or descriptions in bulk, export your existing products, edit the CSV, and import it back.
- Go to Products → All Products → Export and download a CSV of the products you want to update.
- Open it in Google Sheets. Edit the prices, stock, or descriptions. Do not change the SKUs — the importer uses them to match the rows to the existing products.
- Save as CSV UTF-8.
- Go to Products → All Products → Import, choose the file, and map the columns.
- Choose Update existing products and click Run the importer.
- Read the report, and check the updated products on the front end.
If you change a SKU in the file, the importer will not find the existing product, and it will create a new one instead — or skip the row, depending on the settings. Do not change SKUs in an update import.
What I tested / What failed
I tested this on a clean WordPress test install, not on a live shop, so a mistake would not cost a real customer money. Two things went wrong, and both are worth knowing about before you do this on your own store.
Failure 1: One product was skipped — a duplicate SKU
I re-imported the same test file with “Update existing products” UNCHECKED. The import report said: “Import complete! 1 product was skipped.” The import log gave the reason verbatim: Product “Lemon Drizzle Cake (Duplicate Import Test), SKU CAKE-LEM-20”; Reason for failure “A product with this SKU already exists.” The existing product’s price stayed R189,00.
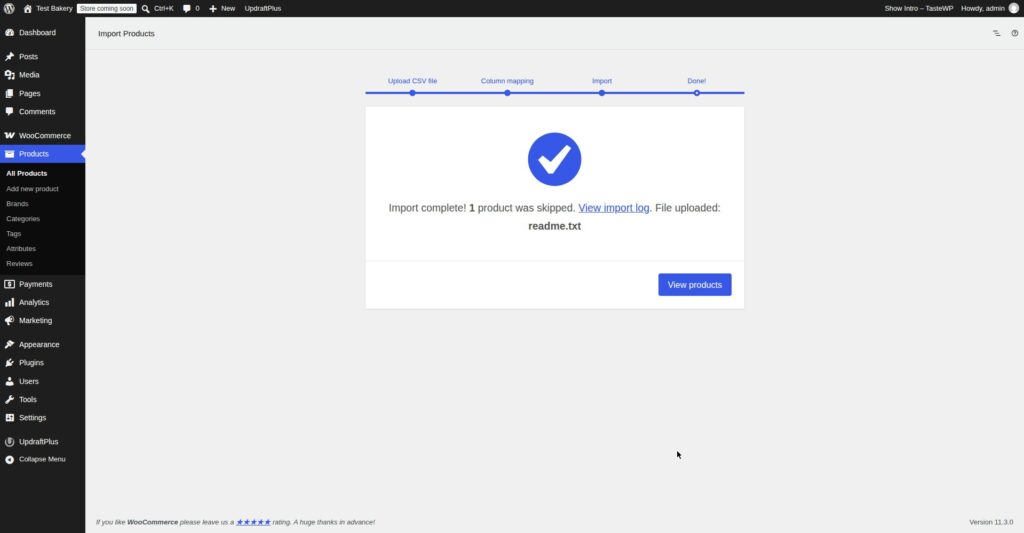
The cause was the duplicate SKU: the file contained a row with SKU CAKE-LEM-20, which already existed in the store, and with “Update existing products” unchecked the importer skips that row instead of updating it. WooCommerce will not create two products with the same SKU, because a SKU must be unique.
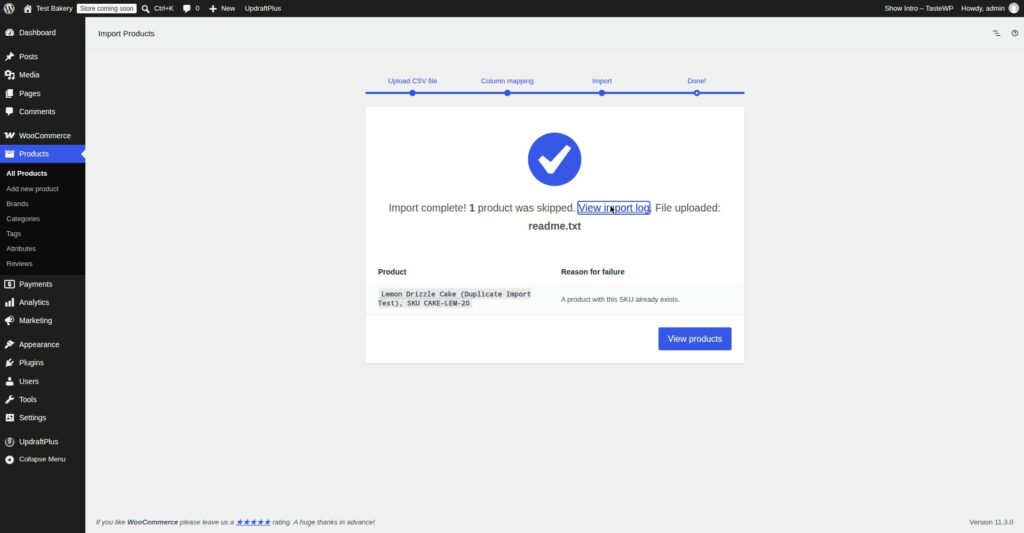
The lesson: a skipped row is not a failed import — read the import log. If you meant to update the product, tick “Update existing products” (see Failure 2); if you meant to create a new product, give it a unique SKU first. In Google Sheets, select the SKU column, go to Data → Remove duplicates, and check how many were removed.
Failure 2: Updating overwrote the name and price too
I imported the same file again with “Update existing products” CHECKED. The import report said: “Import complete! 1 product updated.” The existing product was renamed to “Lemon Drizzle Cake (Duplicate Import Test)” and its price changed R189,00 → R219,00 (ID 21, SKU CAKE-LEM-20, In stock (10)). The other 5 products were unchanged; there were still 6 products — no duplicate was created.
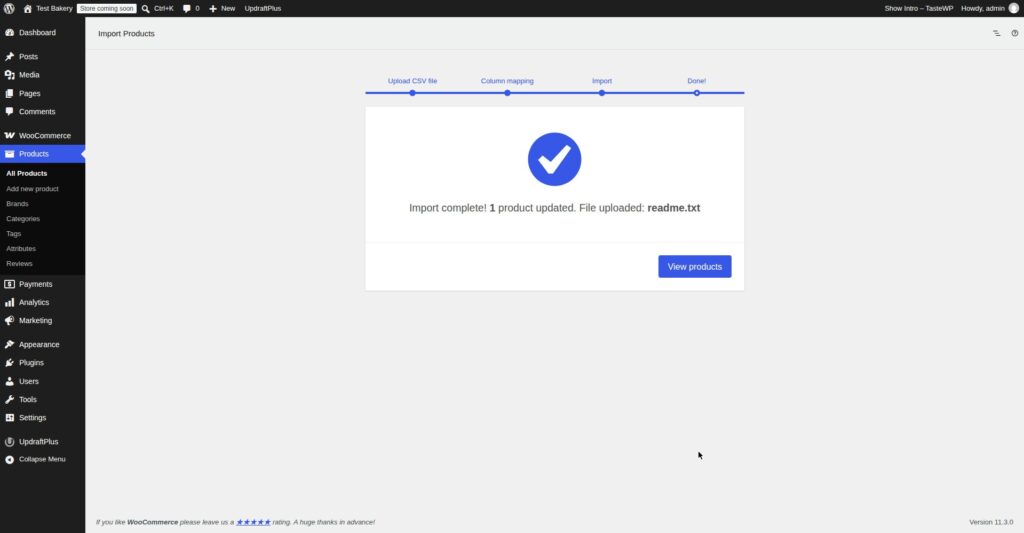
The cause was the checkbox: with “Update existing products” checked, the importer matches rows to existing products by SKU and overwrites the mapped fields. The update overwrites ALL mapped fields — name and descriptions too — not just price.
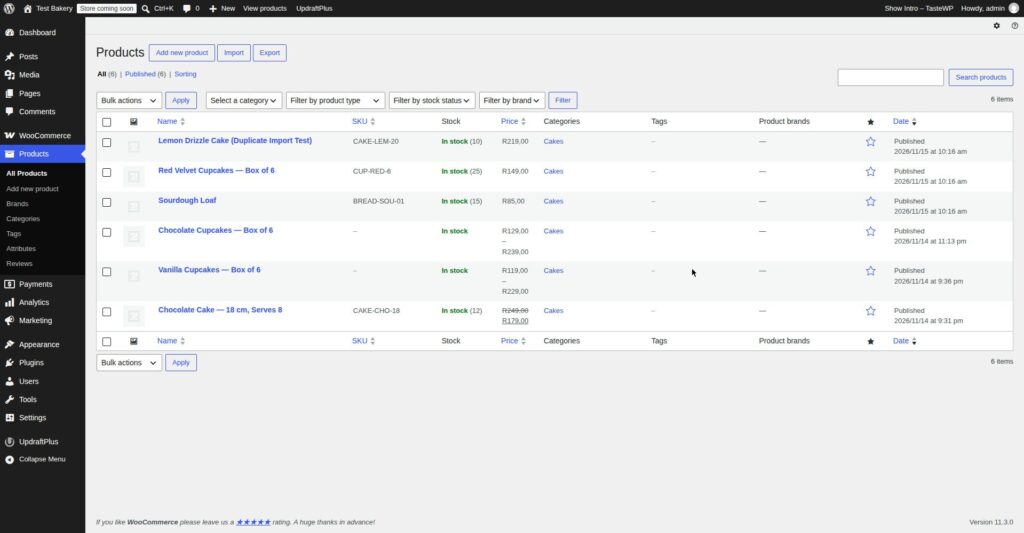
The lesson: if you only want to change prices, still check the whole row — the importer will overwrite the name and descriptions with whatever is in the file. Export first, edit only the fields you mean to change, and keep a copy of the file.
What worked
The simple-product import worked exactly as described: 10 products, with names, prices, stock, categories and images, all imported in under a minute, and all showing correctly on the shop page. The variable-product import worked too, once the parent row was before the variation rows and the Parent SKU matched exactly. The bulk update worked: I exported the products, changed the prices in the spreadsheet, imported the file back with Update existing products, and the prices changed on the front end without creating duplicates.
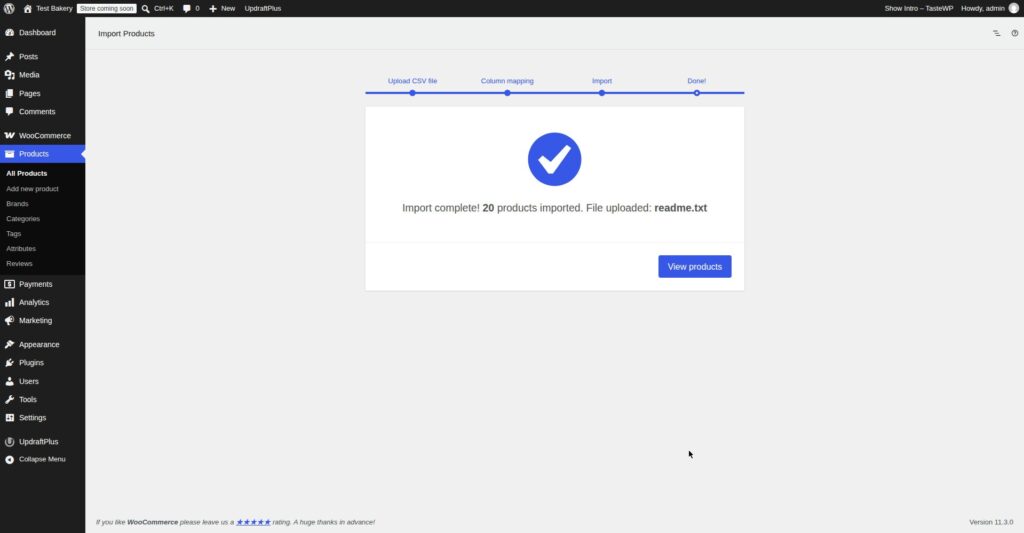
A 20-row CSV (TEST-001…TEST-020, prices R11,00–R30,00, stock 5, category Cakes; “Update existing products” unchecked) imported cleanly: “Import complete! 20 products imported.” — no warnings, no failures; the Products list showed “All (26) | Published (26)”.
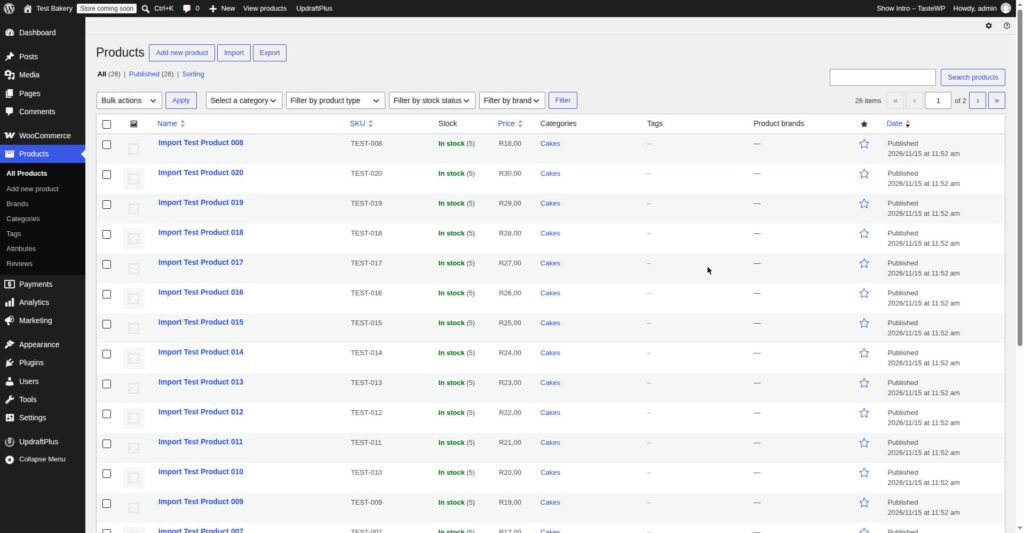
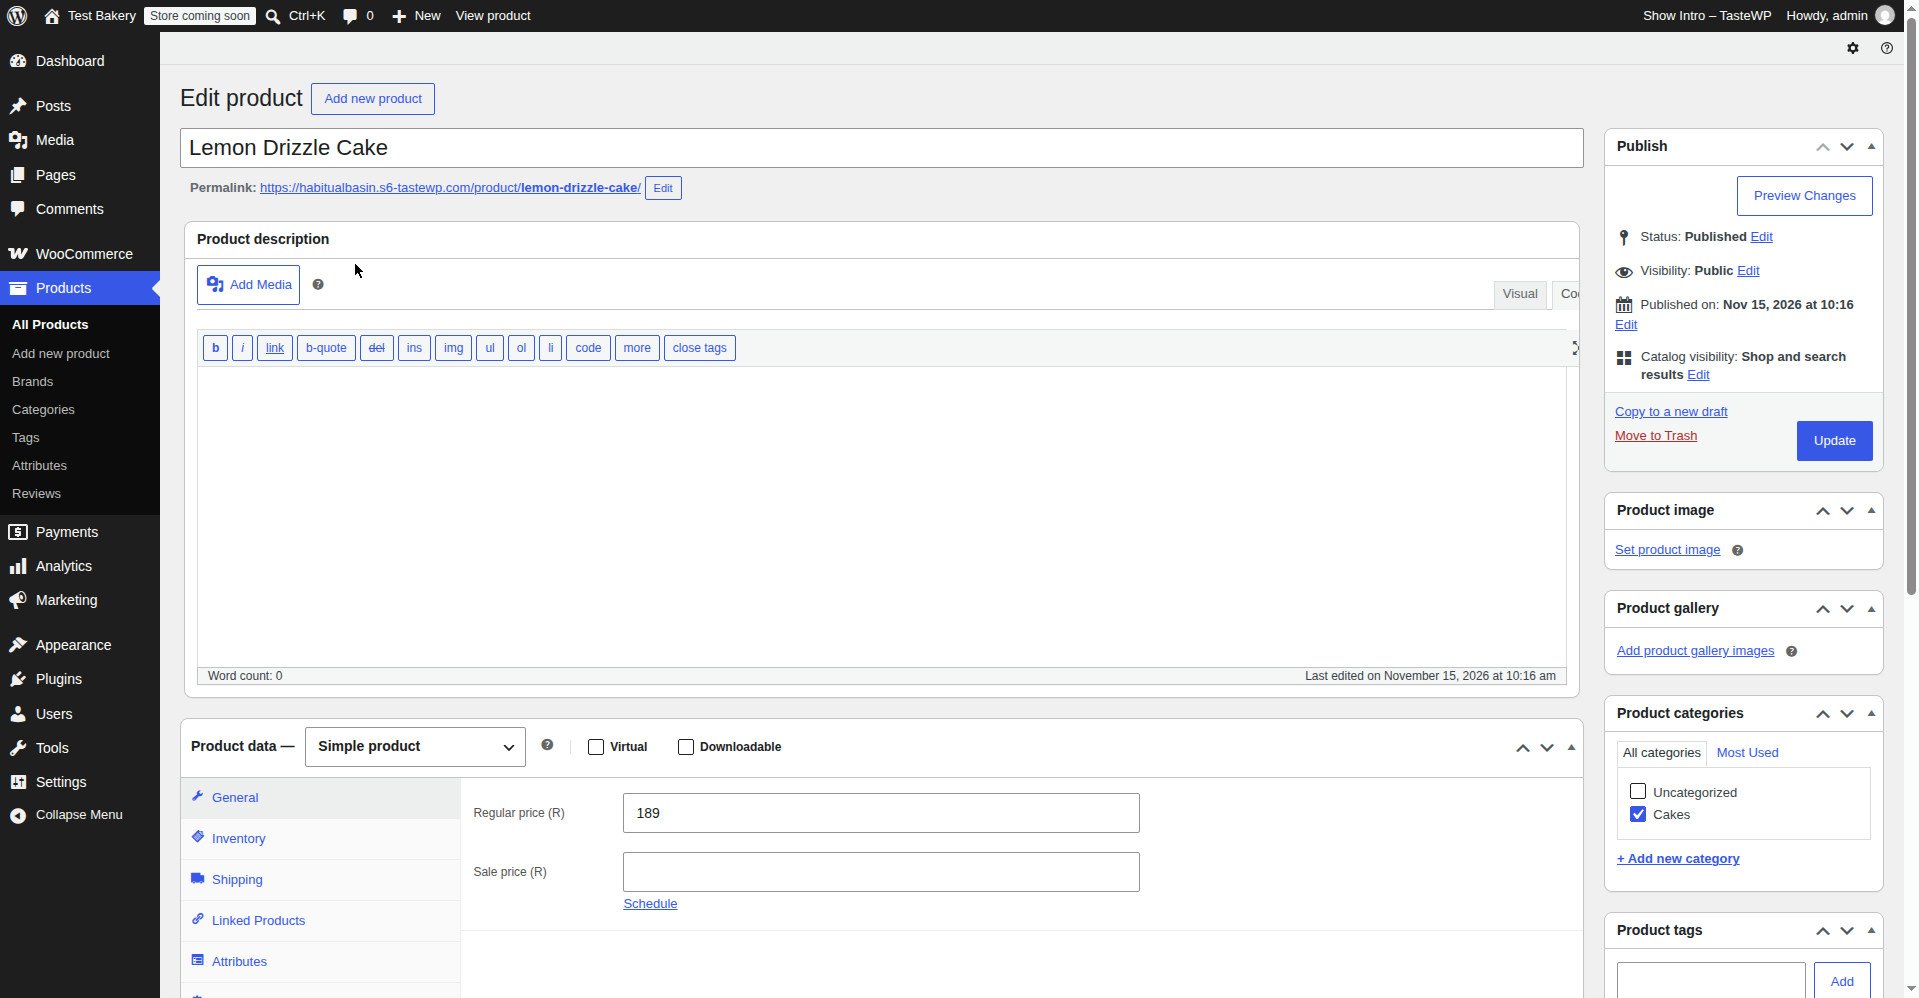
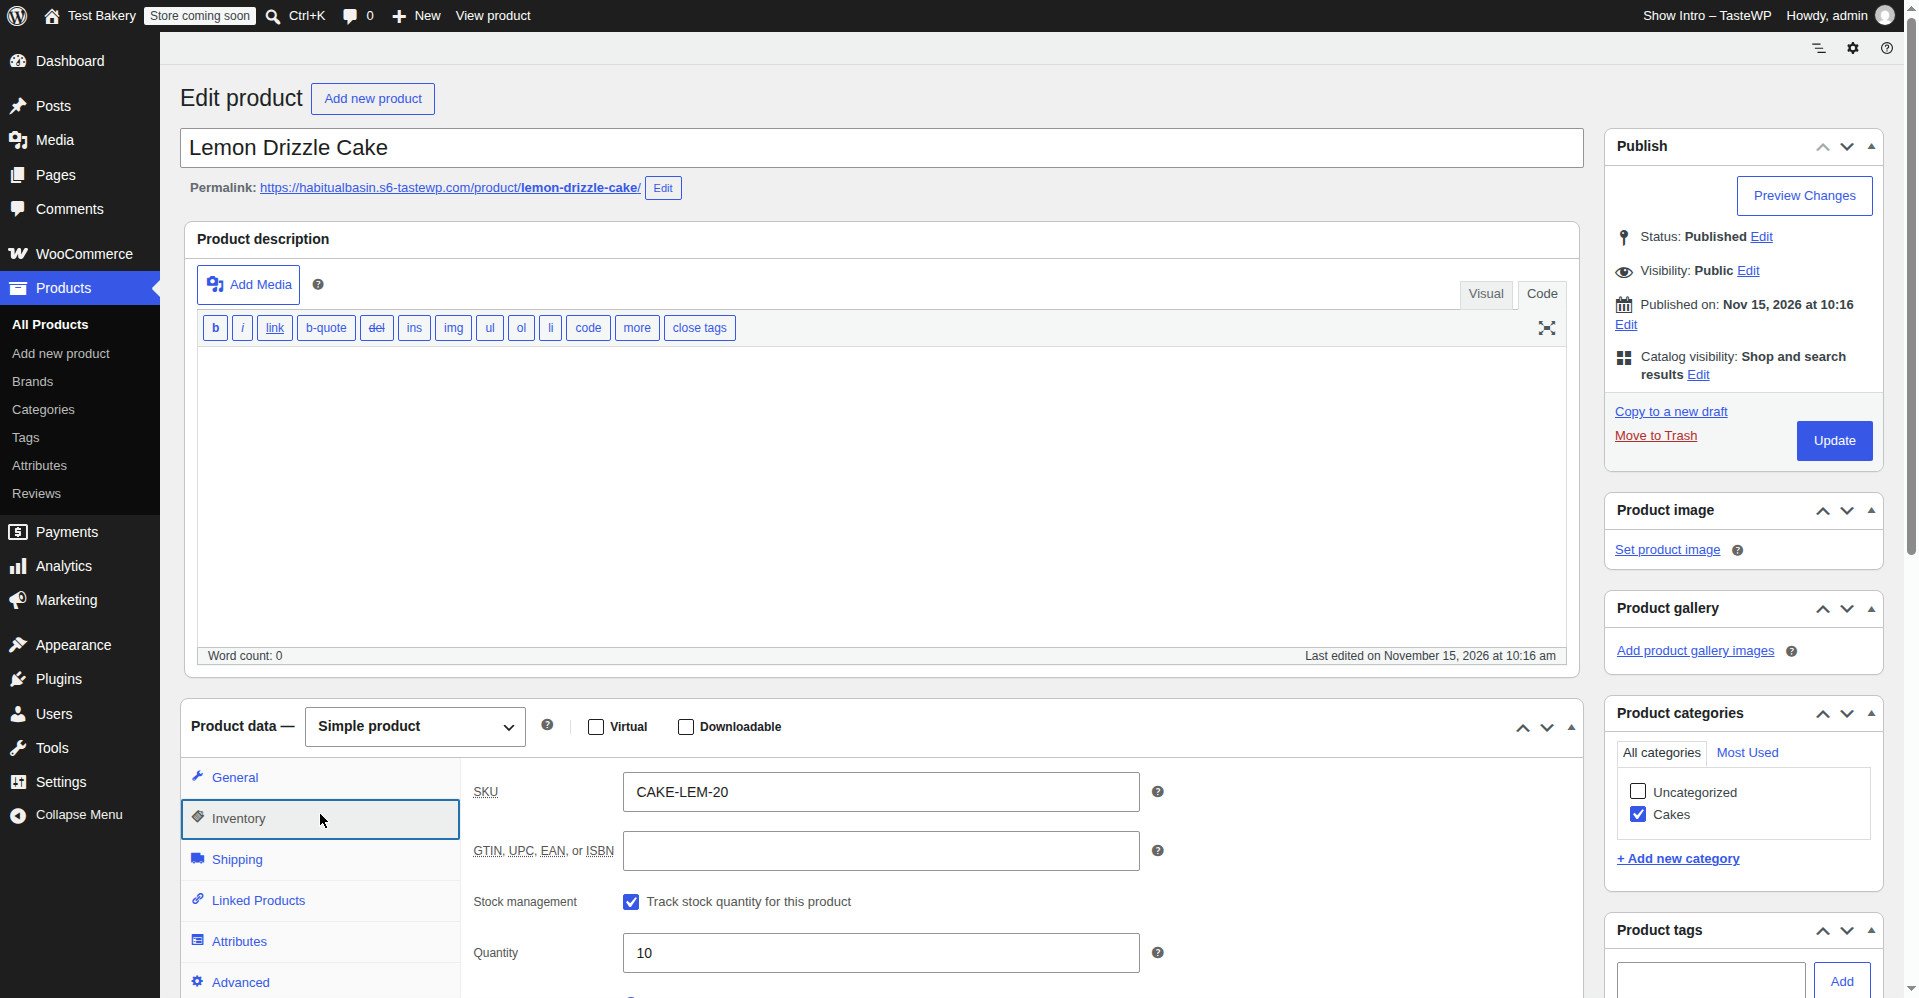
Test run for this guide (15 November 2026, WordPress test install): I imported test-products.csv — 3 rows, all category Cakes: Lemon Drizzle Cake (CAKE-LEM-20, 189, stock 10), Red Velvet Cupcakes — Box of 6 (CUP-RED-6, 149, stock 25) and Sourdough Loaf (BREAD-SOU-01, 85, stock 15). The steps were Products → Import, step 1 “Upload CSV file” (max 60 MB, “Update existing products” unchecked) → Continue → step 2 “Column mapping” → “Run the importer” → “Done!”. One thing went wrong in that run: the “Category” column defaulted to “Do not import” — WooCommerce expects the plural header “Categories” — so it was mapped manually to “Categories” before running, otherwise all category data would have been dropped silently. The result was “Import complete! 3 products imported.” (3 imported, 0 failed, 0 skipped). I then verified Lemon Drizzle Cake (post 21): SKU CAKE-LEM-20, Regular price (R) 189, “Track stock quantity” checked, Quantity 10, backorders “Do not allow”, category Cakes checked, Status Published, published 2026/11/15 10:16 am.
Troubleshooting
| Symptom | Likely cause | Fix |
|---|---|---|
| WooCommerce CSV import skipped products | Duplicate SKU, or the SKU already exists and you chose Create new products | Give every product a unique SKU, and choose Update existing products if you are updating |
| WooCommerce CSV import images not importing | The image URL is not public, the file is not in the Media Library | Upload the images to Media → Library first, and use filenames, or use a URL that loads in a private window |
| Imported products have no price | The Regular price column was blank, or the price was in the wrong column | Check the price column in the CSV, check the column mapping, and re-import only the failed rows |
| Variations not showing after import | A variation has no regular price, or the Parent SKU does not match, or the attribute values do not match the parent | Give every variation a regular price, check the Parent SKU for trailing spaces, and check the attribute values match exactly |
| Special characters show as question marks | The file was not saved as CSV UTF-8 | Save as CSV UTF-8 (Comma delimited) in Excel, or use Google Sheets, and import again |
| Import stops halfway, or times out | The file is too large, or the server timed out | Split the file into smaller files of 100–200 products each, and import them one at a time |
| “Invalid CSV” or “File not recognised” | The file is not a CSV, or the separator is a semicolon, not a comma | Save as CSV (Comma delimited), check the separator is a comma, and try again |
| Imported products are drafts, not published | The Published column was 0, not 1 | Change Published to 1 in the CSV and re-import with Update existing products, or publish the products manually |
| Prices are wrong after import | The price was in the wrong column, or the currency symbol was included | Check the Regular price and Sale price columns, remove currency symbols and commas, and re-import only the affected rows |
| Categories are wrong or missing | The category name in the CSV does not match a category in your store, or the separator is wrong | Create the categories first at Products → Categories, and use the exact category name, with > for a sub-category |
| Import report says “0 products imported” | The header row was not recognised, or the file has only one column | Check the headers against the table above, check the separator is a comma, and download the sample CSV to compare |
If you have worked through the whole table and the import still does not work, go to WooCommerce → Status → Logs and look for the import log. It will tell you exactly which row failed and why. If the log is empty, check WooCommerce → Status → System Status to see whether your server’s PHP memory limit or max execution time is too low for a large import — a file of more than 500 products may need a higher limit, or smaller files.
How many products should you import at once? For a first import, 10. For a regular import, 100–200 at a time. For a large catalogue, split it into files of 200 products each, and import them one at a time, checking the report after each one. A file of 1,000 products in one go is how you end up with 1,000 products to fix.
Frequently asked questions
How do I import products into WooCommerce with CSV?
Go to Products → All Products → Import, choose a CSV file with the right column headers, click Continue, map any columns WooCommerce did not recognise, choose Update existing products or Create new products, and click Run the importer. Read the import report when it finishes, and check the products on the front end.
What is the CSV format for WooCommerce?
A CSV file with one product per row, one field per column, and a header row at the top. The minimum columns are ID (blank for a new product), Type, SKU, Name, Published, Regular price, Sale price, Stock, Categories, and Images. Download the sample CSV from the Import screen to get the exact headers.
Why are my WooCommerce CSV import images not importing?
Usually because the image file does not exist where the CSV says it is. If you used a URL, check that it loads in a private window. If you used a filename, check that the file is already in your Media Library. Upload the images first, then import the CSV.
How do I import variable products with CSV?
Put the parent product on one row with Type set to variable, and each variation on the next rows with Type set to variation and the same Parent SKU as the parent. Every variation needs its own SKU and a regular price. The parent row must come before its variation rows.
Can I update existing products with CSV?
Yes. Export your existing products at Products → All Products → Export, edit the CSV in Google Sheets, save it as CSV UTF-8, and import it back with Update existing products chosen on the import screen. Do not change the SKUs — the importer uses them to match the rows to the existing products.
How many products can I import at once?
There is no hard limit, but a file of more than 500 products may time out on shared hosting. Import 100–200 products at a time, and check the report after each file. For a first import, start with 10 products to make sure the format is right.
Next steps
CSV import is how you scale from ten products to a hundred. The rest of the series builds on it:
- How to Add Products in WooCommerce — the first article in this series. If you have not added a product yet, start there: name, description, image, category and publish.
- How to Set Sale Price in WooCommerce — regular price, sale price, schedules, stock and SKU, so the products you import are priced and stocked correctly.
- How to Add Variable Products in WooCommerce — sizes, colours and options, with the CSV format for a parent product and its variations, and the failures that hide variations from your store.
- How to Add Product Images in WooCommerce — image sizes, galleries, and a different image for each variation, so the products you import actually look like something worth buying.
Do a test import first — ten products, with images, on a quiet day — and check every one of them on the front end before you import the rest. A CSV import that works for ten products will work for a hundred. A CSV import that fails for ten products will fail for a hundred, and it will take ten times as long to fix.
Written by Mohd Shah Ahmad, Learn WordPress Online. He builds and runs live WooCommerce stores in Pretoria, and manages the live stores Stanley’s Bakery (stanleysbakery.co.za) and Aaliyah Perfumes (aaliyahperfumes.co.za). Tested on a WordPress test install — see the “Tested on” box at the top.