
If you run a WooCommerce shop in South Africa, Yoco is one of the most obvious ways to take payments: Visa, Mastercard, American Express and Instant EFT, all in rand, with no monthly fee. The setup looks simple — install the plugin, switch it on, paste in your keys — but there are two places where it stops you dead if you do them in the wrong order. First, Yoco only works if your store is set to South Africa and rand; second, WooCommerce will not let you enable Yoco at all until you have finished its settings, and the settings need API keys from a Yoco account. We tested the whole install on 20 November 2026, and this guide shows you every step that worked — and marks clearly the part we could not test, because it needs a Yoco account we did not create.
Tested on
- WordPress: 7.1.5
- WooCommerce: 11.3.1
- Yoco Payments plugin: 3.9.5
- PHP: 8.5.12
- Theme: Twenty Twenty-Three 1.7
- Test date: 20 November 2026
- Test install: a WordPress test install with one test product (Test Product, R100.00), set to ZAR and South Africa — Gauteng as the store country.
Tested 20 November 2026 on a WordPress test install. Screenshots are from that test install.
Before you start
- Your store must be set to South Africa, and your currency must be rand (ZAR). Yoco only supports South African rand. If your store is still set to United States and dollars — which is the default on a fresh WooCommerce install — Yoco will not work for you. Set it first: WooCommerce > Settings > General, set Country / Region to South Africa and Currency to South African rand (R), then save. We set our test store to South Africa — Gauteng, currency ZAR, before installing anything.
- You need a Yoco account for the last step. The plugin asks for a Live Secret Key and a Test Secret Key, and both come from the Yoco Business Portal. We did not create a Yoco account, so we could not test anything past the point where the keys go in. Everything up to that point is tested; everything after it is documented, not tested — and the guide says so at each step.
- WooCommerce must already be installed. Yoco is a payment gateway for WooCommerce, not a shop on its own. If you have not set up your store yet, start with our guide on how to set up WooCommerce.
- No payment was tested. No test card, no real card, no live payment. This guide proves the install and the settings work; it does not prove a payment goes through.
Step 1: Install the Yoco Payments plugin
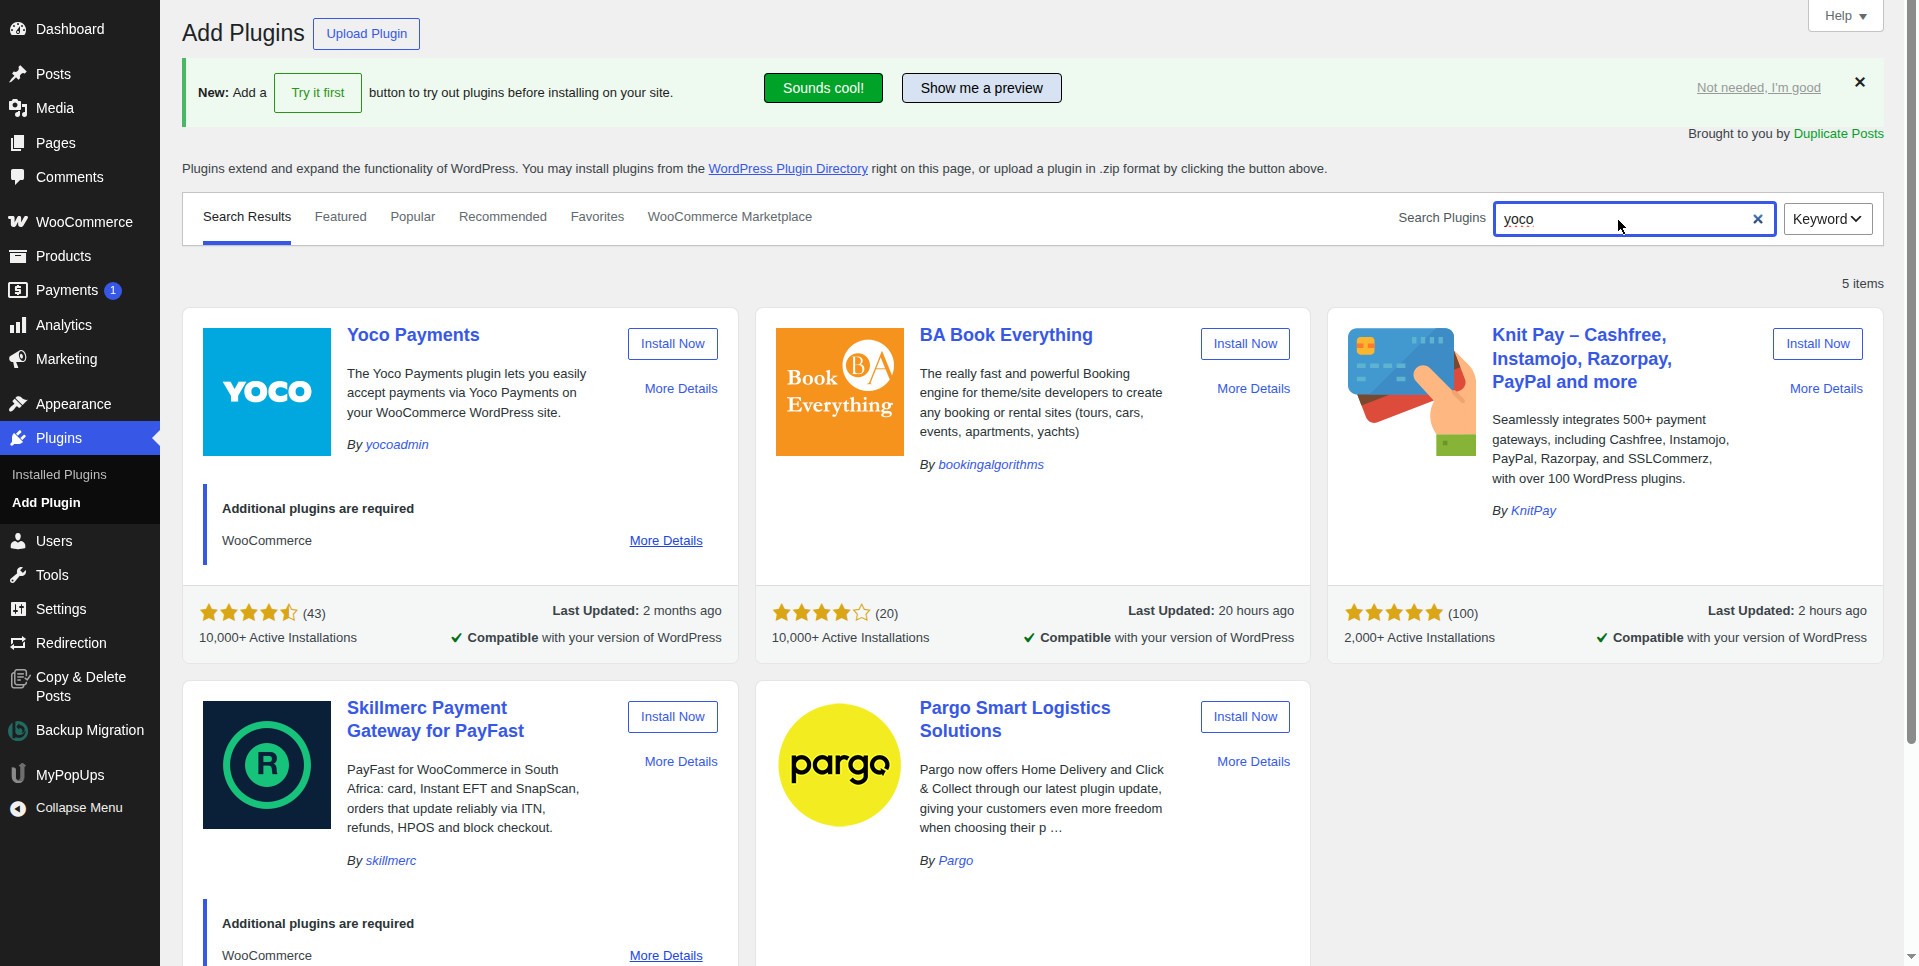
- Go to Plugins > Add New.
- Type yoco in the search box. The official plugin — Yoco Payments, by Yoco — is the top result. It has 10,000+ active installations, 4.5 stars from 43 ratings, and it says it is compatible with your version of WordPress.
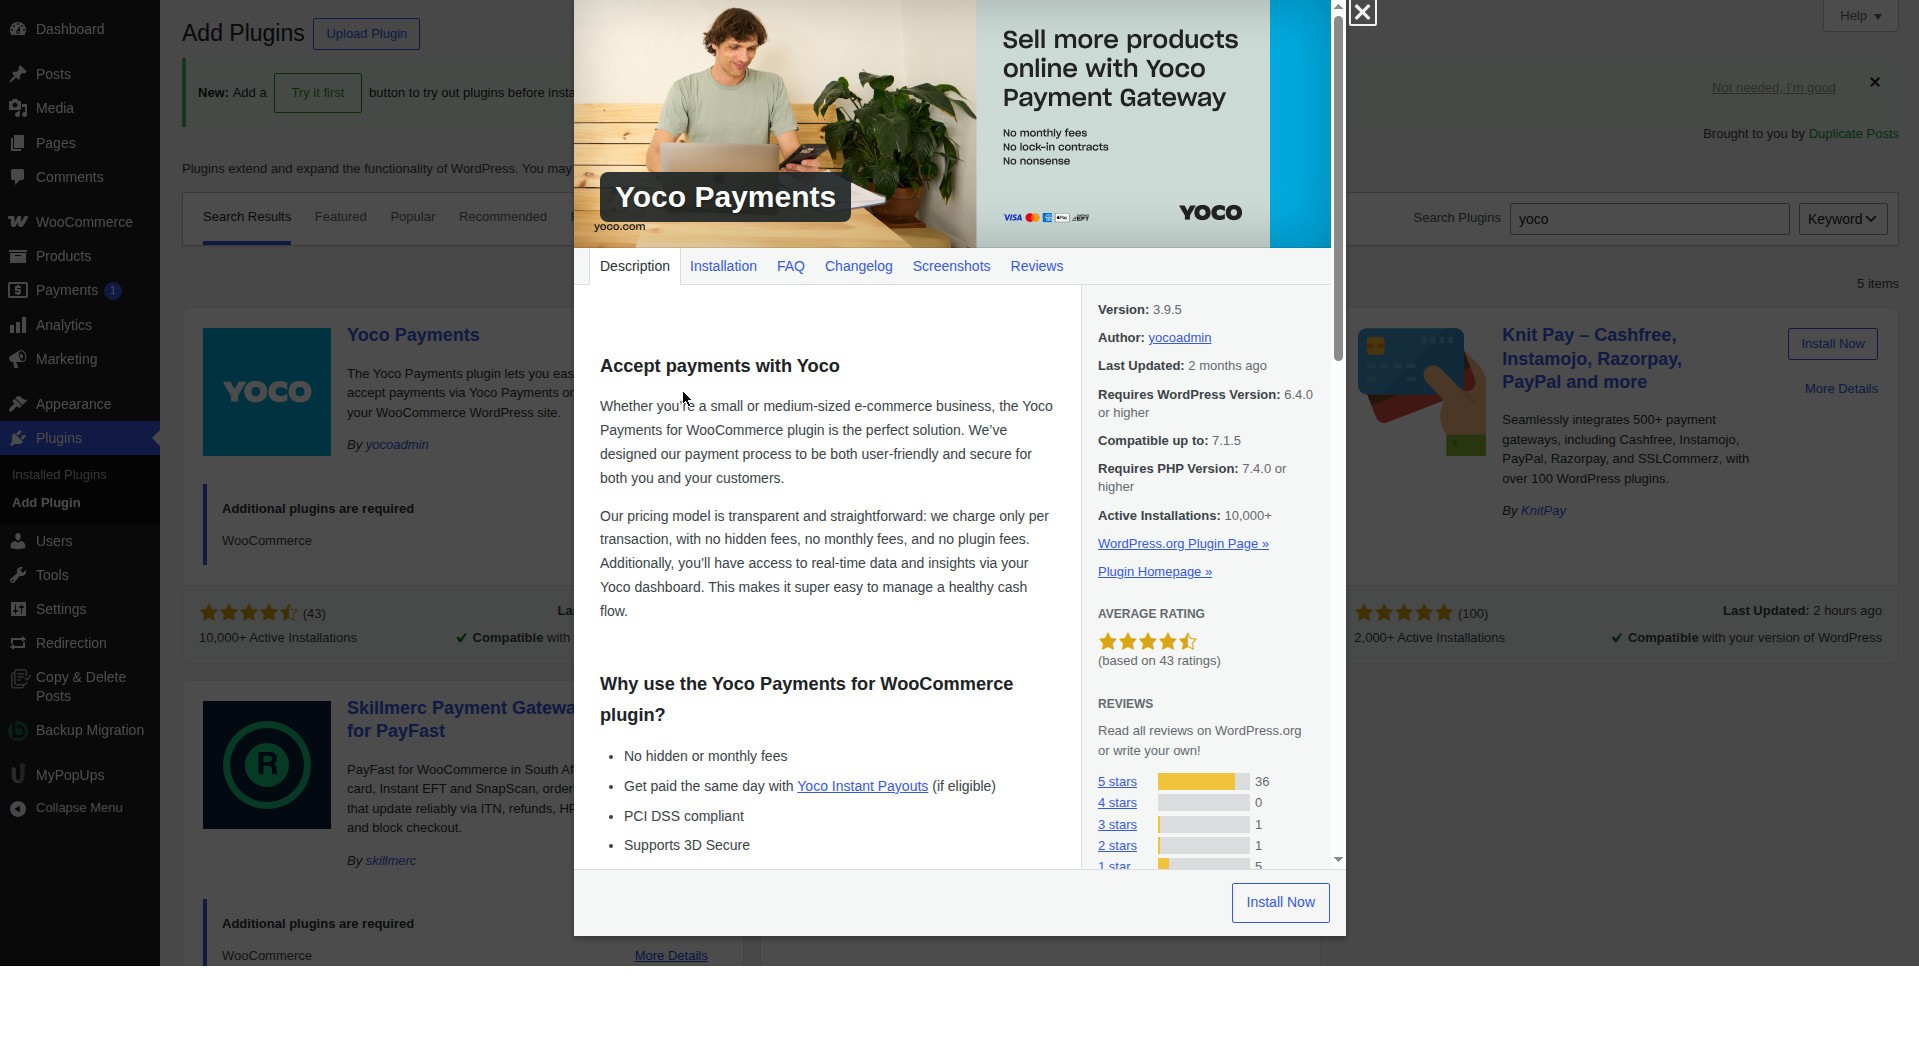
- Click More Details if you want to check it first. The details page shows Version 3.9.5, requires WordPress 6.4 or higher and PHP 7.4 or higher, and that it needs WooCommerce installed. Then click Install Now.
Step 2: Activate the plugin
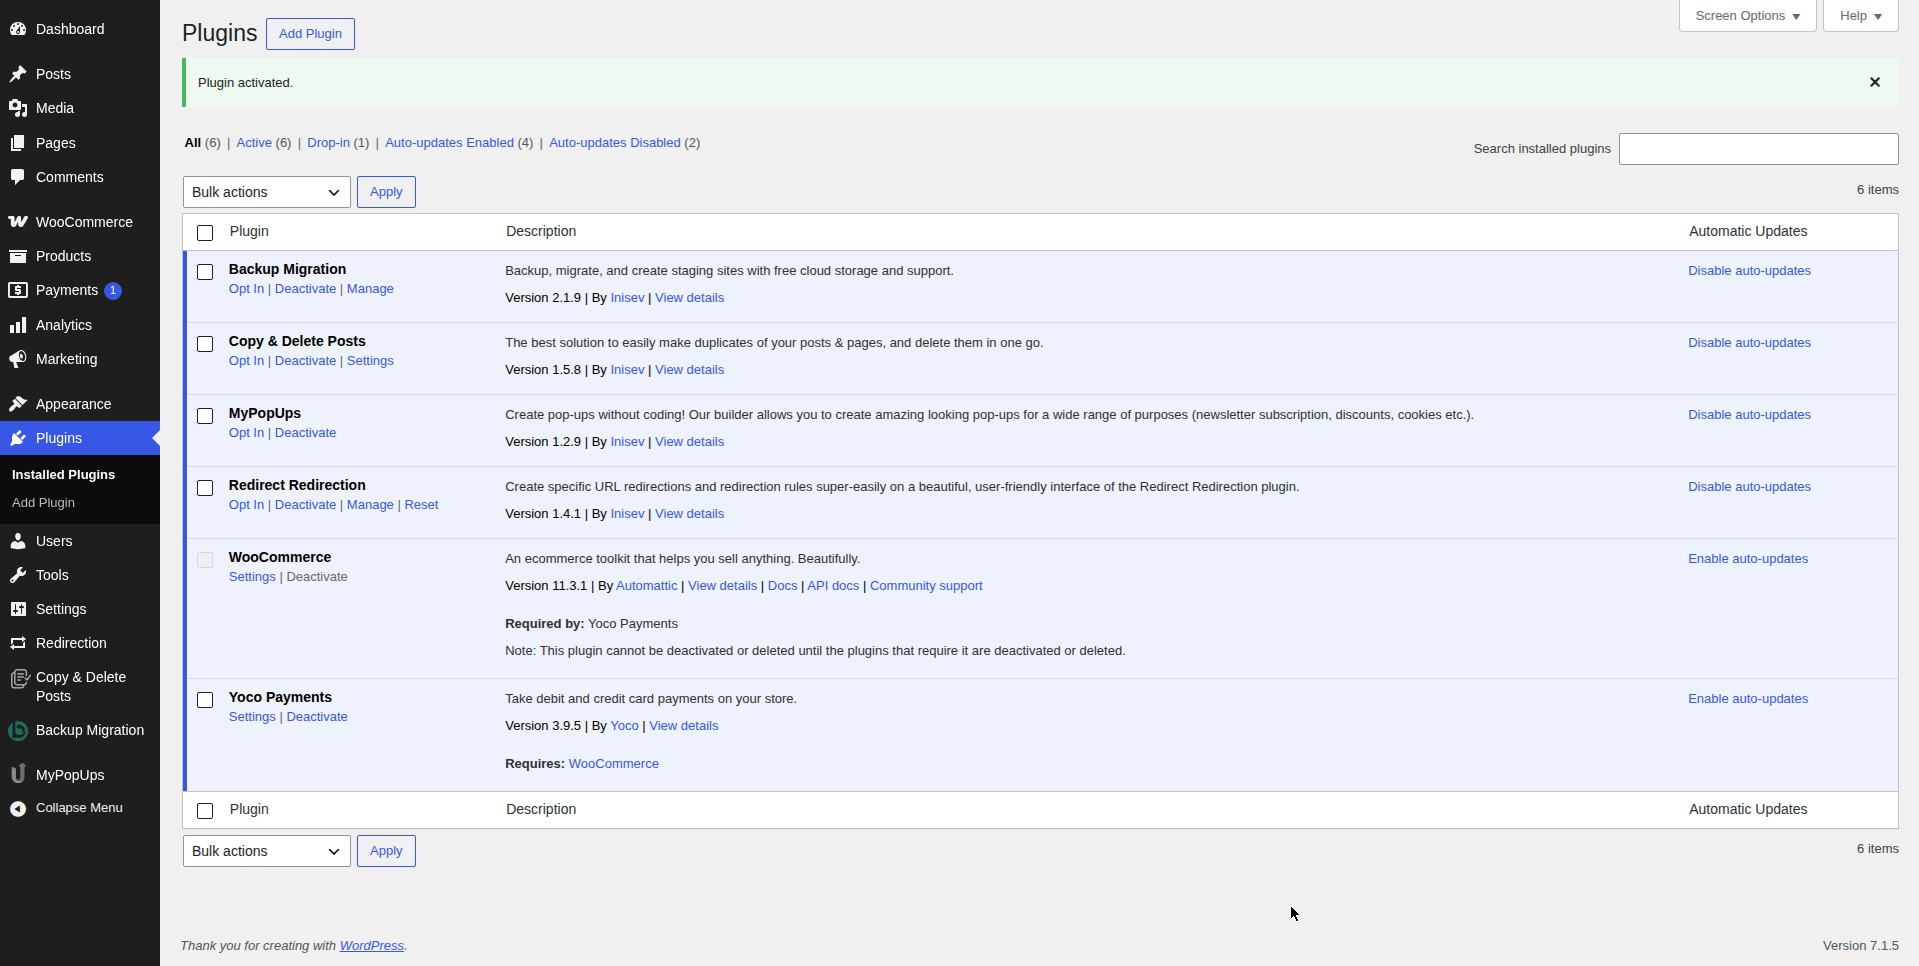
After the install finishes, the button changes to Activate. Click it.
WordPress takes you to the Plugins list and shows a green notice: “Plugin activated.” Yoco Payments is now in the list — Version 3.9.5, by Yoco — and the WooCommerce row underneath says “Required by: Yoco Payments”, which confirms the two plugins are connected.
Step 3: Find Yoco in your payment settings — and do not click Enable yet
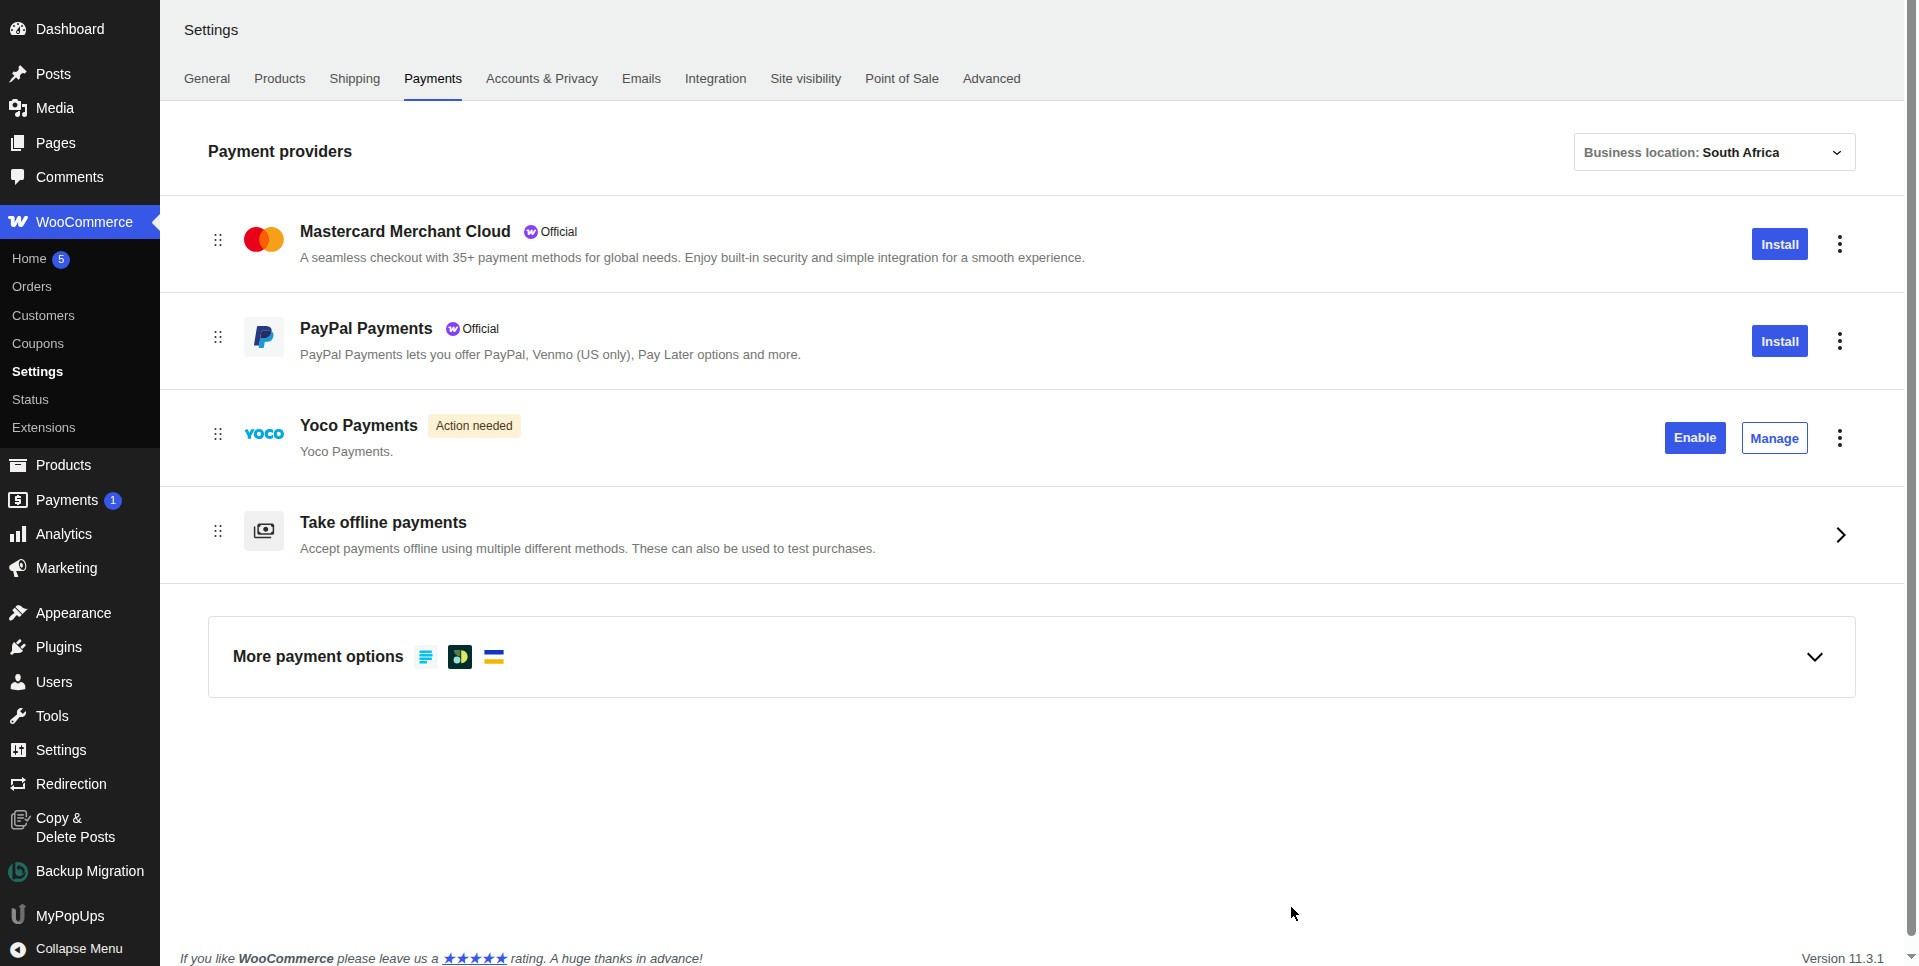
- Go to WooCommerce > Settings > Payments. This is the “Payment providers” screen, and it shows your business location — ours said South Africa.
- Find Yoco Payments in the list. It has an “Action needed” badge, and two buttons: Enable and Manage.
Here is the trap: do not click Enable. We tried it, and WooCommerce refused with the message “Finish setting up Yoco Payments before enabling it.” The gateway cannot be switched on until its settings are filled in — and the settings need your API keys. Click Manage instead.
Step 4: Open the Yoco settings
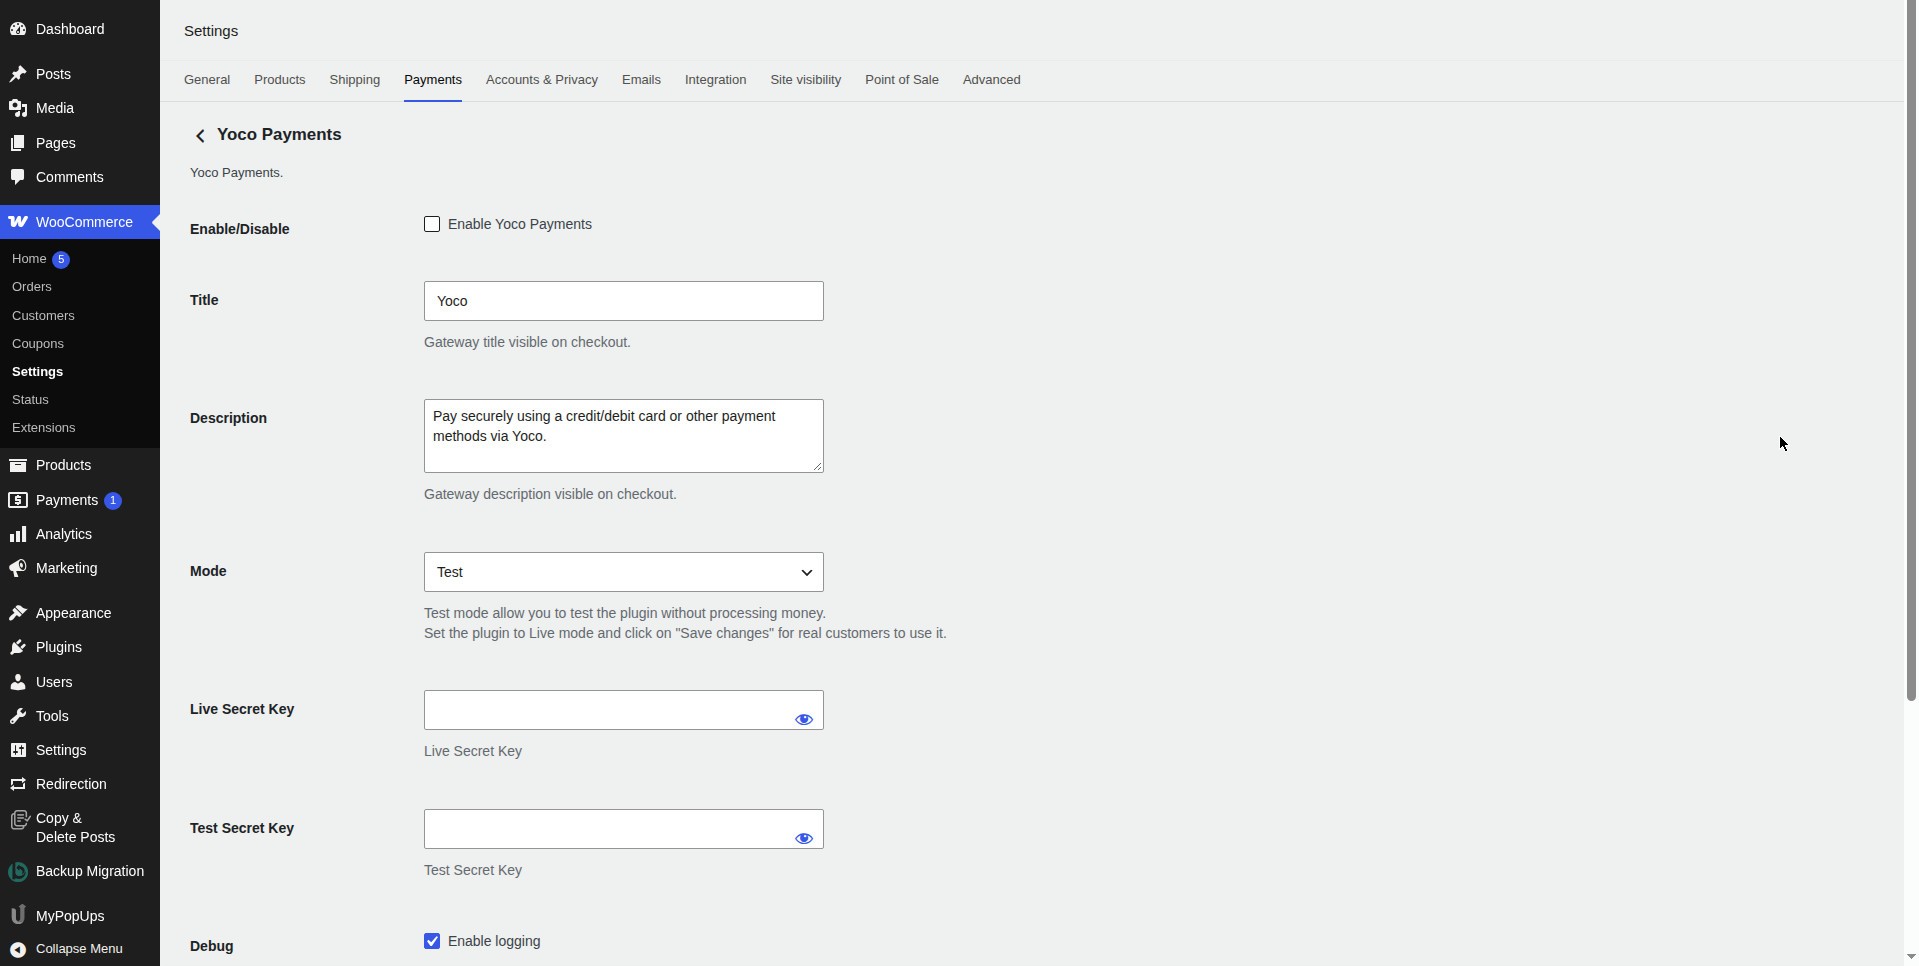
The settings page has exactly these fields, in this order:
- Enable/Disable — a checkbox, “Enable Yoco Payments”. It is unchecked, and it stays unchecked until the keys are in.
- Title — “Yoco”. This is the name your customers will see at checkout.
- Description — “Pay securely using a credit/debit card or other payment methods via Yoco.” This is the text shown under the title at checkout.
- Mode — a dropdown, set to Test by default. The help text under it says: “Test mode allow you to test the plugin without processing money. Set the plugin to Live mode and click on ‘Save changes’ for real customers to use it.”
- Live Secret Key — an empty password field.
- Test Secret Key — an empty password field.
- Debug — “Enable logging” is ticked by default. The error-log viewer below it said “No error logs”.
There are no per-method toggles here — you cannot switch Visa, Mastercard, Amex or Instant EFT on and off individually. The methods the plugin offers are set by Yoco, not by these settings.
Step 5: What checkout looks like before Yoco is enabled
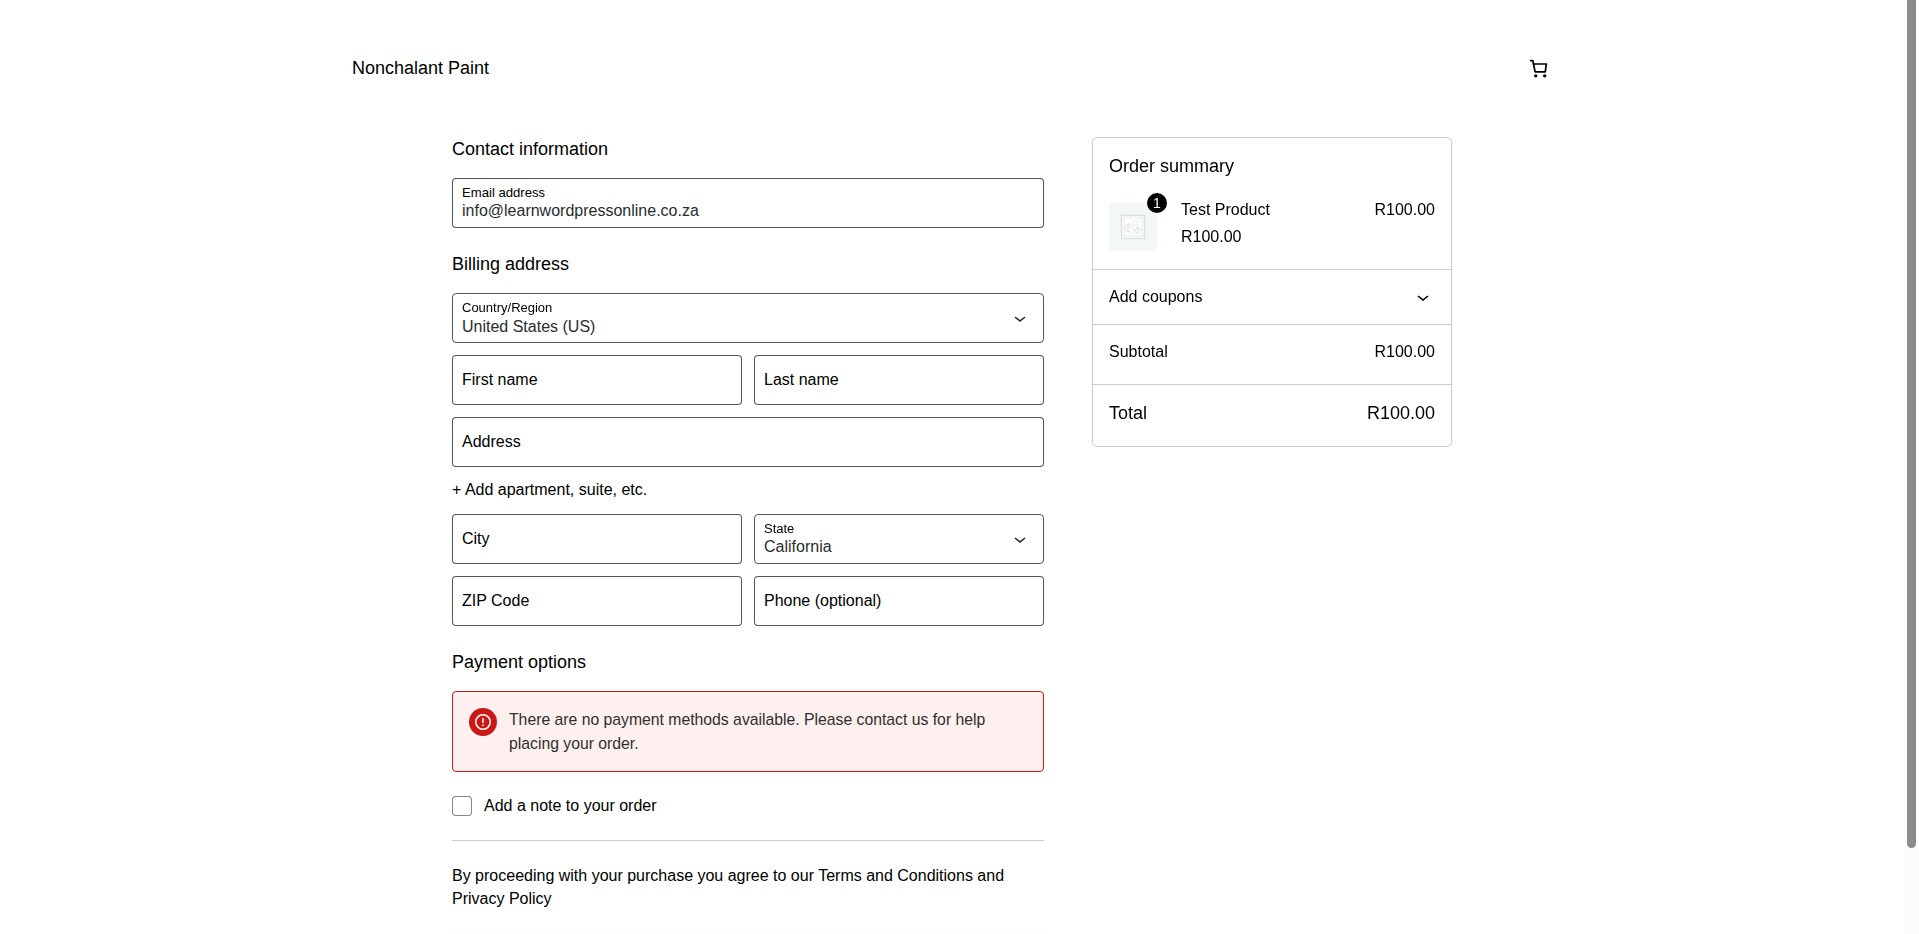
To show you why the keys matter, we put a R100.00 test product in the cart and opened the checkout page with Yoco still unconfigured. The order summary was correct — Test Product R100.00, Subtotal R100.00, Total R100.00 — but under Payment options there was no Yoco and no payment method at all, just a red notice:
“There are no payment methods available. Please contact us for help placing your order.”
That is expected. Until Yoco has its keys and is enabled, WooCommerce has nothing to offer the customer. If your own shop shows this message, it means a gateway is installed but not finished — not that your checkout is broken.
What Yoco charges, and what it accepts
These figures come from the plugin’s own description and FAQ on WordPress.org — they are documented, not tested by us, because no payment went through.
- Payment methods: Visa, Mastercard, American Express and Instant EFT, all in South African rand (ZAR) only.
- Fees, excluding VAT: Local Cards 2.95%–2.6%; International Cards 3.5%–3.05%; American Express 3.5%–3.05%; Instant EFT 2%. There is no monthly fee and no plugin fee, and the plugin says same-day Instant Payouts are available if you are eligible.
- Security: PCI DSS compliant, with 3D Secure supported.
If you want a different South African gateway instead, or as well, see our guide on how to set up PayFast in WooCommerce.
After the keys: what to do next (documented, NOT tested)
This is the part we could not test, because it needs a Yoco account. The steps below come from the plugin’s own FAQ and settings help text — follow them in order, and test with a test payment before you go live.
- Get your test keys. Sign up for a Yoco account, open the Yoco Business Portal, and fetch your Test Secret Key. Keep Mode set to Test while you do this.
- Paste the Test Secret Key into the Test Secret Key field on the Yoco settings page, tick Enable Yoco Payments, and click Save changes.
- Go back to WooCommerce > Settings > Payments. The “Action needed” badge should be gone, and the Enable button should now work. Click it.
- Place a test order yourself with a test card, and confirm the order completes and the payment shows in your Yoco dashboard. The plugin’s FAQ warns that using a real credit card in Test mode will fail — use a test card from Yoco’s documentation.
- Go live only when the test order works. Paste your Live Secret Key, change Mode to Live, save, and place one small real order to confirm it.
We will update this guide with the tested steps for keys, enabling and a test payment once we have a Yoco account to test with.
What we could not verify
- Enabling the Yoco gateway. Clicking Enable before setup is blocked by WooCommerce, and enabling after setup needs API keys we did not have.
- The Yoco checkout and redirect flow. We never saw Yoco’s payment screen, because it only appears once the gateway is enabled.
- A test-card payment in test mode, live mode, refunds, 3D Secure behaviour, and the Instant EFT flow. None of these can be tested without a Yoco account.
- How Yoco renders at checkout once enabled. The checkout screenshot above shows the store before Yoco is enabled — the Yoco option itself was never visible to us.
The short version
Set your store to South Africa and rand first, install Yoco Payments from Plugins > Add New, activate it, then go to WooCommerce > Settings > Payments and click Manage — not Enable. Leave Mode on Test, paste your Test Secret Key from the Yoco Business Portal, save, enable it, and place a test order before you go live. The install takes minutes; the part that takes time is the Yoco account and the keys, and that part is the only part we could not test for you.

About the author
Learn WordPress Online is written by Mohd Shah Ahmad, a WordPress & WooCommerce specialist based in Pretoria, South Africa, who builds and runs live WooCommerce stores and designed the websites for Aaliyah Perfumes and Stanley’s Bakery. Every guide is tested step by step on a WordPress test install before it is published.